Reflowable text for reading and search, with all supplied original pages, the joined controls spread, diagrams and alignment-sensitive music retained as images.
The all new Omnichord by Suzuki makes it possible for you to sound like a pro, even if you've never played before. This electronic digital musicomputer provides an ultimate combination of musical instruments in a lightweight, portable and dynamic-sounding package.
The Omnichord can be strummed like a guitar with the SonicStrings Strumplate. A selected chord is electronically matched to the four-octave strumplate, so a song's correct chord progression can be strummed just like a guitar. Its functions may be used individually or in combinations.
The advanced microtechnology of the OM-300 lets you program background chords, rhythms, bass and drums without knowing one note from another. While that background plays automatically, you can add the melody line. MIDI allows the instrument to connect to a computer, synthesizer or other MIDI device for performance and recording applications.
This manual contains easy-to-follow, step-by-step explanations of the Omnichord's functions. Read it carefully to make full use of the instrument's potential. In just a few minutes, you may be discovering the hidden musician in you - imagine the music!
View original scanned 1Original 2
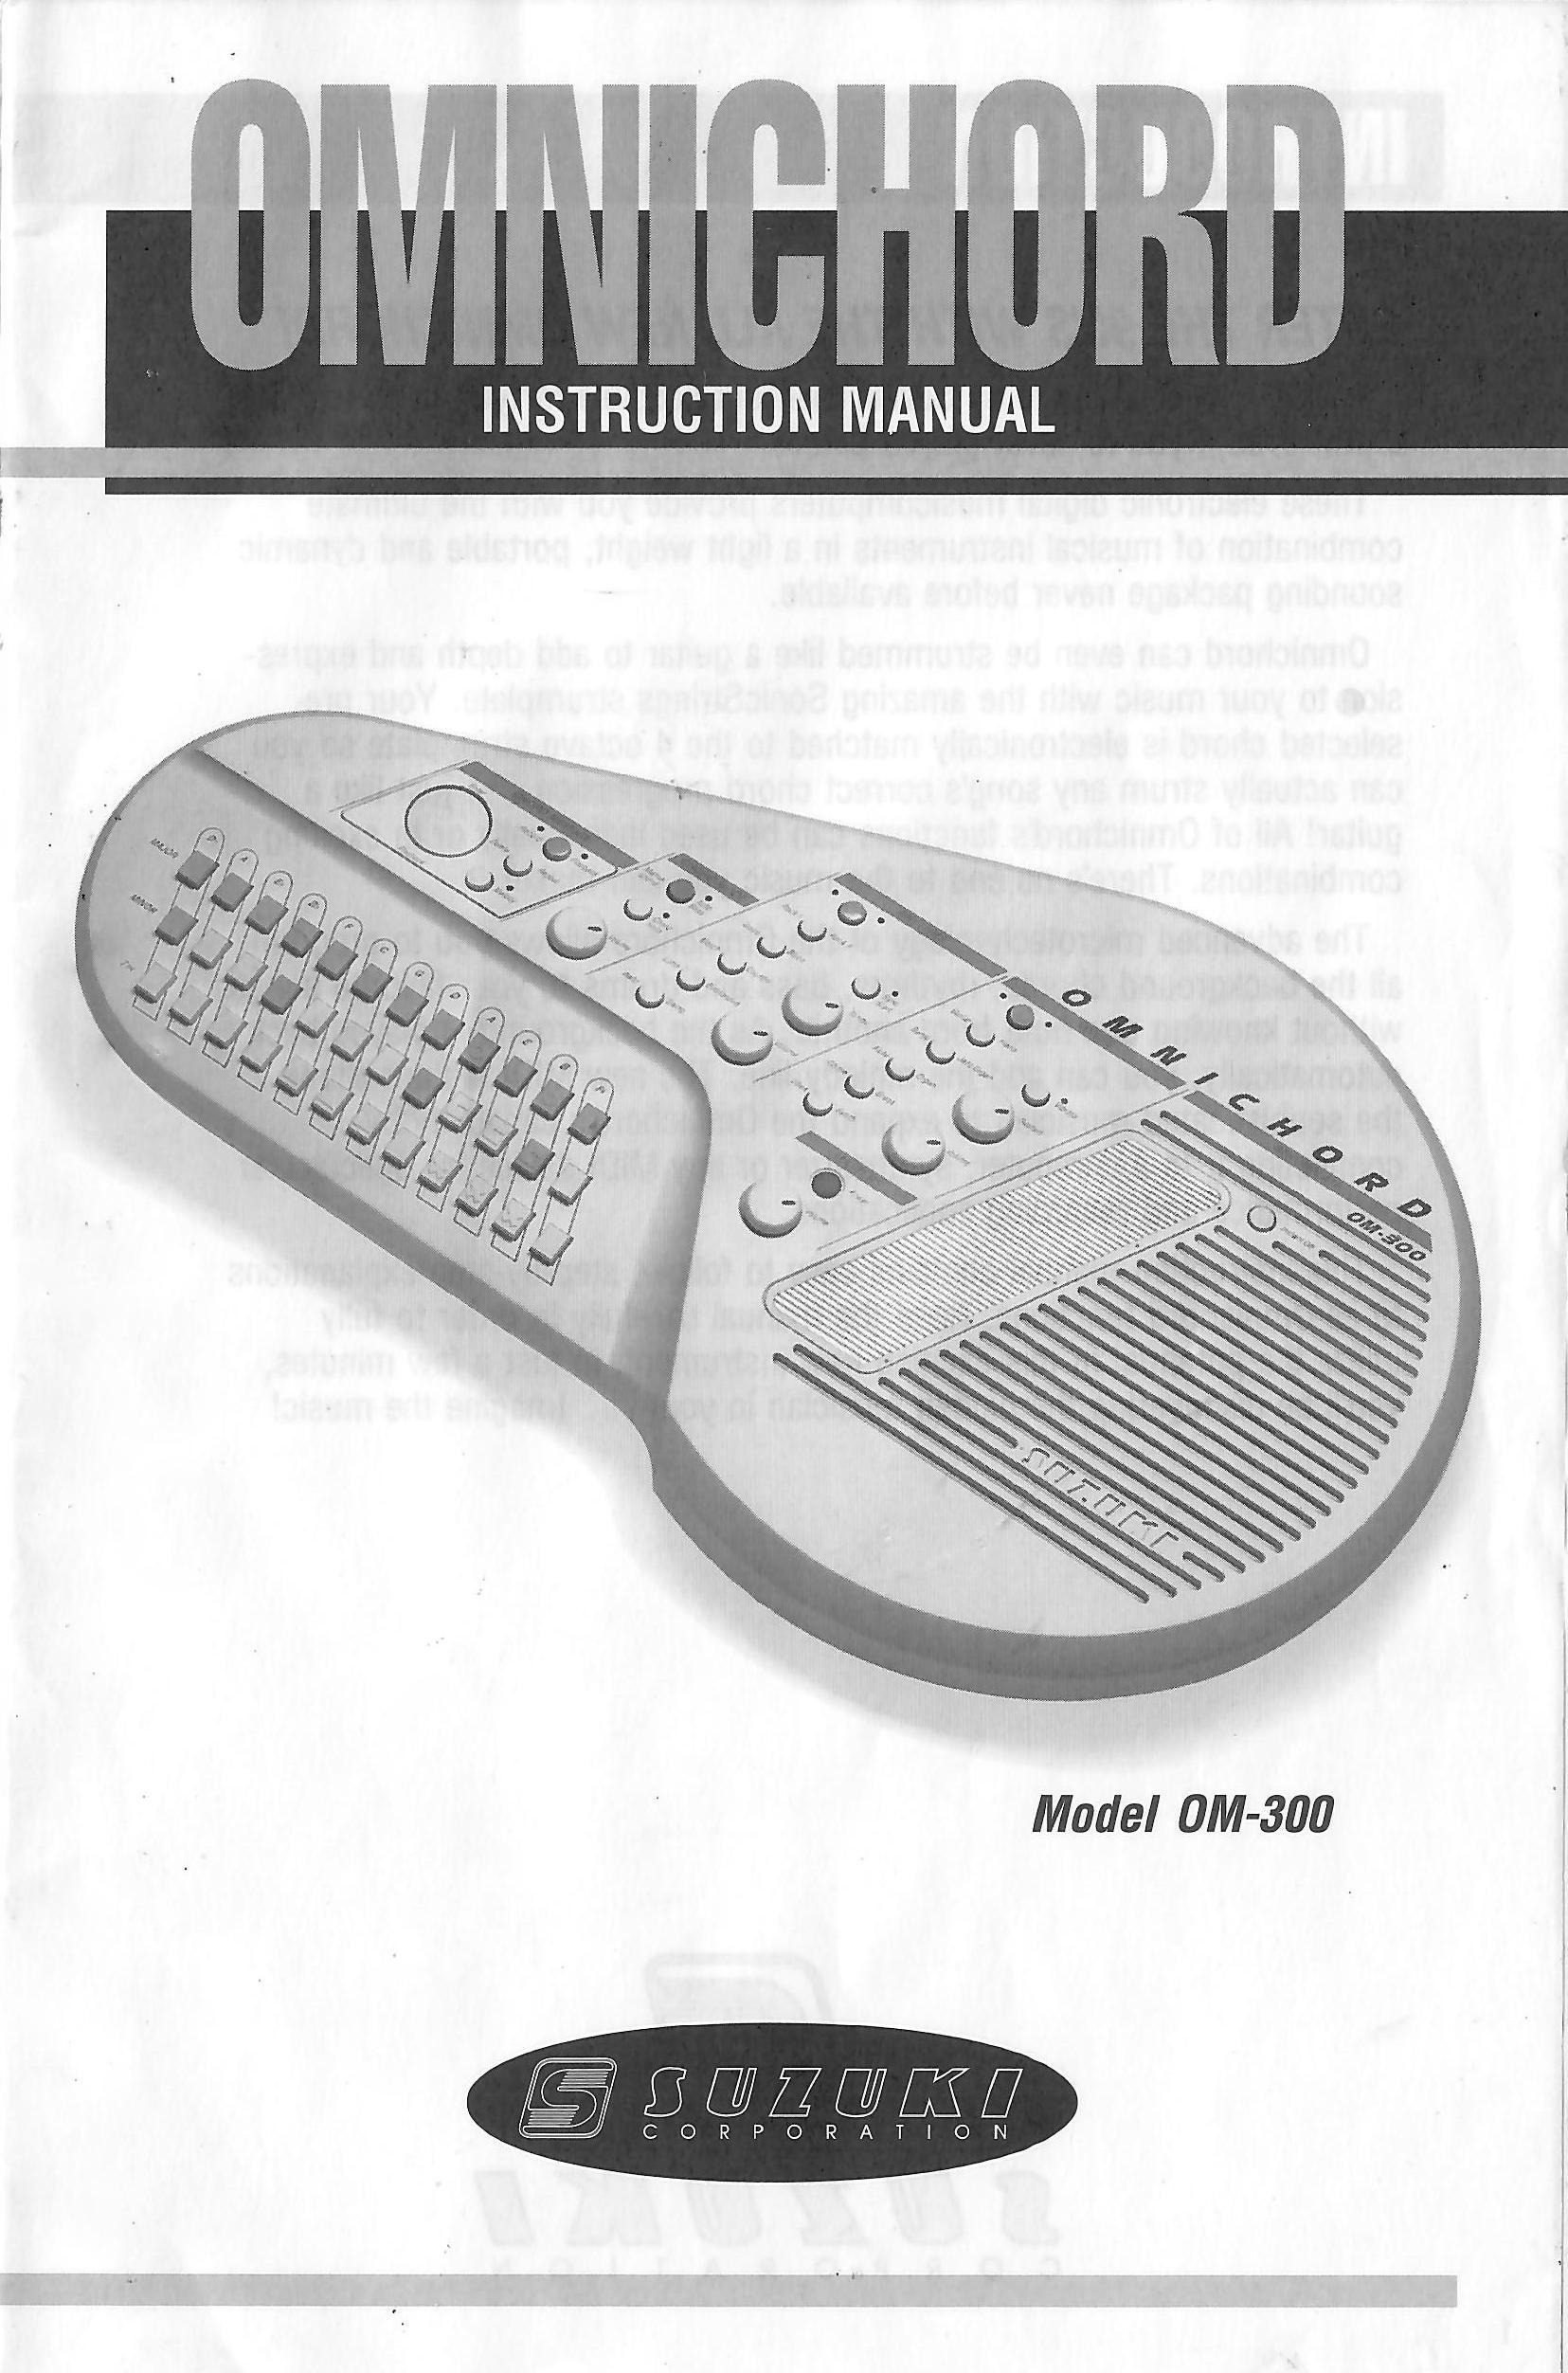
OM-300
Table of Contents
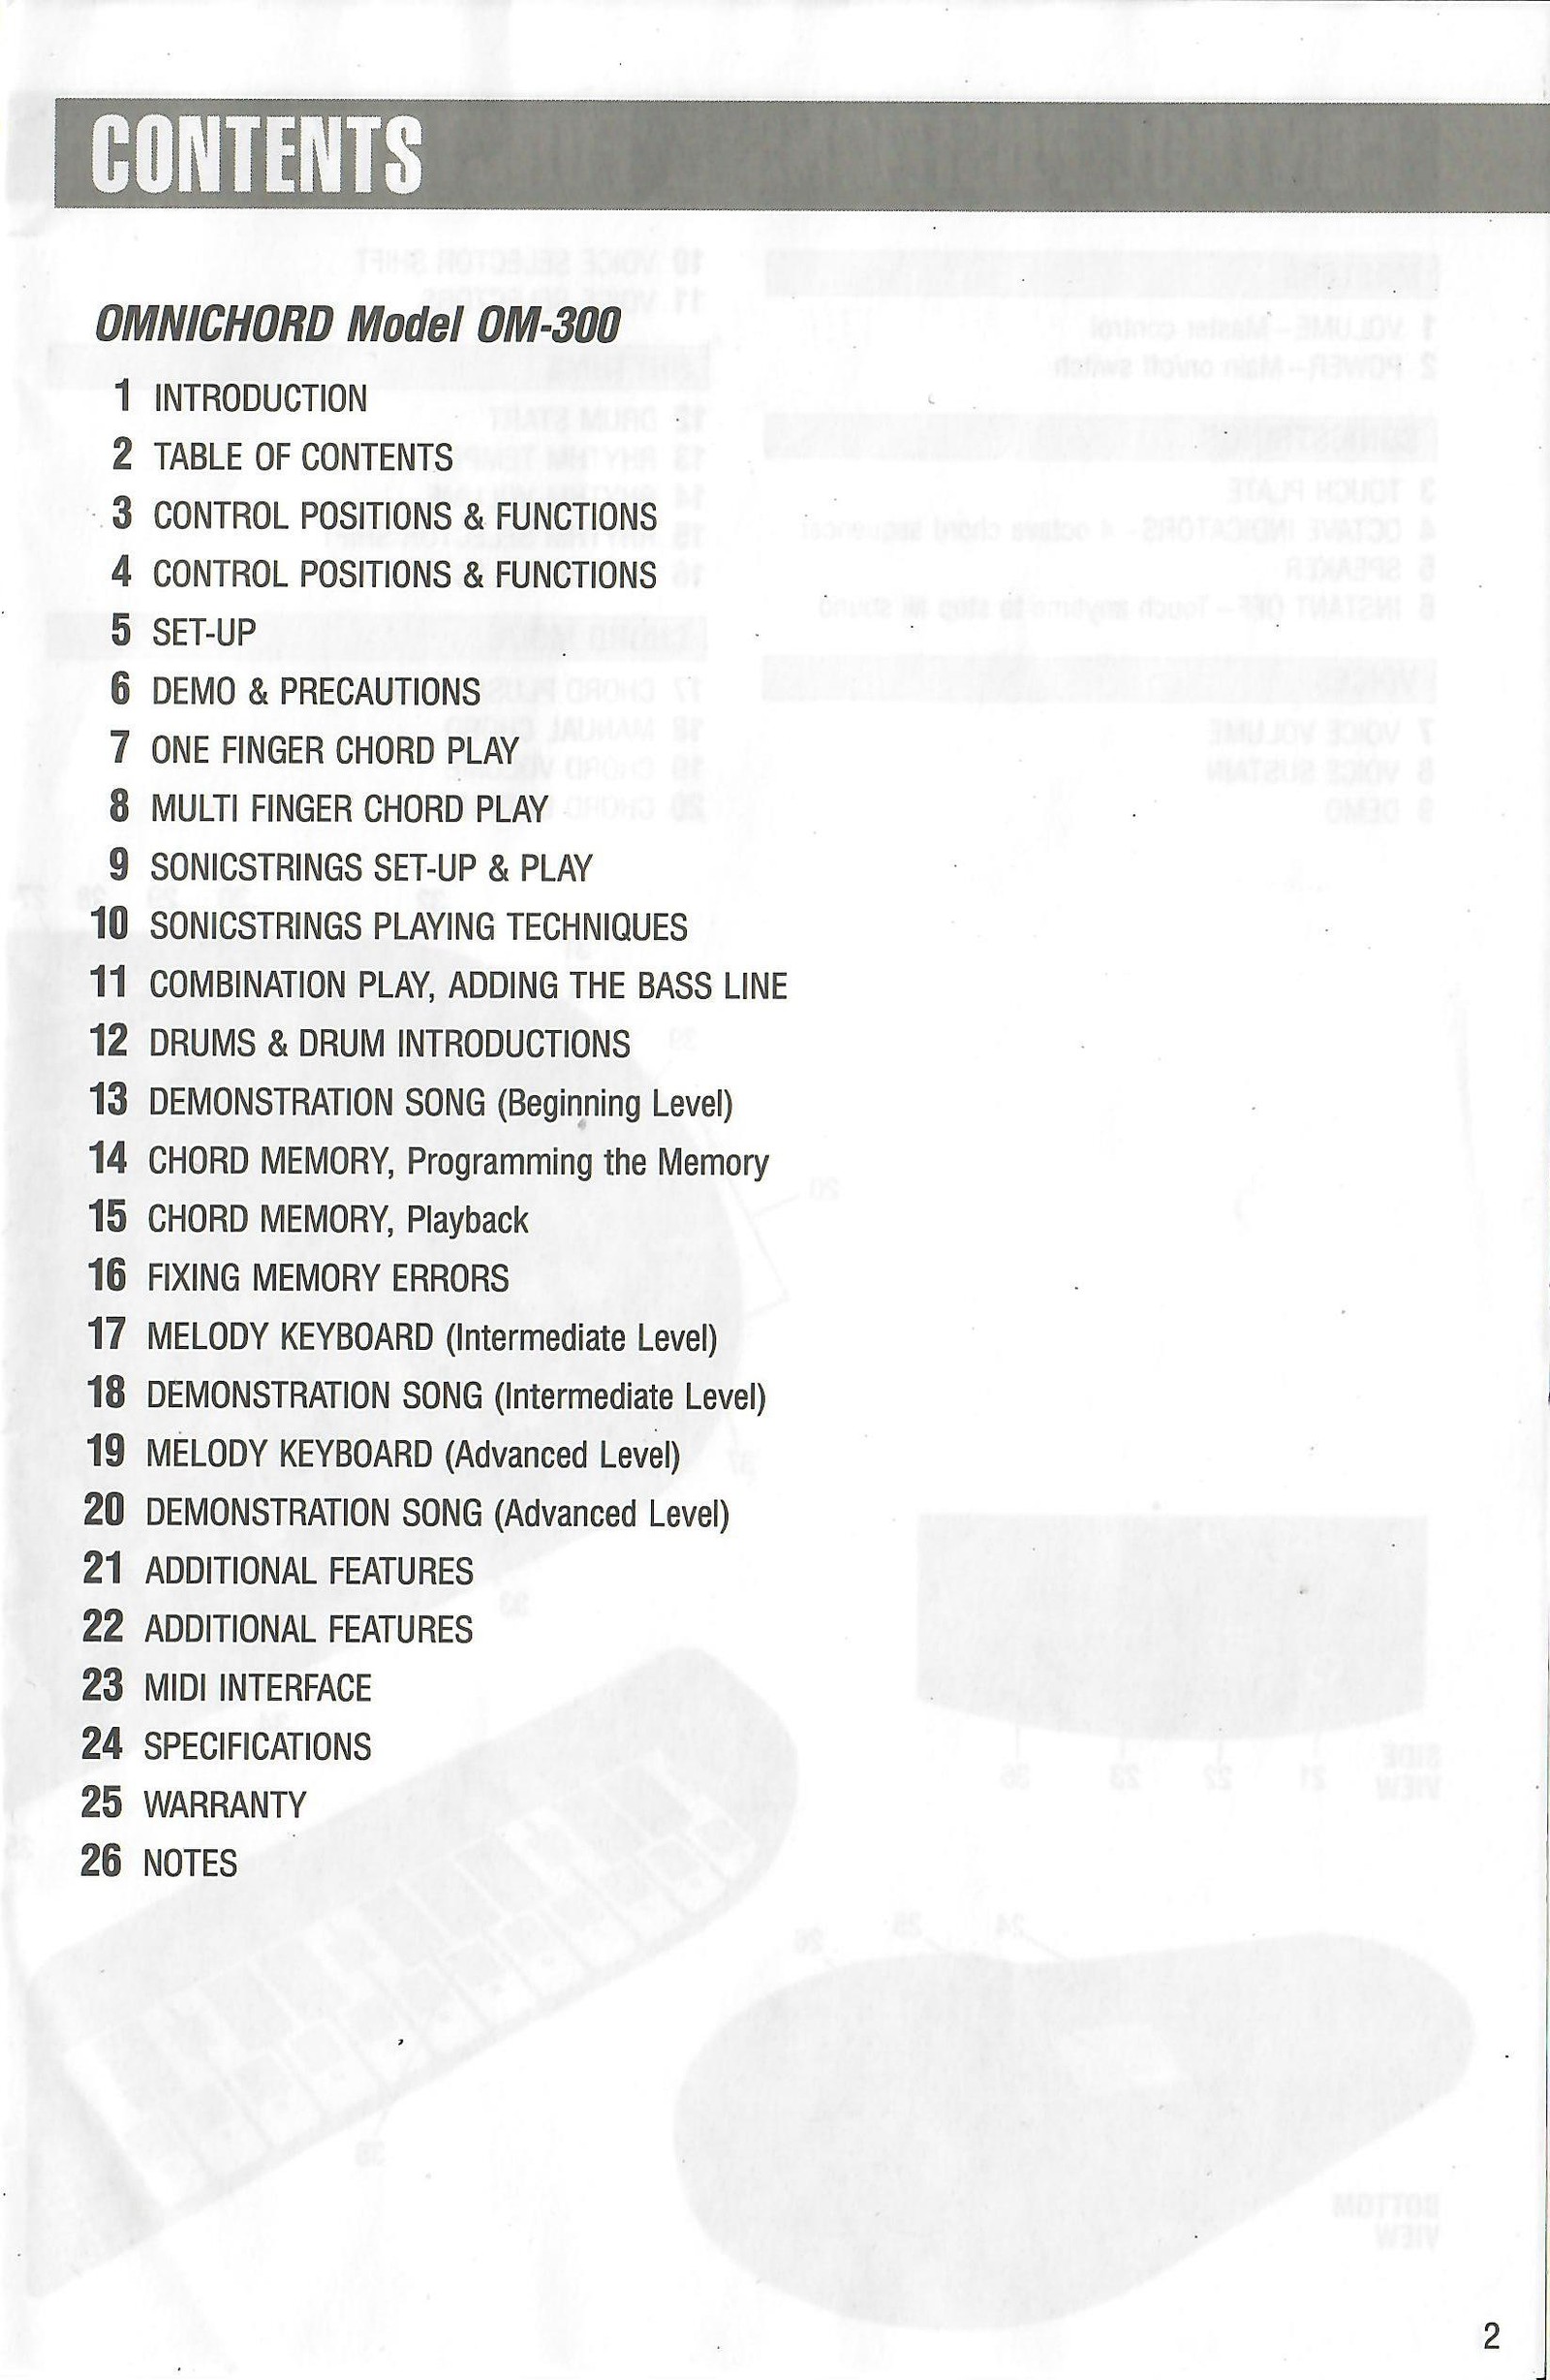
Omnichord model OM-300
Introduction
Table of Contents
Control Positions & Functions
Control Positions & Functions
Set-Up
Demo & Precautions
One Finger Chord Play
Multi-Finger Chord Play
SonicStrings Set-Up & Play
SonicStrings Playing Techniques
Combination Play, Adding the Bass Line
Drums & Drum Introductions
Demonstration Song - Beginning Level
Chord Memory - Programming the Memory
Chord Memory - Playback
Fixing Memory Errors
Melody Keyboard - Intermediate Level
Demonstration Song - Intermediate Level
Melody Keyboard - Advanced Level
Demonstration Song - Advanced Level
Additional Features
Additional Features - Continued
MIDI Interface
Specifications
Warranty
Notes - listed in the printed contents; scan not supplied
View original scanned 2Original 3
OM-300
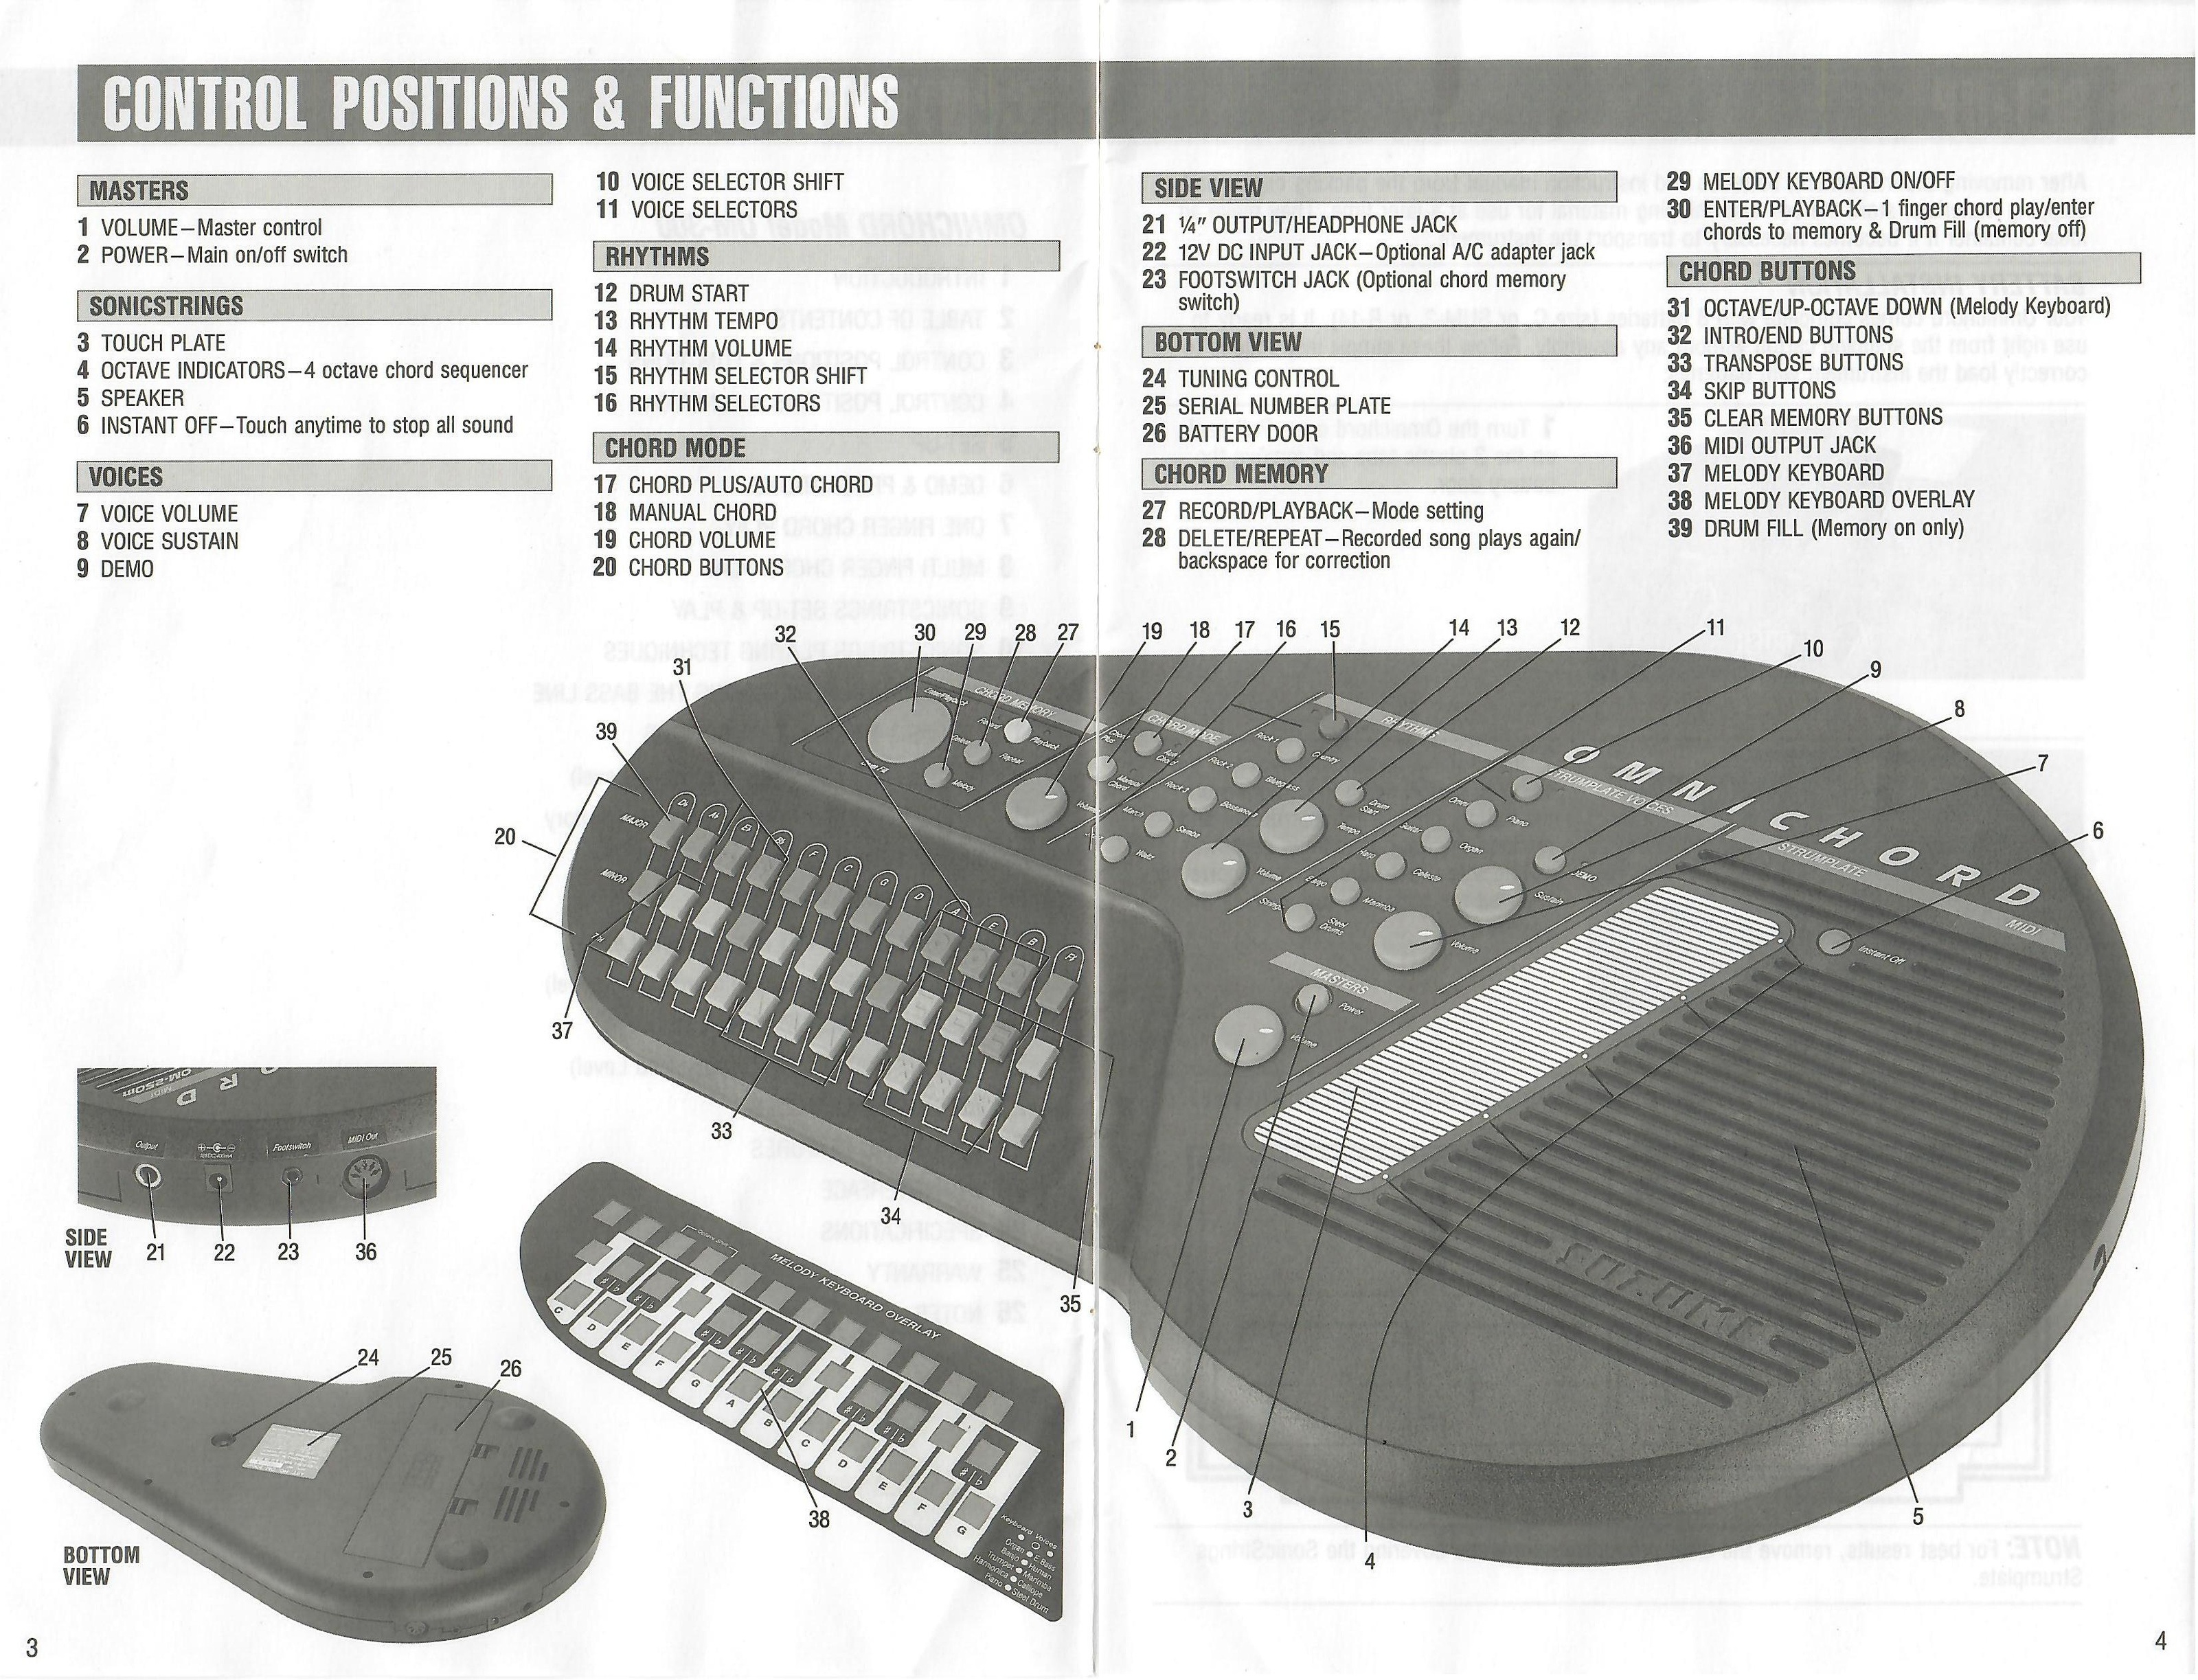
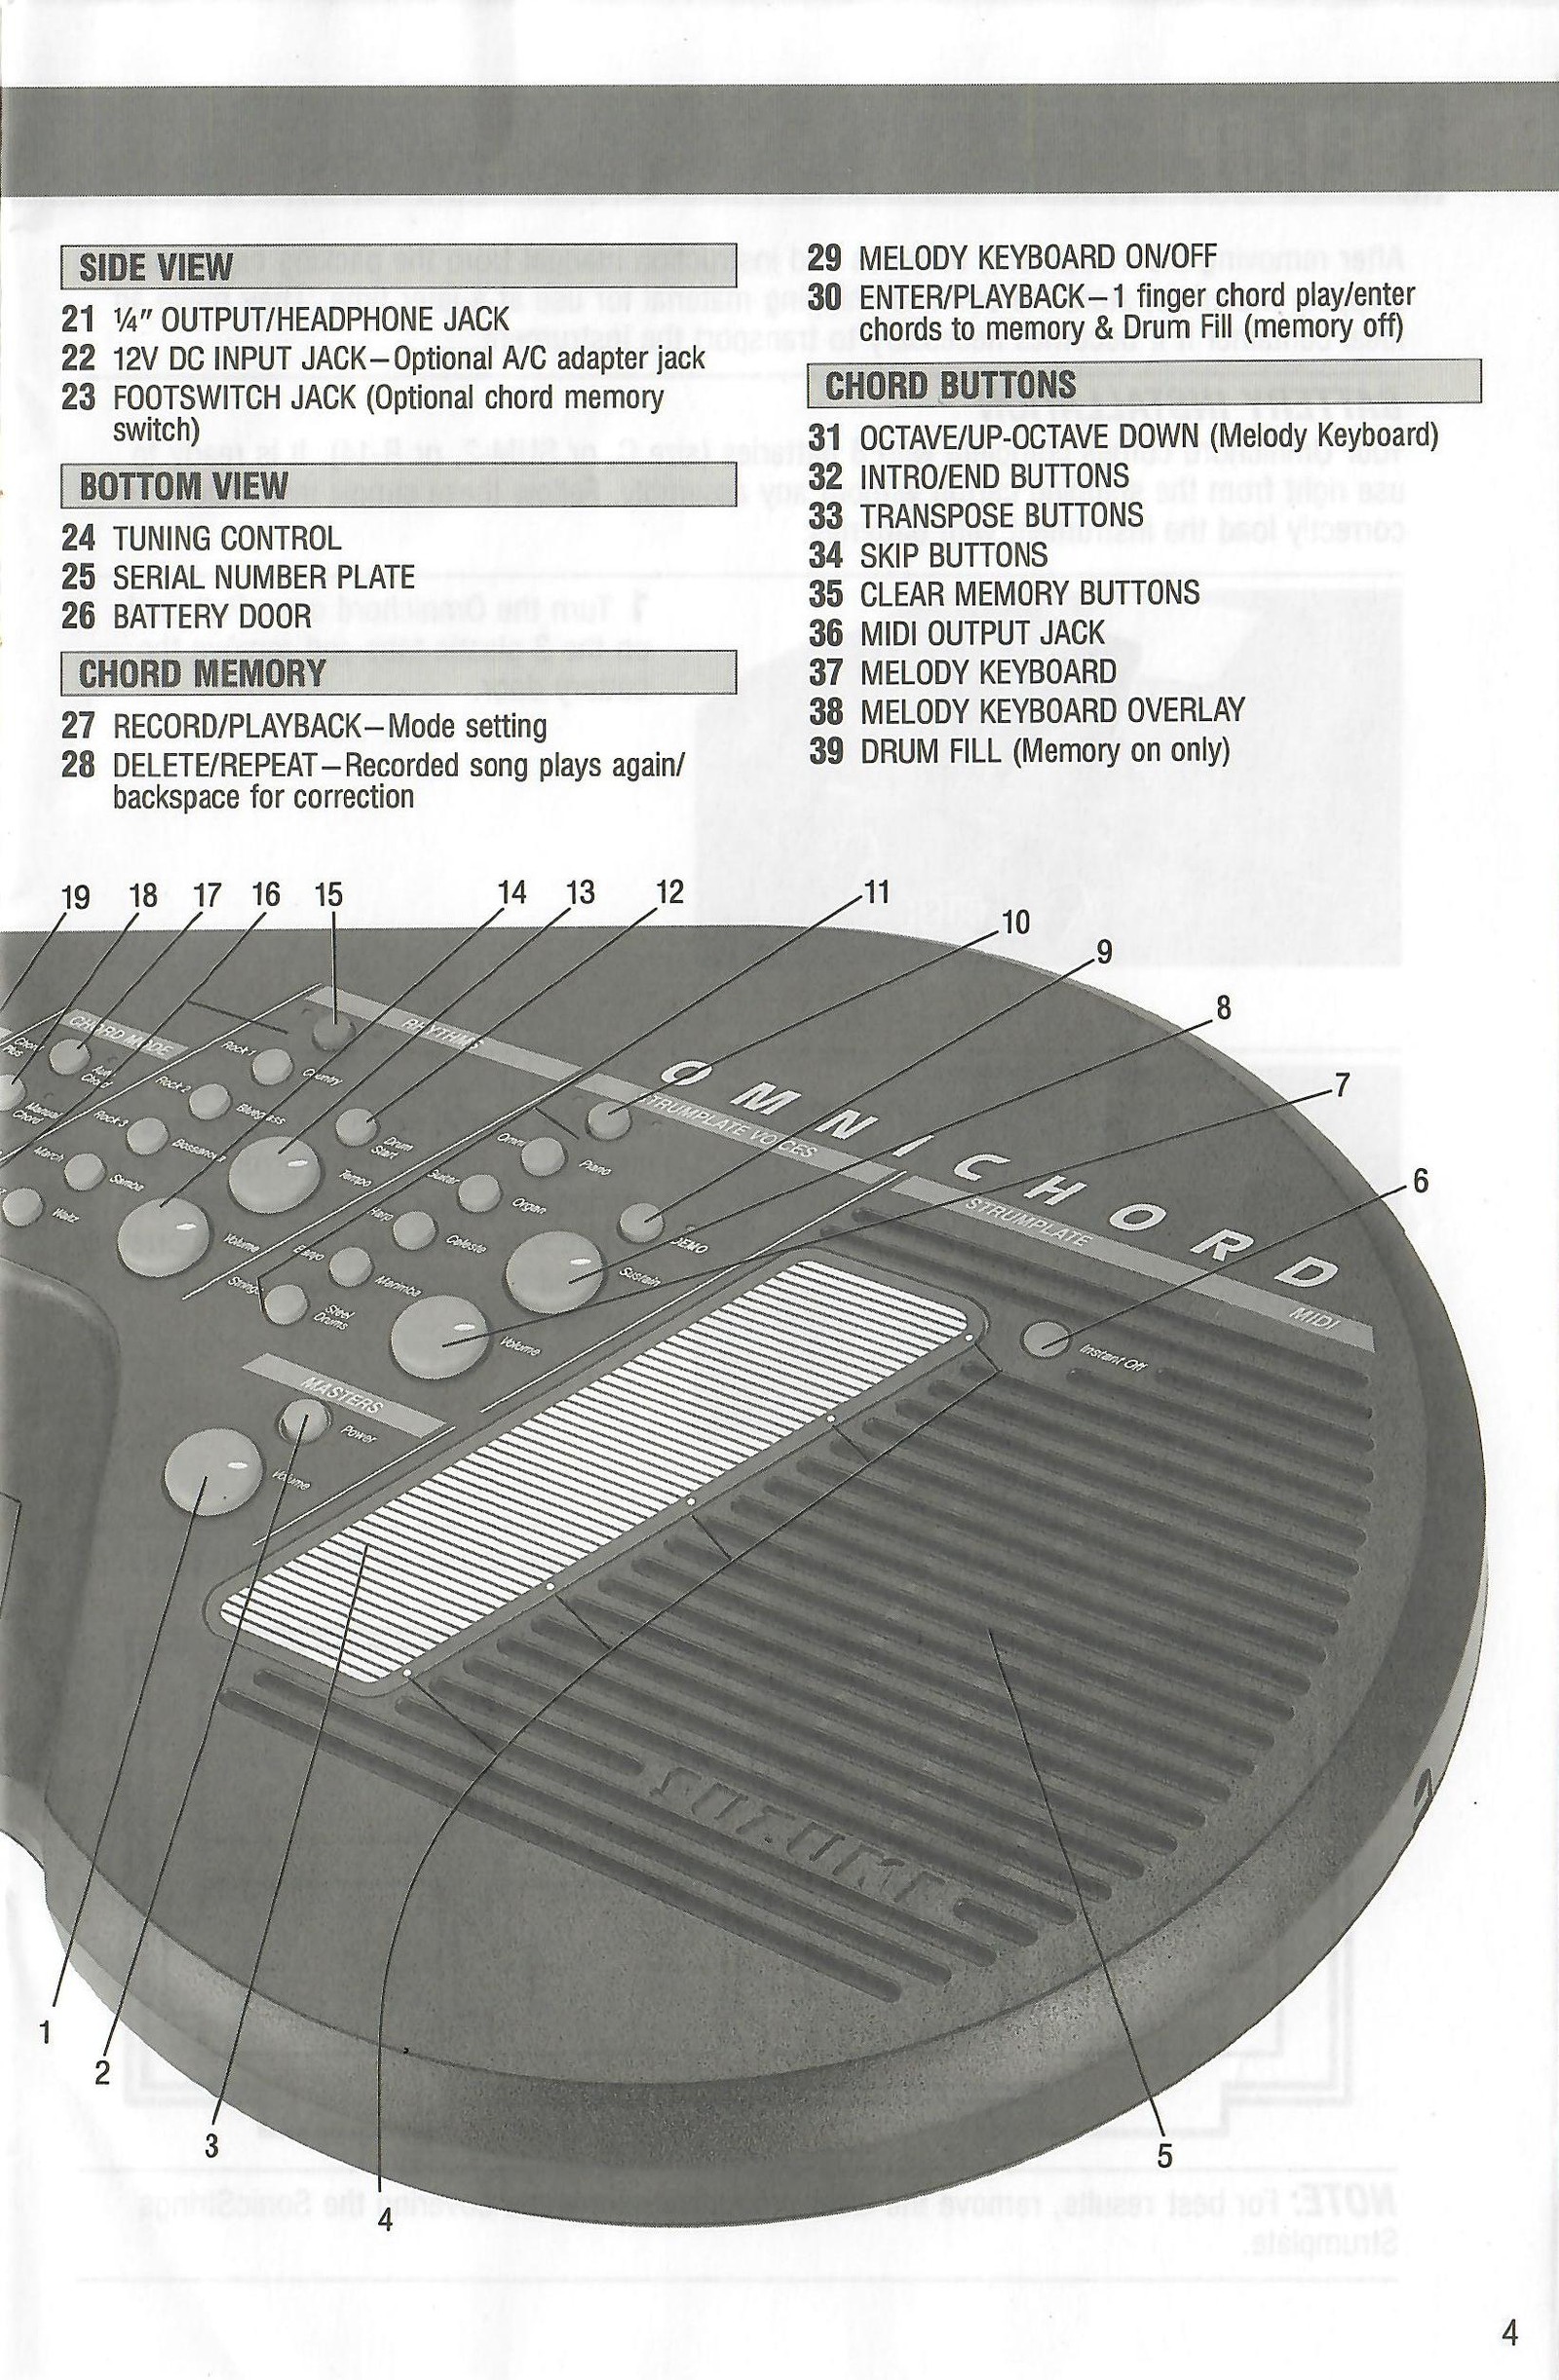
Control Positions & Functions
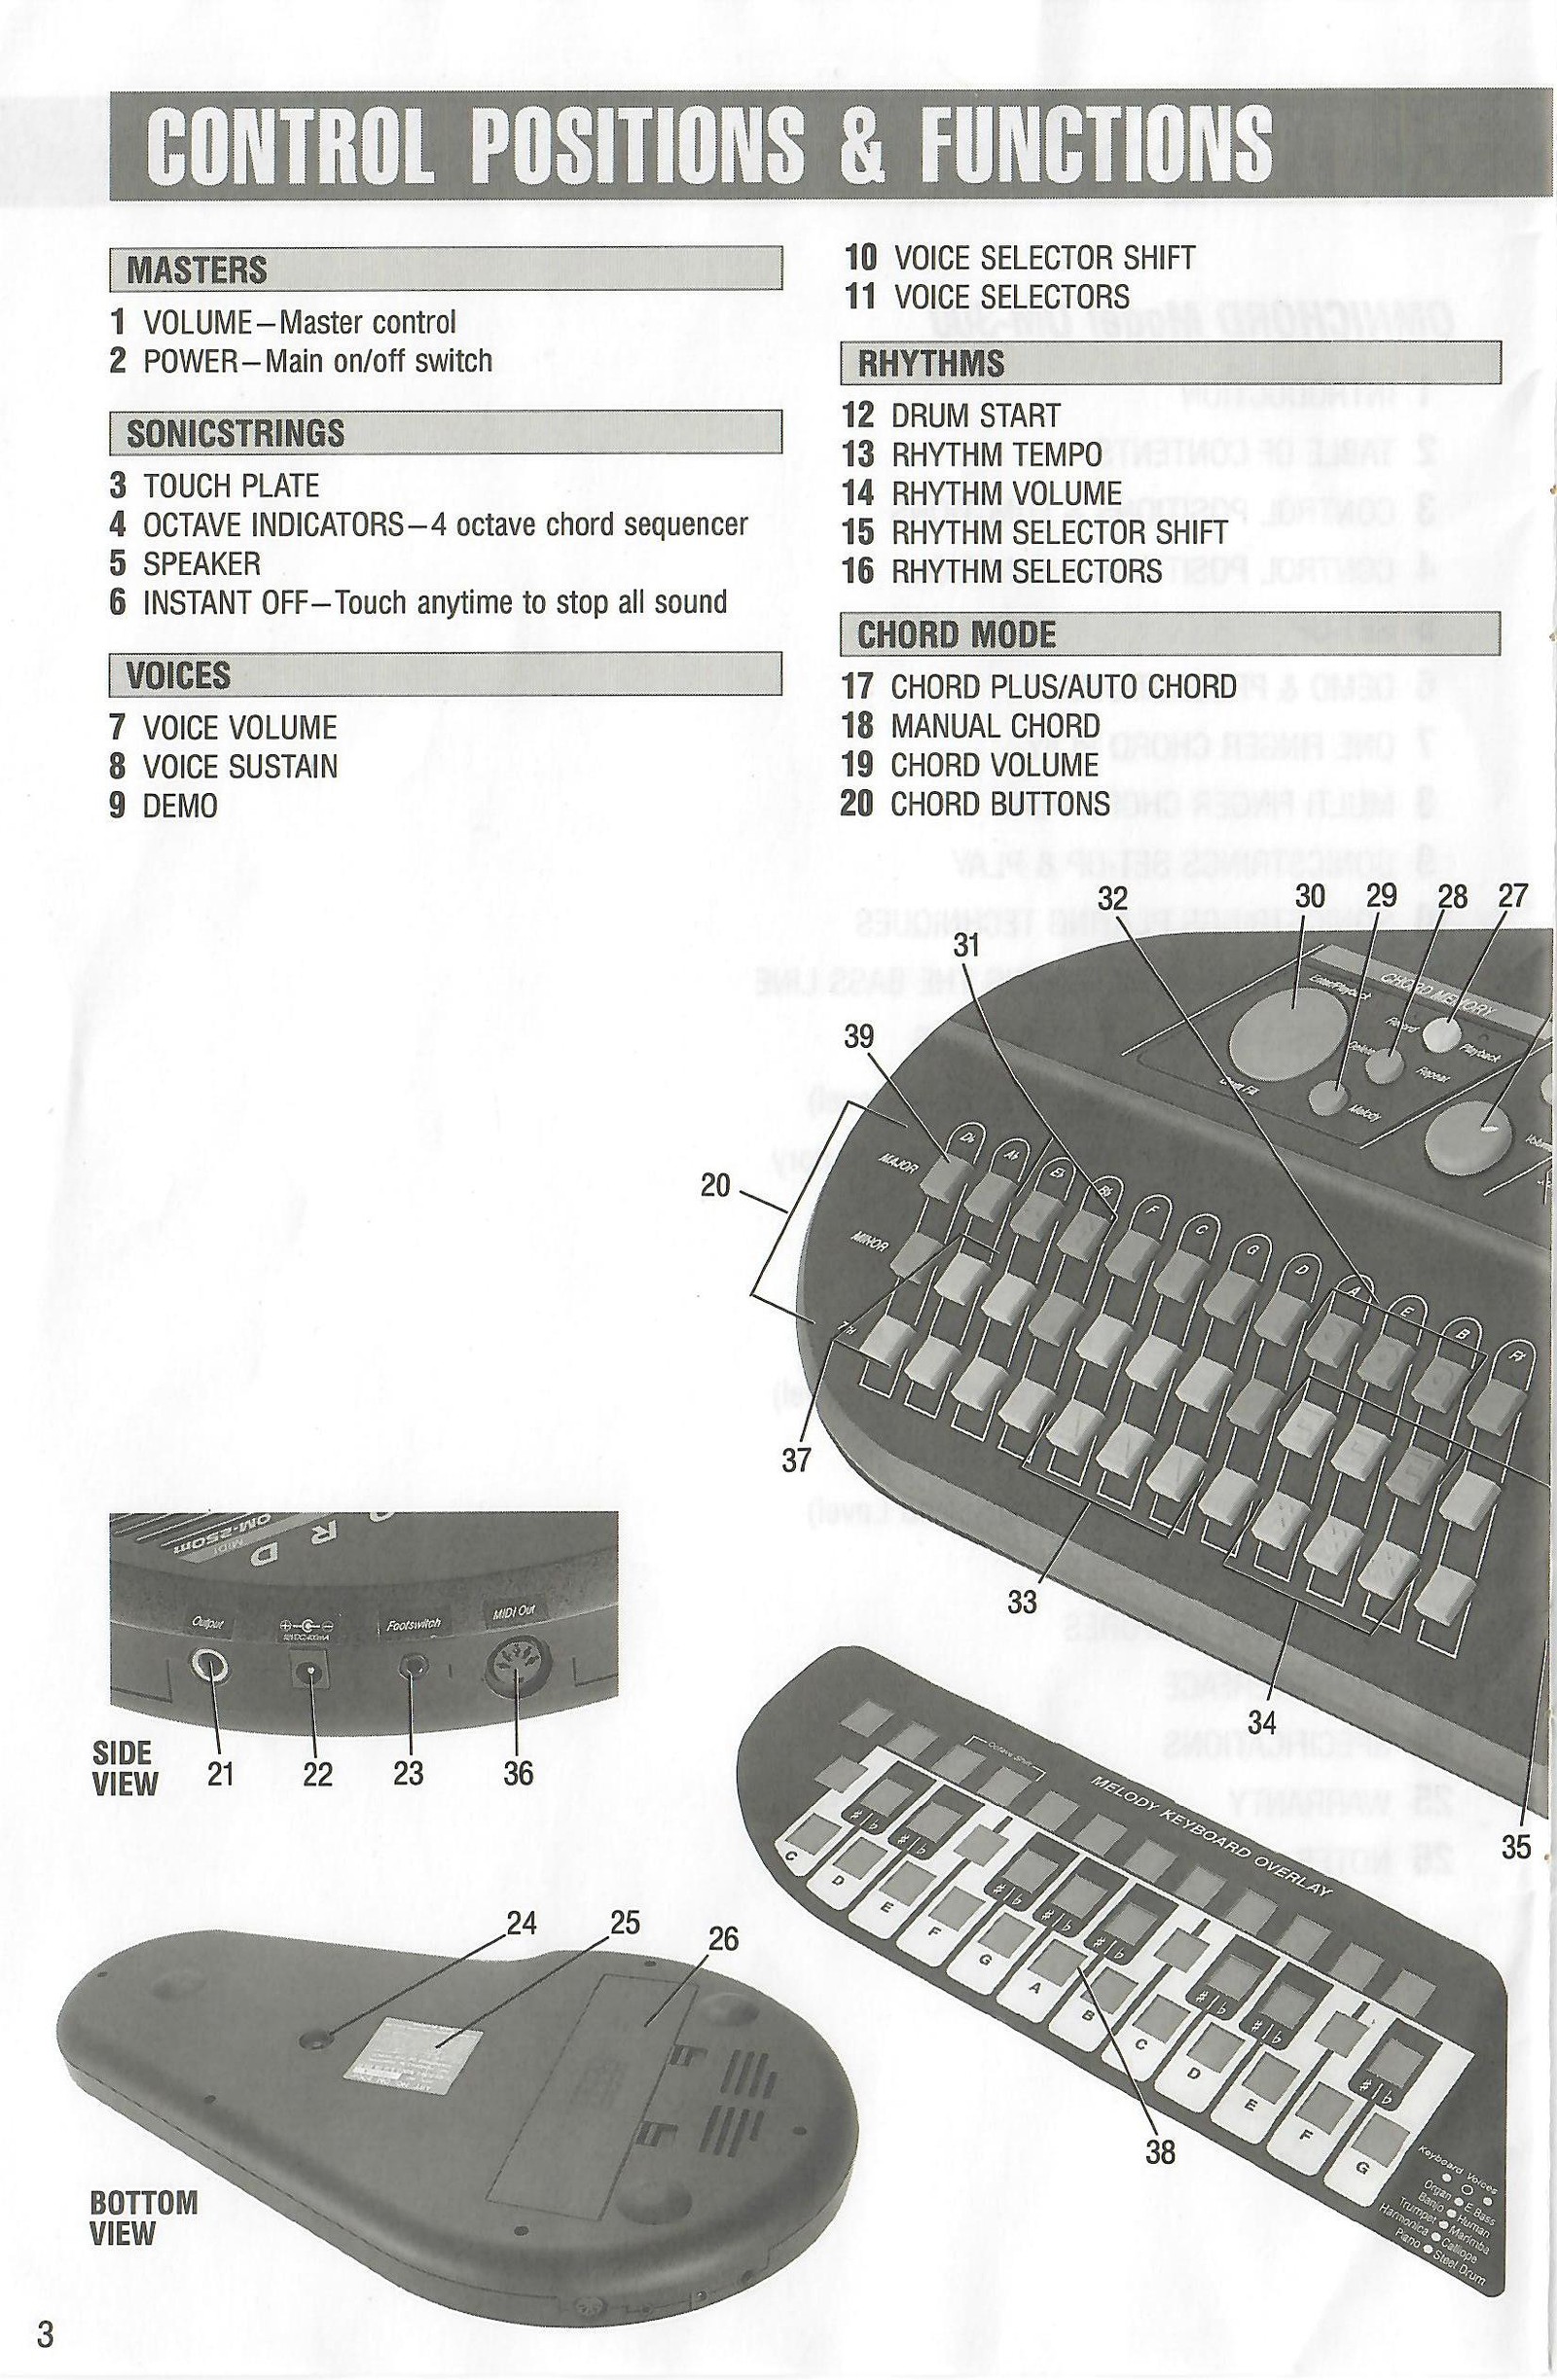
Controls 1-20
Masters
VOLUME - Master control
POWER - Main on/off switch
SonicStrings
TOUCH PLATE
OCTAVE INDICATORS - 4-octave chord sequencer
SPEAKER
INSTANT OFF - Touch anytime to stop all sound
Voices
VOICE VOLUME
VOICE SUSTAIN
DEMO
VOICE SELECTOR SHIFT
VOICE SELECTORS
Rhythms
DRUM START
RHYTHM TEMPO
RHYTHM VOLUME
RHYTHM SELECTOR SHIFT
RHYTHM SELECTORS
Chord Mode
CHORD PLUS / AUTO CHORD
MANUAL CHORD
CHORD VOLUME
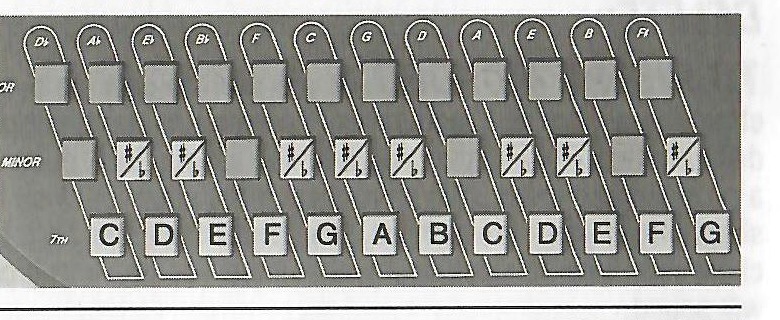
CHORD BUTTONS
View original scanned 3Original 4
OM-300
Control Positions & Functions
Controls 21-39
Side View
1/4-inch OUTPUT/HEADPHONE JACK
12V DC INPUT JACK - Optional A/C adapter jack
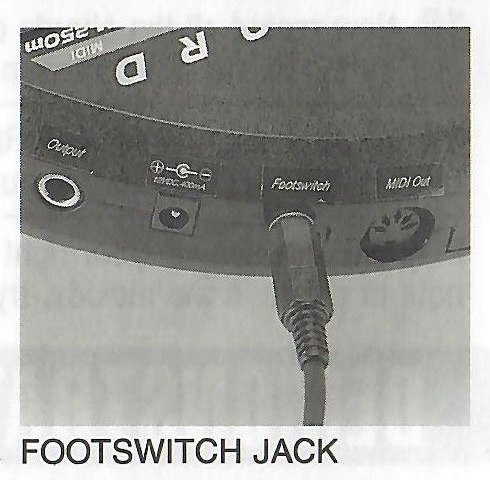
FOOTSWITCH JACK - Optional chord-memory switch
Bottom View
TUNING CONTROL
SERIAL NUMBER PLATE
BATTERY DOOR
Chord Memory
RECORD/PLAYBACK - Mode setting
DELETE/REPEAT - Replay a recorded song or backspace for correction
MELODY KEYBOARD ON/OFF
ENTER/PLAYBACK - One-finger chord play, memory entry and Drum Fill when memory is off
Chord Buttons and Keyboard
OCTAVE UP / OCTAVE DOWN - Melody Keyboard
INTRO/END BUTTONS
TRANSPOSE BUTTONS
SKIP BUTTONS
CLEAR MEMORY BUTTONS
MIDI OUTPUT JACK
MELODY KEYBOARD
MELODY KEYBOARD OVERLAY
DRUM FILL - Memory on only
Original joined OM-300 control-position spread (printed pages 3-4). Select the image to open it full size.View original scanned 4Original 5
OM-300
Set-Up
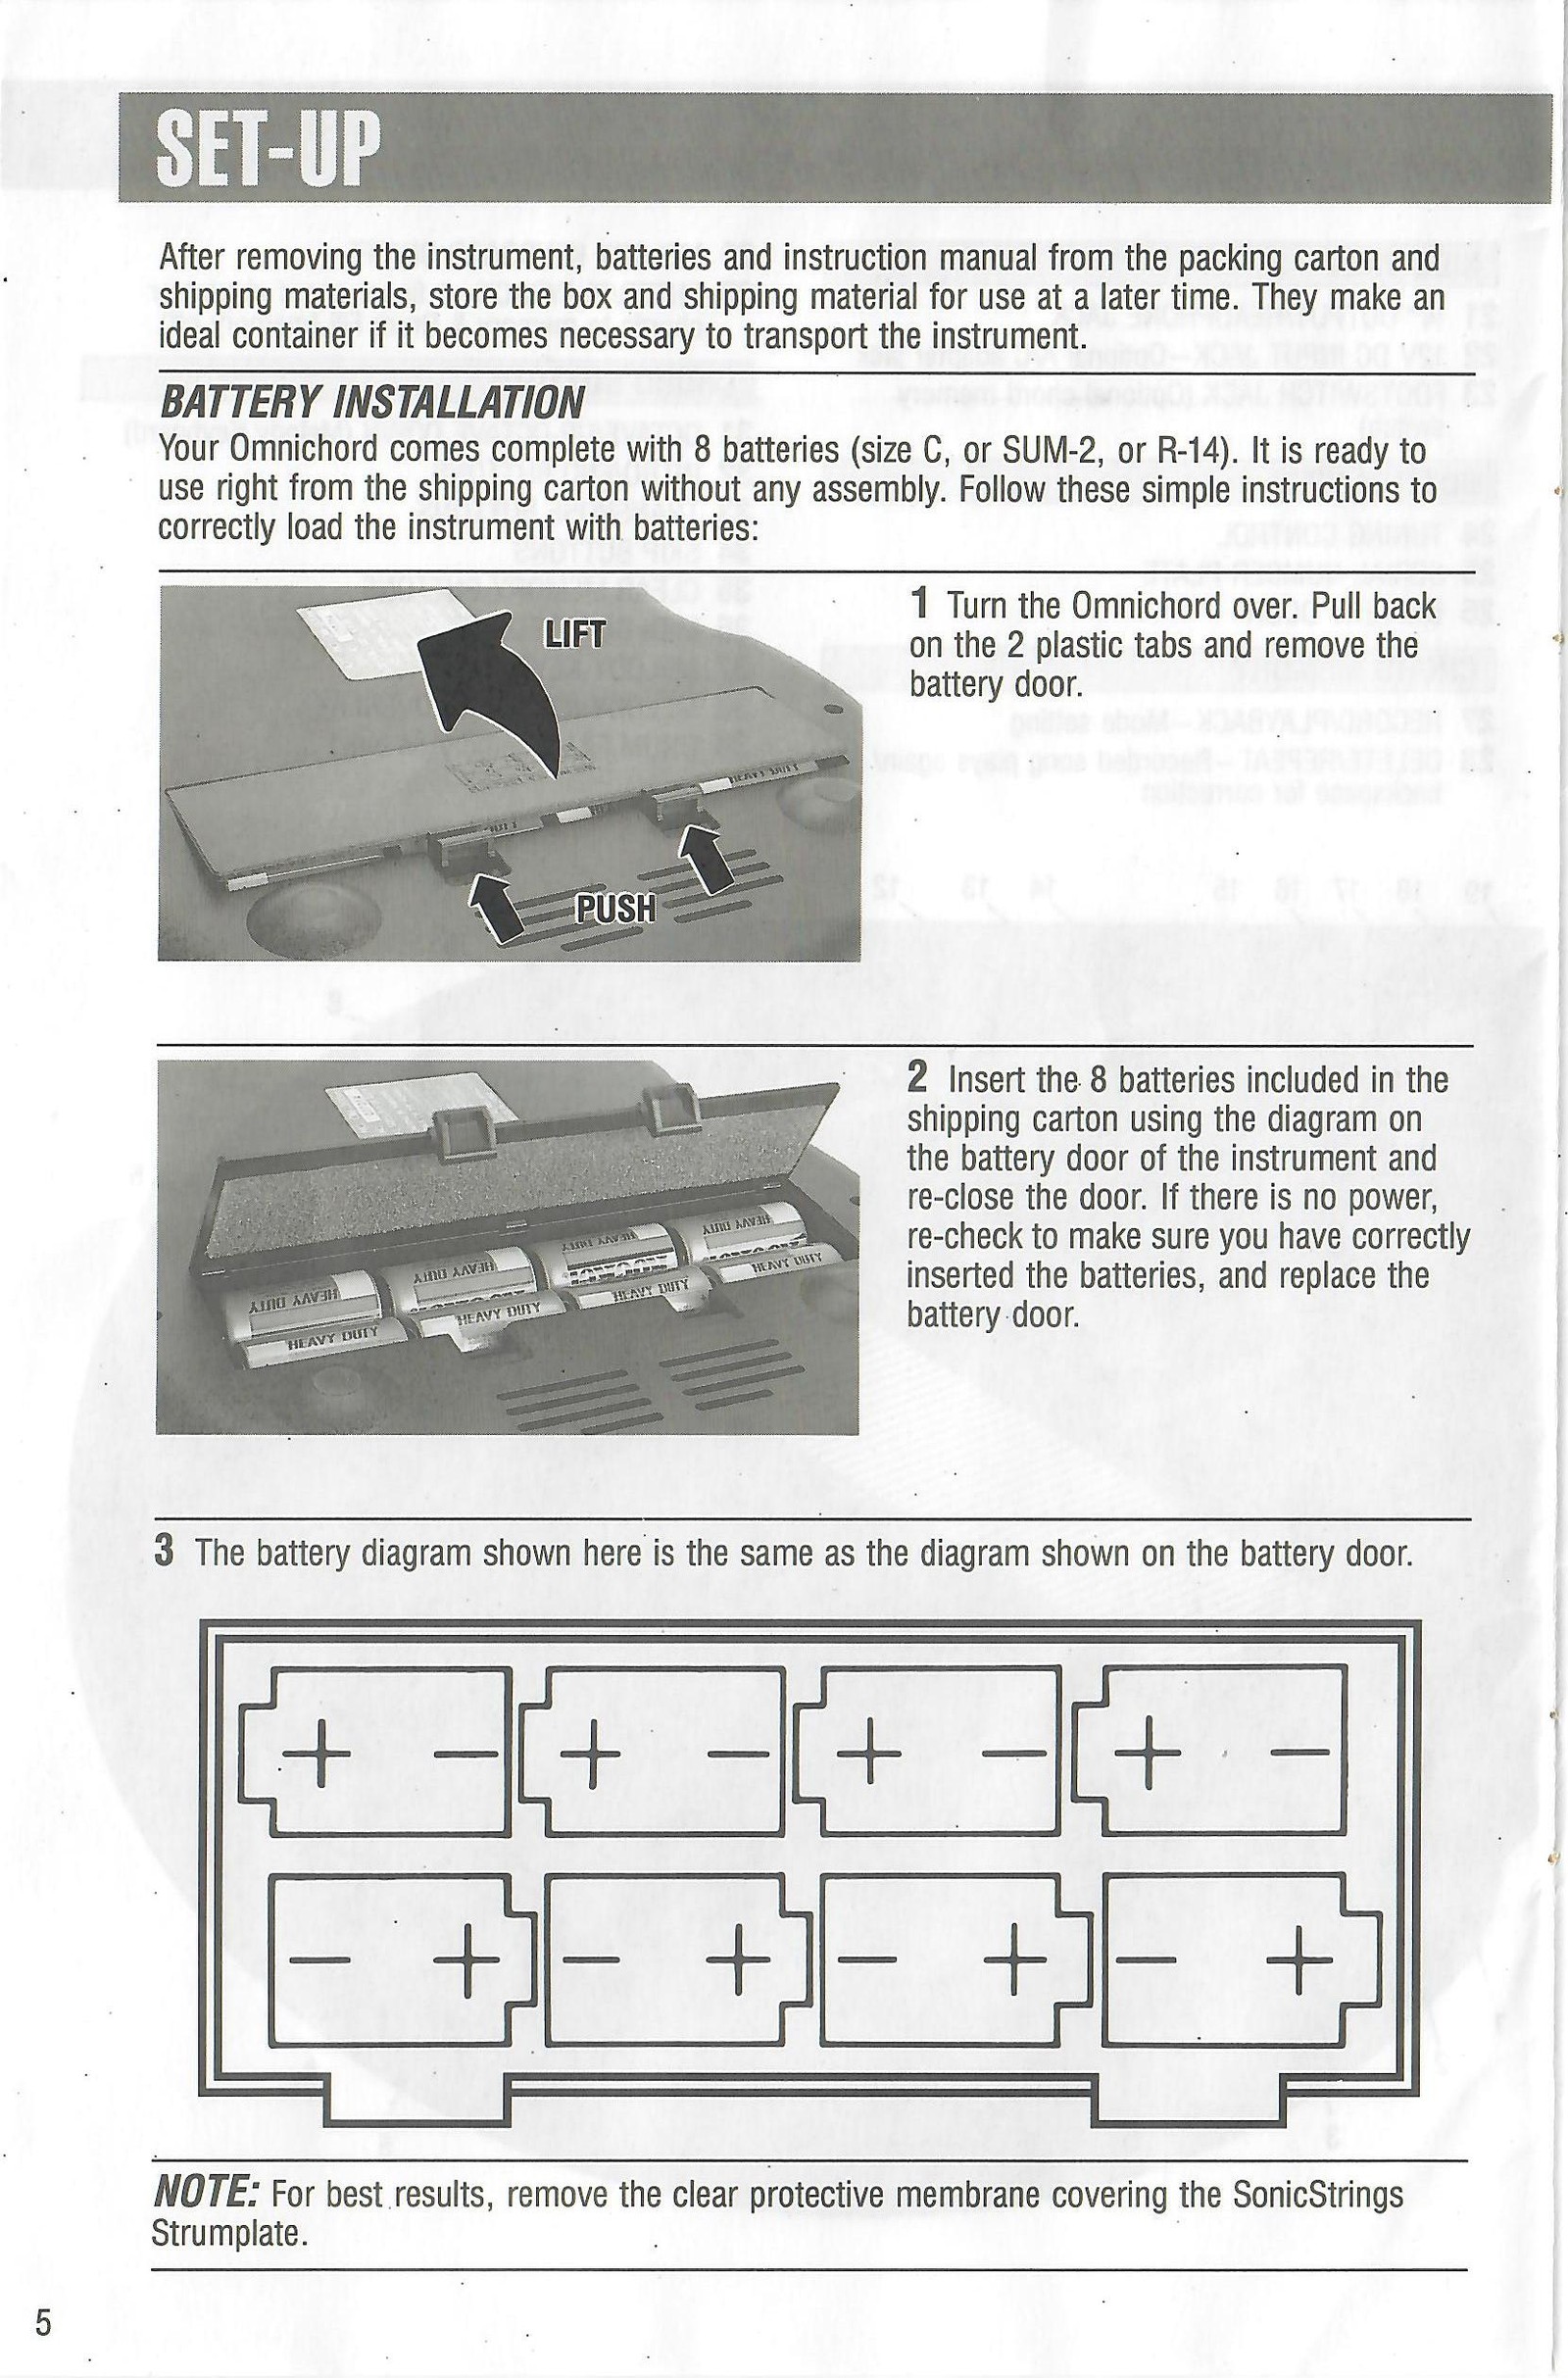
Battery installation
After removing the instrument, batteries and instruction manual from the packing carton and shipping materials, store the box and shipping material for later use. They make an ideal container if it becomes necessary to transport the instrument.
Your Omnichord comes complete with eight batteries (size C, SUM-2 or R-14) and is ready to use without assembly. Follow these instructions to load the batteries correctly:
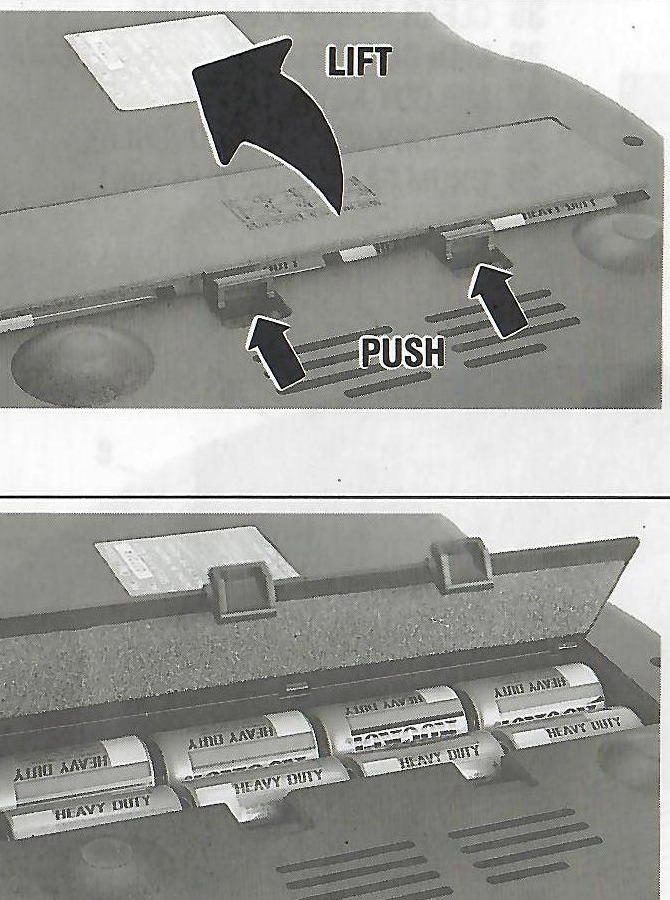
Turn the Omnichord over. Pull back on the two plastic tabs and remove the battery door.
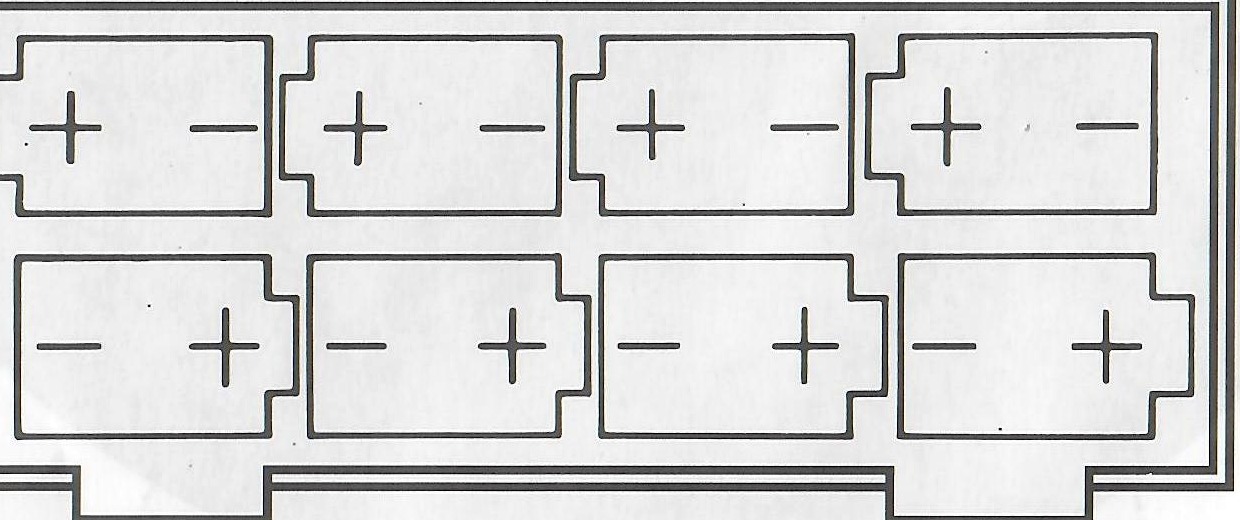
Insert the eight batteries using the diagram on the instrument's battery door, then close the door. If there is no power, re-check the battery orientation and replace the battery door.
The battery diagram shown in the illustration is the same as the diagram on the battery door.
Battery-door removal and eight-battery installation.Eight-cell battery polarity diagram.View original scanned 5Original 6
OM-300
Demo & Precautions
Dos and don'ts to make your Omnichord last a lifetime
The Omnichord has a built-in demo feature to introduce its rhythms, strum and melody voices. Turn the instrument on and press the DEMO button (#9).
During the demo you may strum the Strumplate, adjust master volume, switch Chord-Plus on or off and, on the OM-300, use Drum Fill. All other controls are disabled during demo play.
Omnichords use a digital microprocessor to translate commands into music. The solid-state electronics are protected by an ABS plastic case. With reasonable care, the instrument should provide years of dependable operation.
Avoid Direct Heat
Never leave your instrument near extreme heat or in direct sunlight. Keep it away from radiators, heaters and the back-window ledge of a car.
Keep Your Omnichord Dry
Do not use your Omnichord near moisture or place liquids on or near the instrument. Liquid spilled inside will require extensive repairs.
Don't Use Solvents or Abrasives
Clean the cabinet, buttons and touchplate with a soft, damp cloth. Do not use benzine, solvents or abrasive cleaners; they will permanently damage the finish.
Protect the Power Source
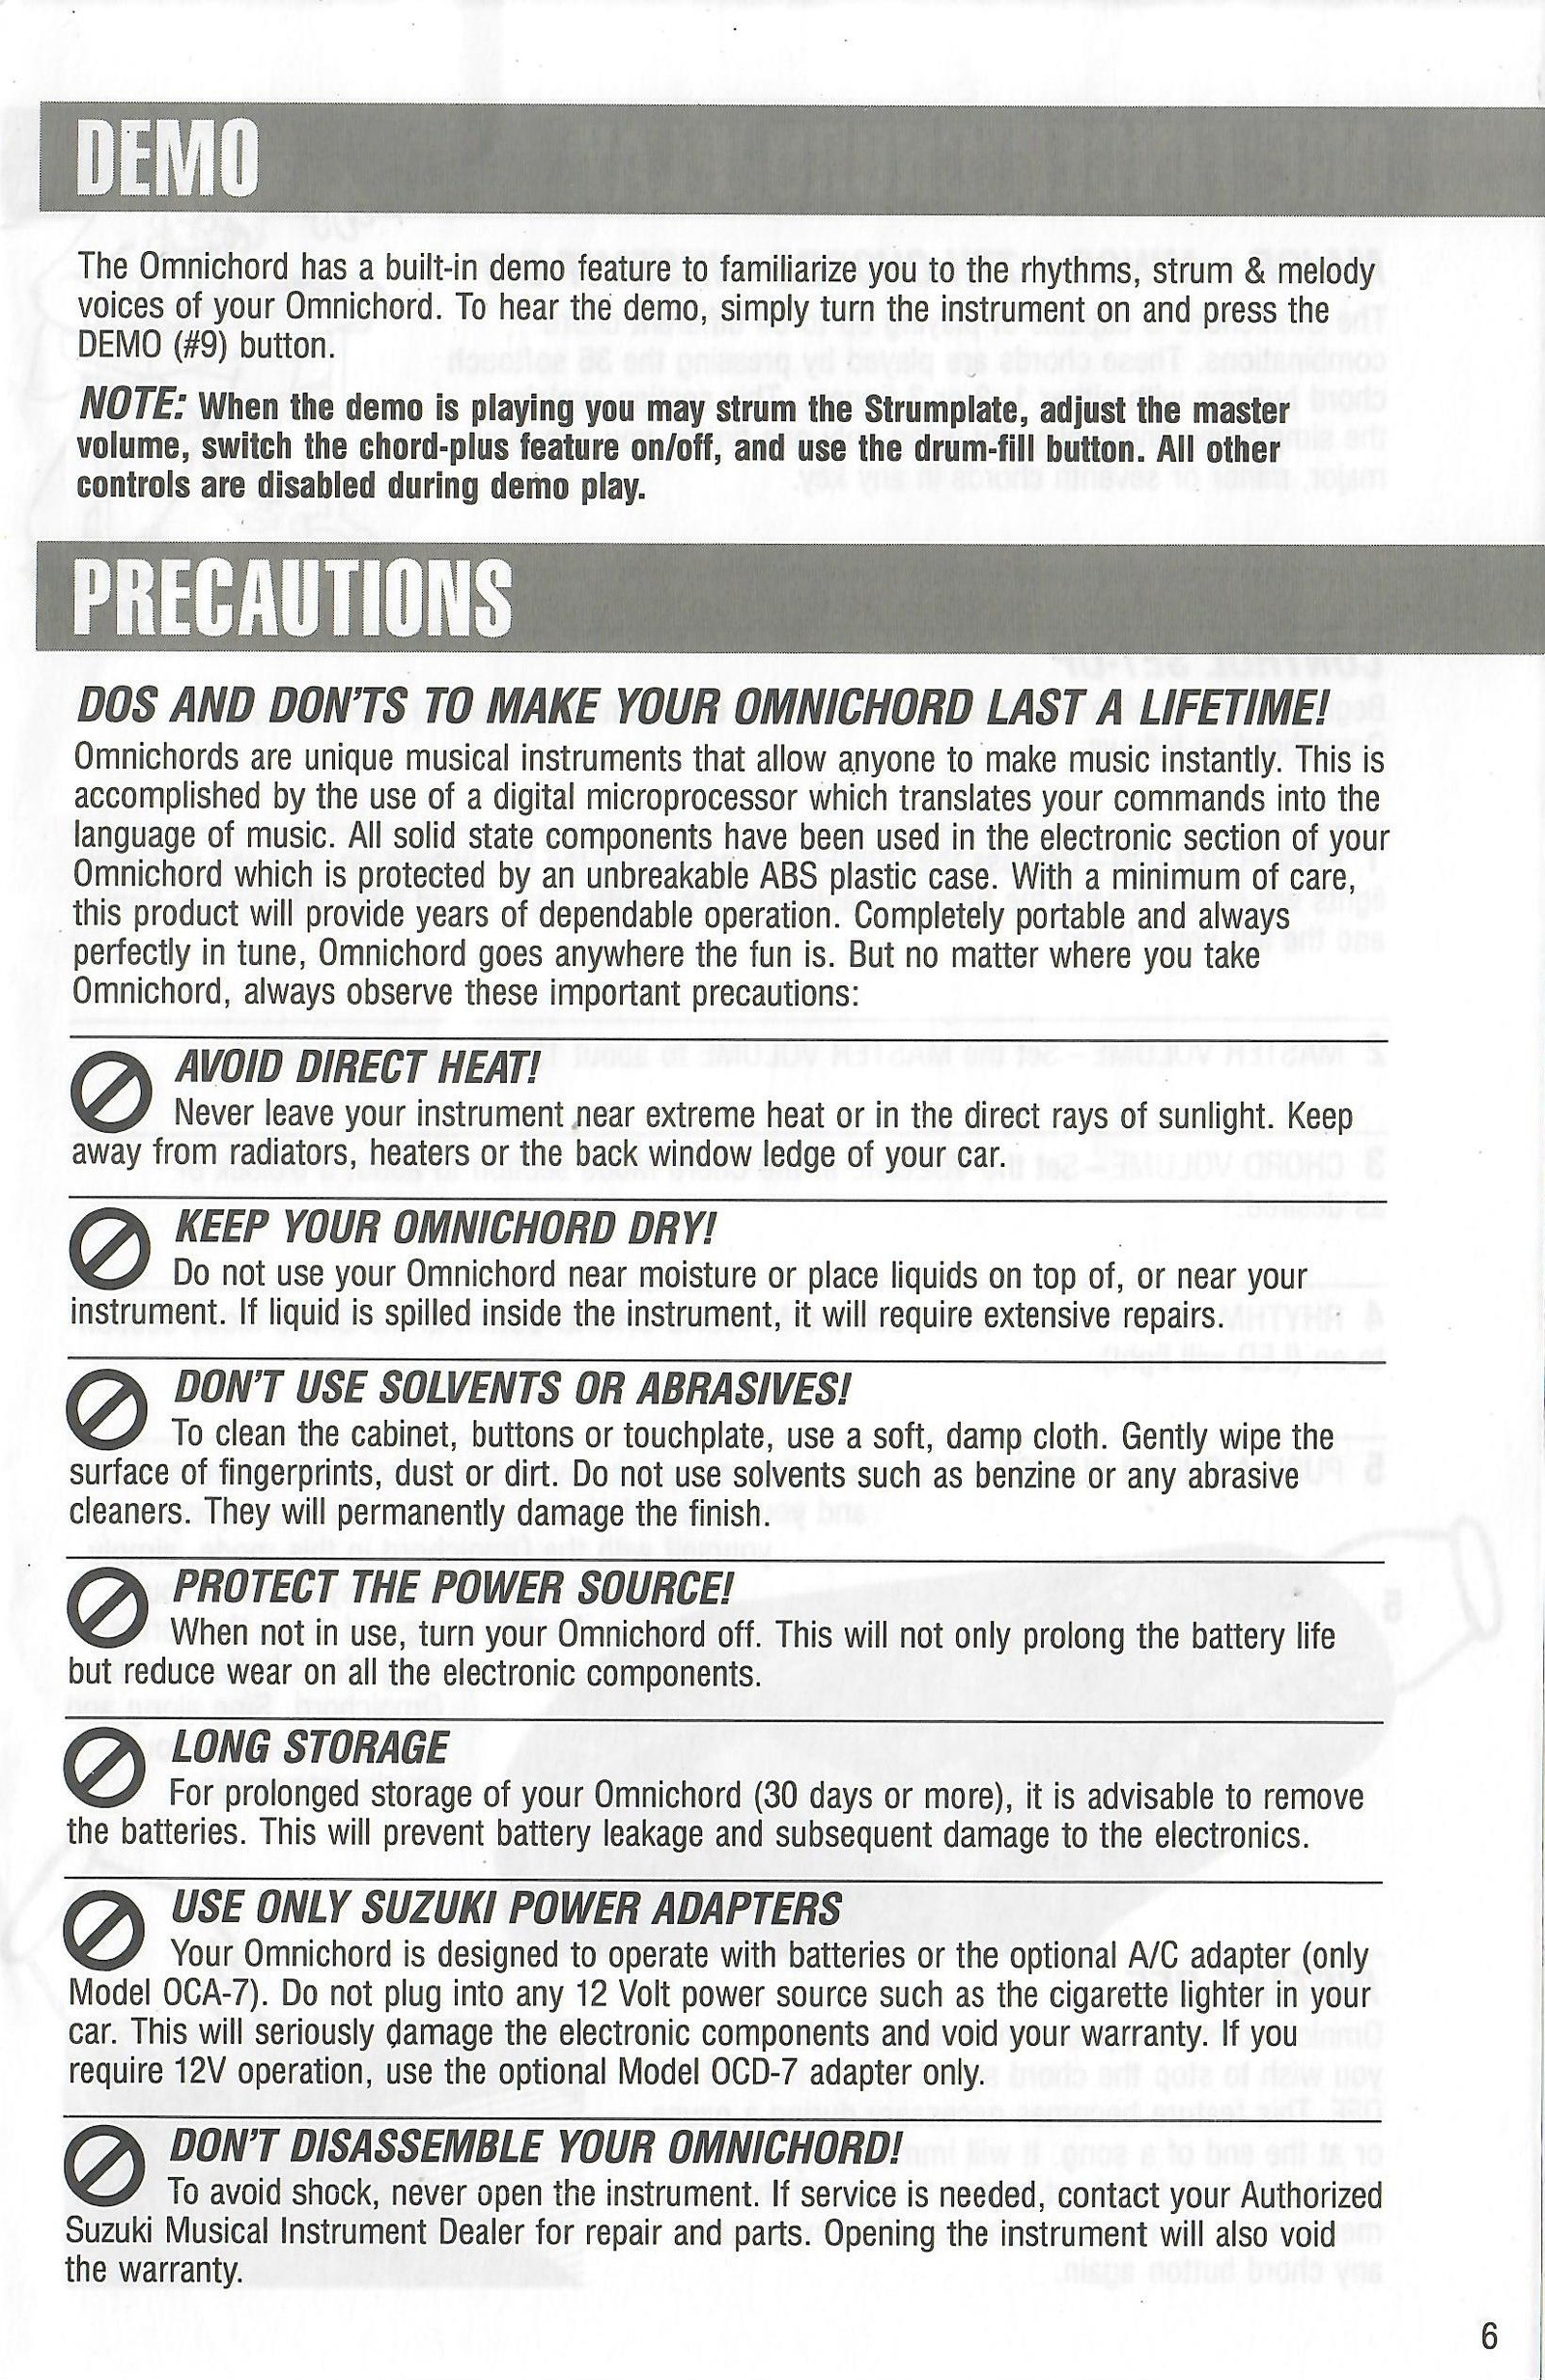
Turn the Omnichord off when it is not in use. This prolongs battery life and reduces wear on the electronic components.
Long Storage
For storage of 30 days or more, remove the batteries to prevent leakage and subsequent electronic damage.
Use Only Suzuki Power Adapters
Operate the Omnichord from batteries or the optional OCA-7 A/C adapter. Do not connect it directly to a 12-volt source such as a car cigarette lighter; use the optional OCD-7 adapter for 12-volt operation.
Don't Disassemble Your Omnichord
To avoid shock, never open the instrument. If service is needed, contact an authorized musical-instrument dealer. Opening the instrument will also void the warranty.
View original scanned 6Original 7
OM-300
One Finger Chord Play
Major, minor and seventh chords
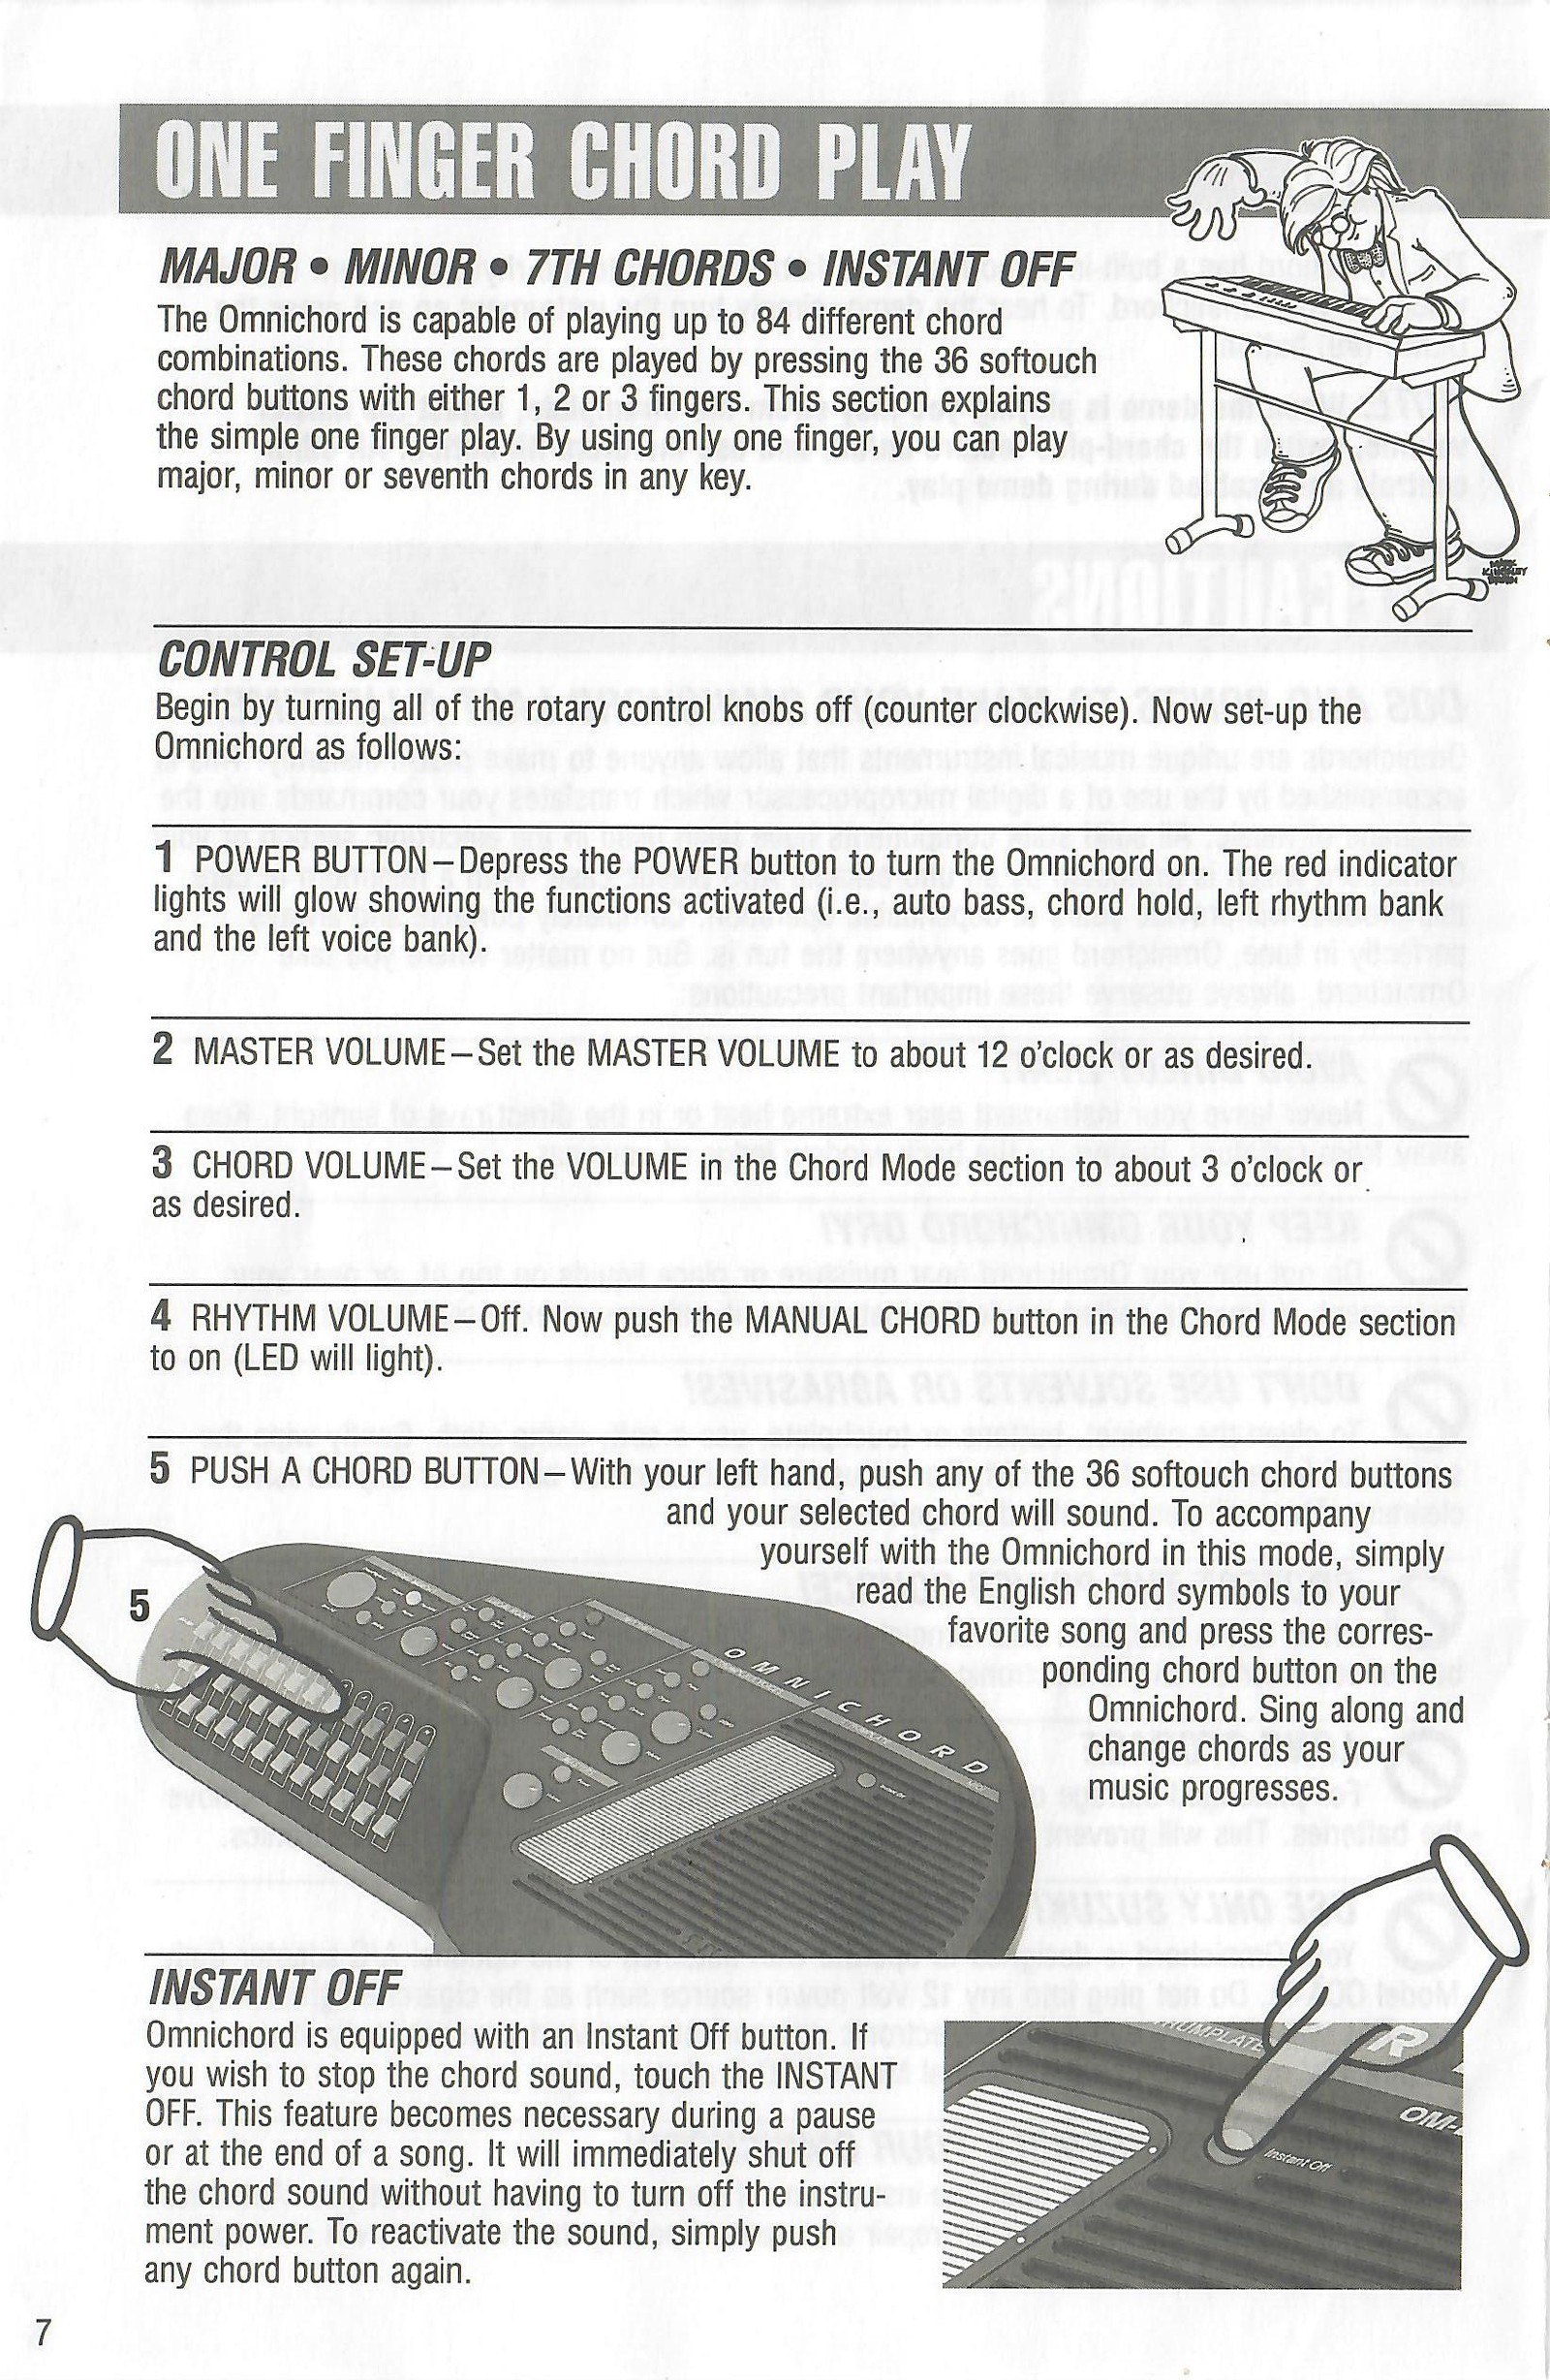
The Omnichord is capable of playing up to 84 chord combinations using the 36 softouch chord buttons. This section explains simple one-finger play: major, minor or seventh chords in any key. The manual pictures the OM-300, but the OM-300 functions identically for these instructions. Features unique to the OM-300 begin on page 14.
Begin by turning all rotary control knobs fully counter-clockwise, then set up the instrument as follows:
POWER BUTTON - Press POWER to turn on the Omnichord. The red indicator lights show the active functions.
MASTER VOLUME - Set the master volume to about 12 o'clock or as desired.
CHORD VOLUME - Set the volume in the Chord Mode section to about 3 o'clock or as desired.
RHYTHM VOLUME - Off. Press MANUAL CHORD in the Chord Mode section so its indicator lights.
PUSH A CHORD BUTTON - With your left hand, press any of the 36 softouch chord buttons. To accompany a song, read its chord symbols and press the corresponding Omnichord buttons as the music continues.
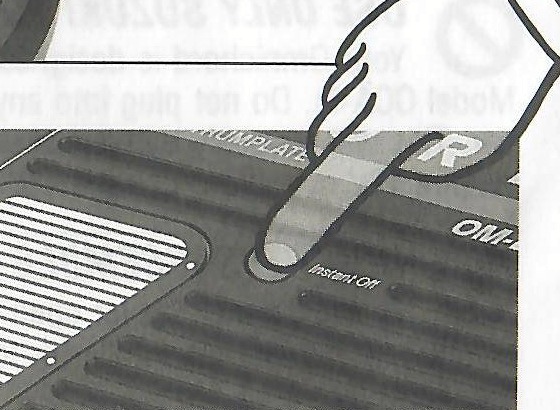
INSTANT OFF - Touch INSTANT OFF to stop the chord sound during a pause or at the end of a song. Press any chord button to reactivate the sound.
The Instant Off touch point used to stop all sound.View original scanned 7Original 8
OM-300
Multi-Finger Chord Play
Major seventh, minor seventh, augmented and diminished chords
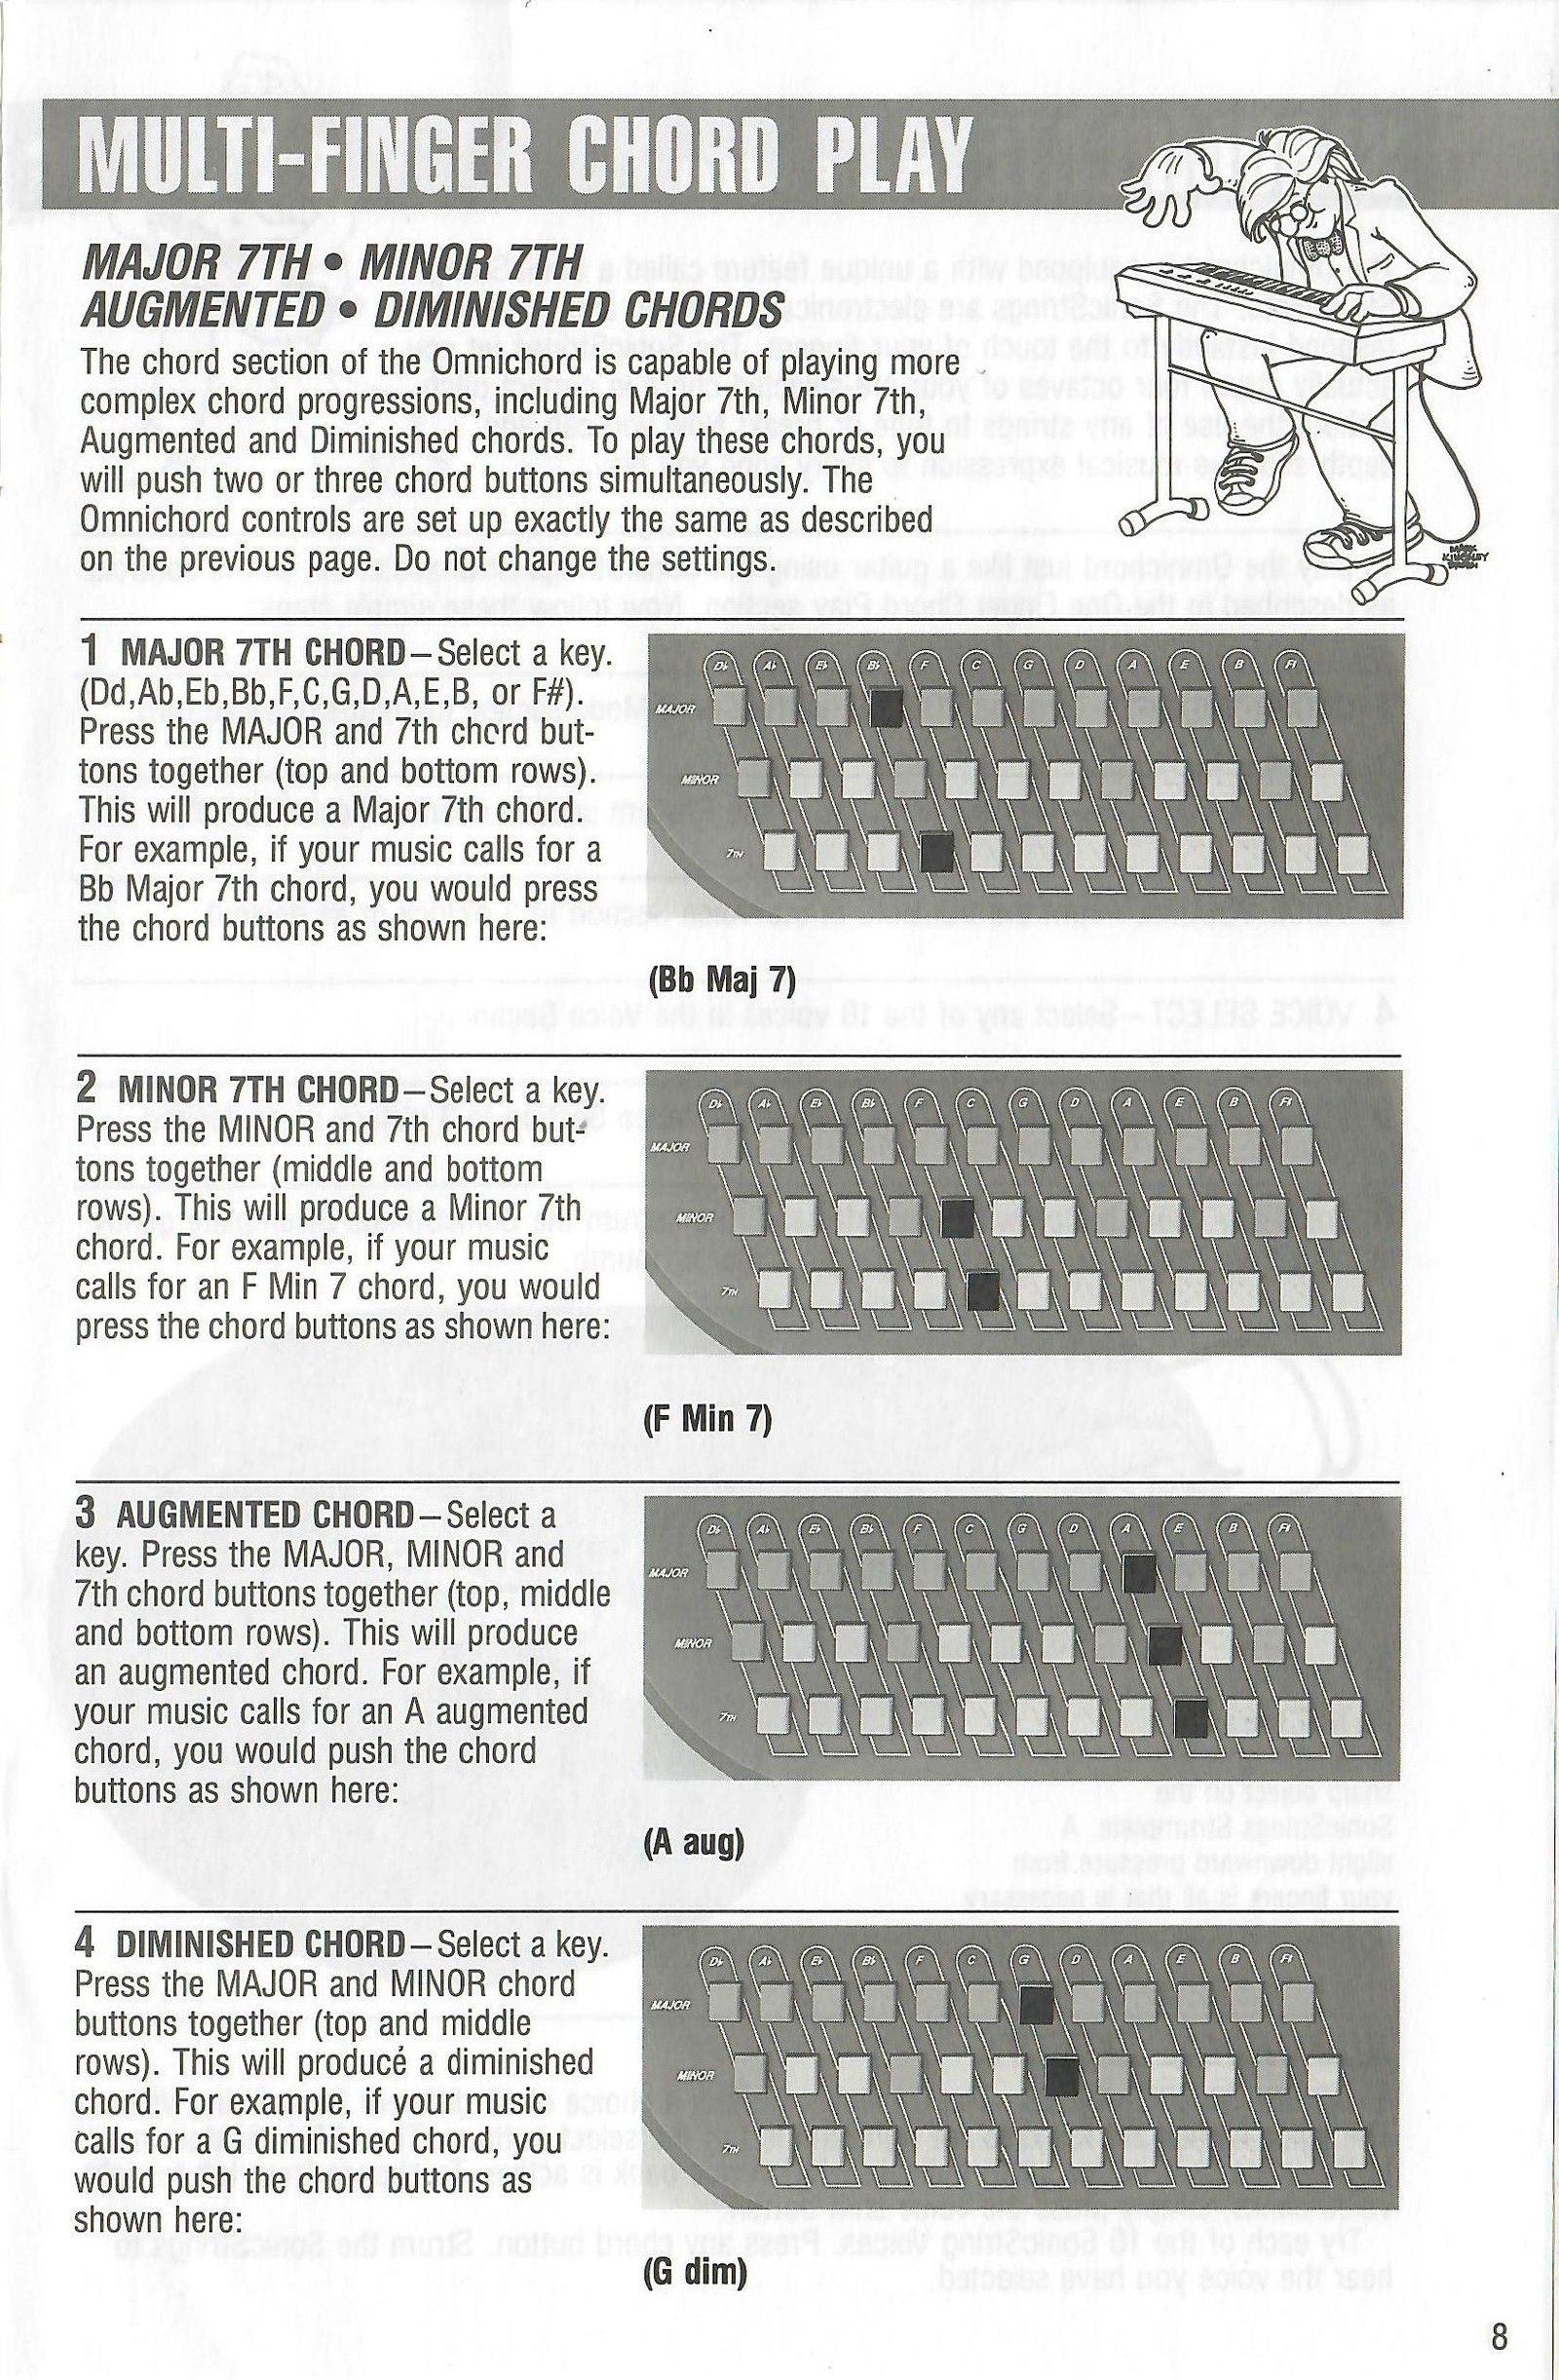
The chord section can play more complex progressions by pressing two or three chord buttons simultaneously. Keep the control settings described on the previous page.
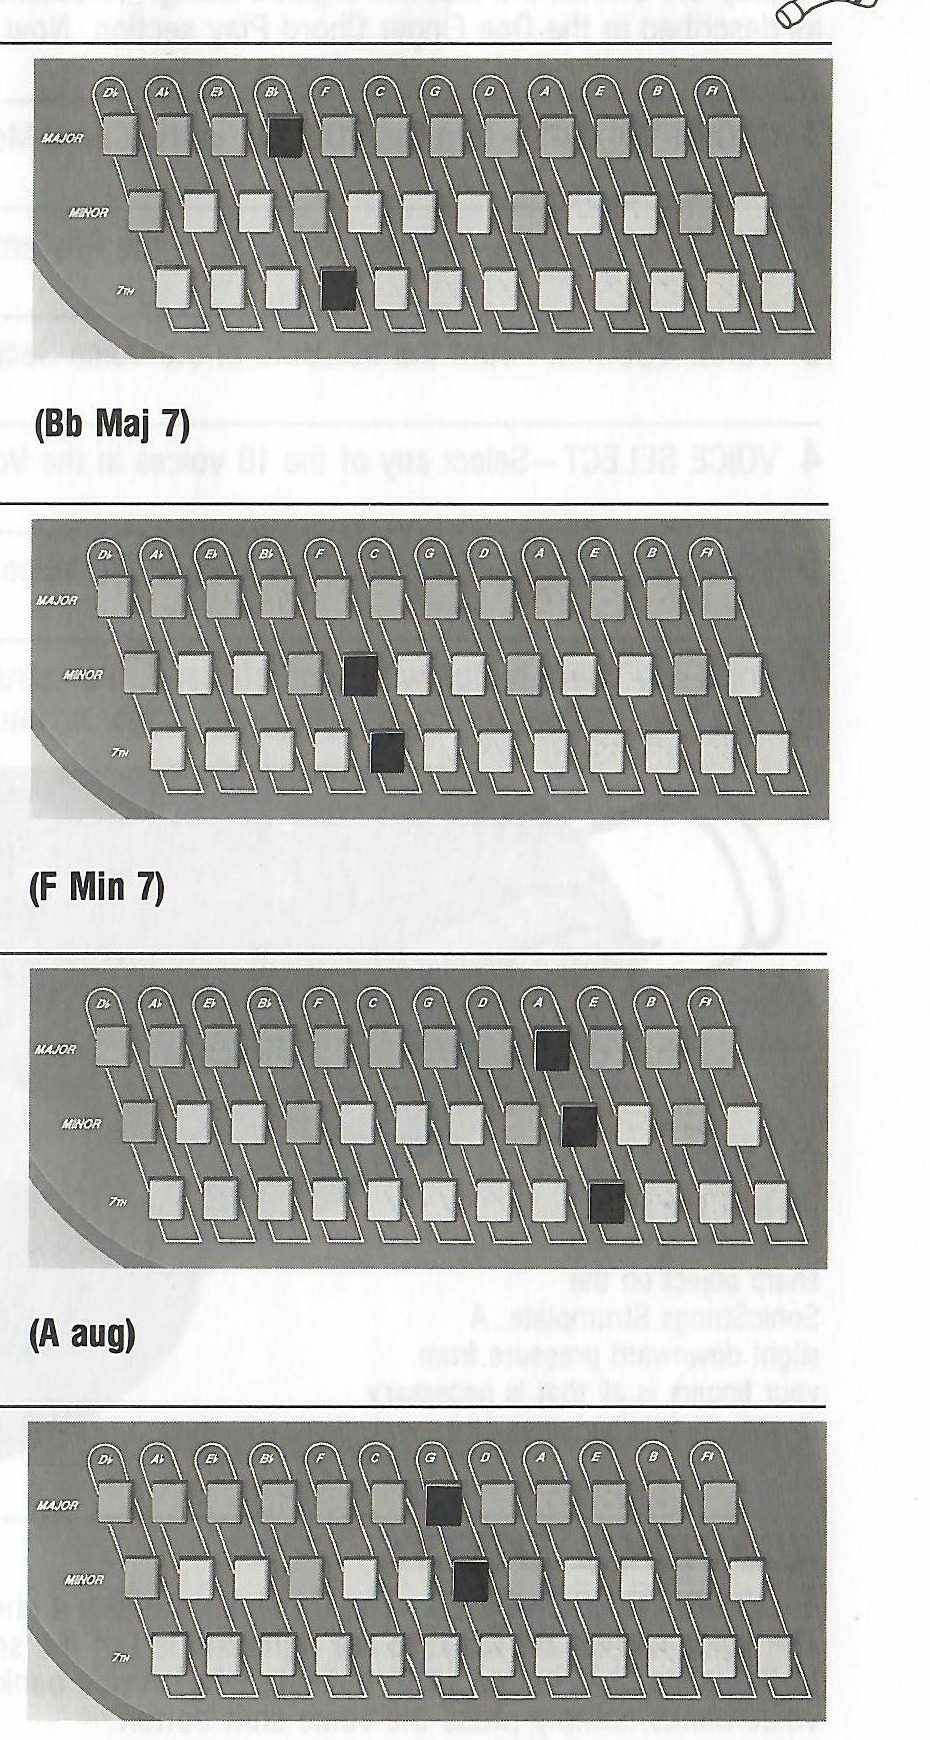
MAJOR 7TH CHORD - Select a key (Db, Ab, Eb, Bb, F, C, G, D, A, E, B or F#). Press the MAJOR and 7th buttons together (top and bottom rows). The illustration shows Bb major seventh.
MINOR 7TH CHORD - Select a key. Press the MINOR and 7th buttons together (middle and bottom rows). The illustration shows F# minor seventh.
AUGMENTED CHORD - Select a key. Press the MAJOR, MINOR and 7th buttons together (top, middle and bottom rows). The illustration shows A augmented.
DIMINISHED CHORD - Select a key. Press the MAJOR and MINOR buttons together (top and middle rows). The illustration shows G diminished.
Four chord-button diagrams for Bb major seventh, F-sharp minor seventh, A augmented and G diminished.View original scanned 8Original 9
OM-300
SonicStrings Strumplate Set-Up & Play
Guitar-style strumming and voice effects
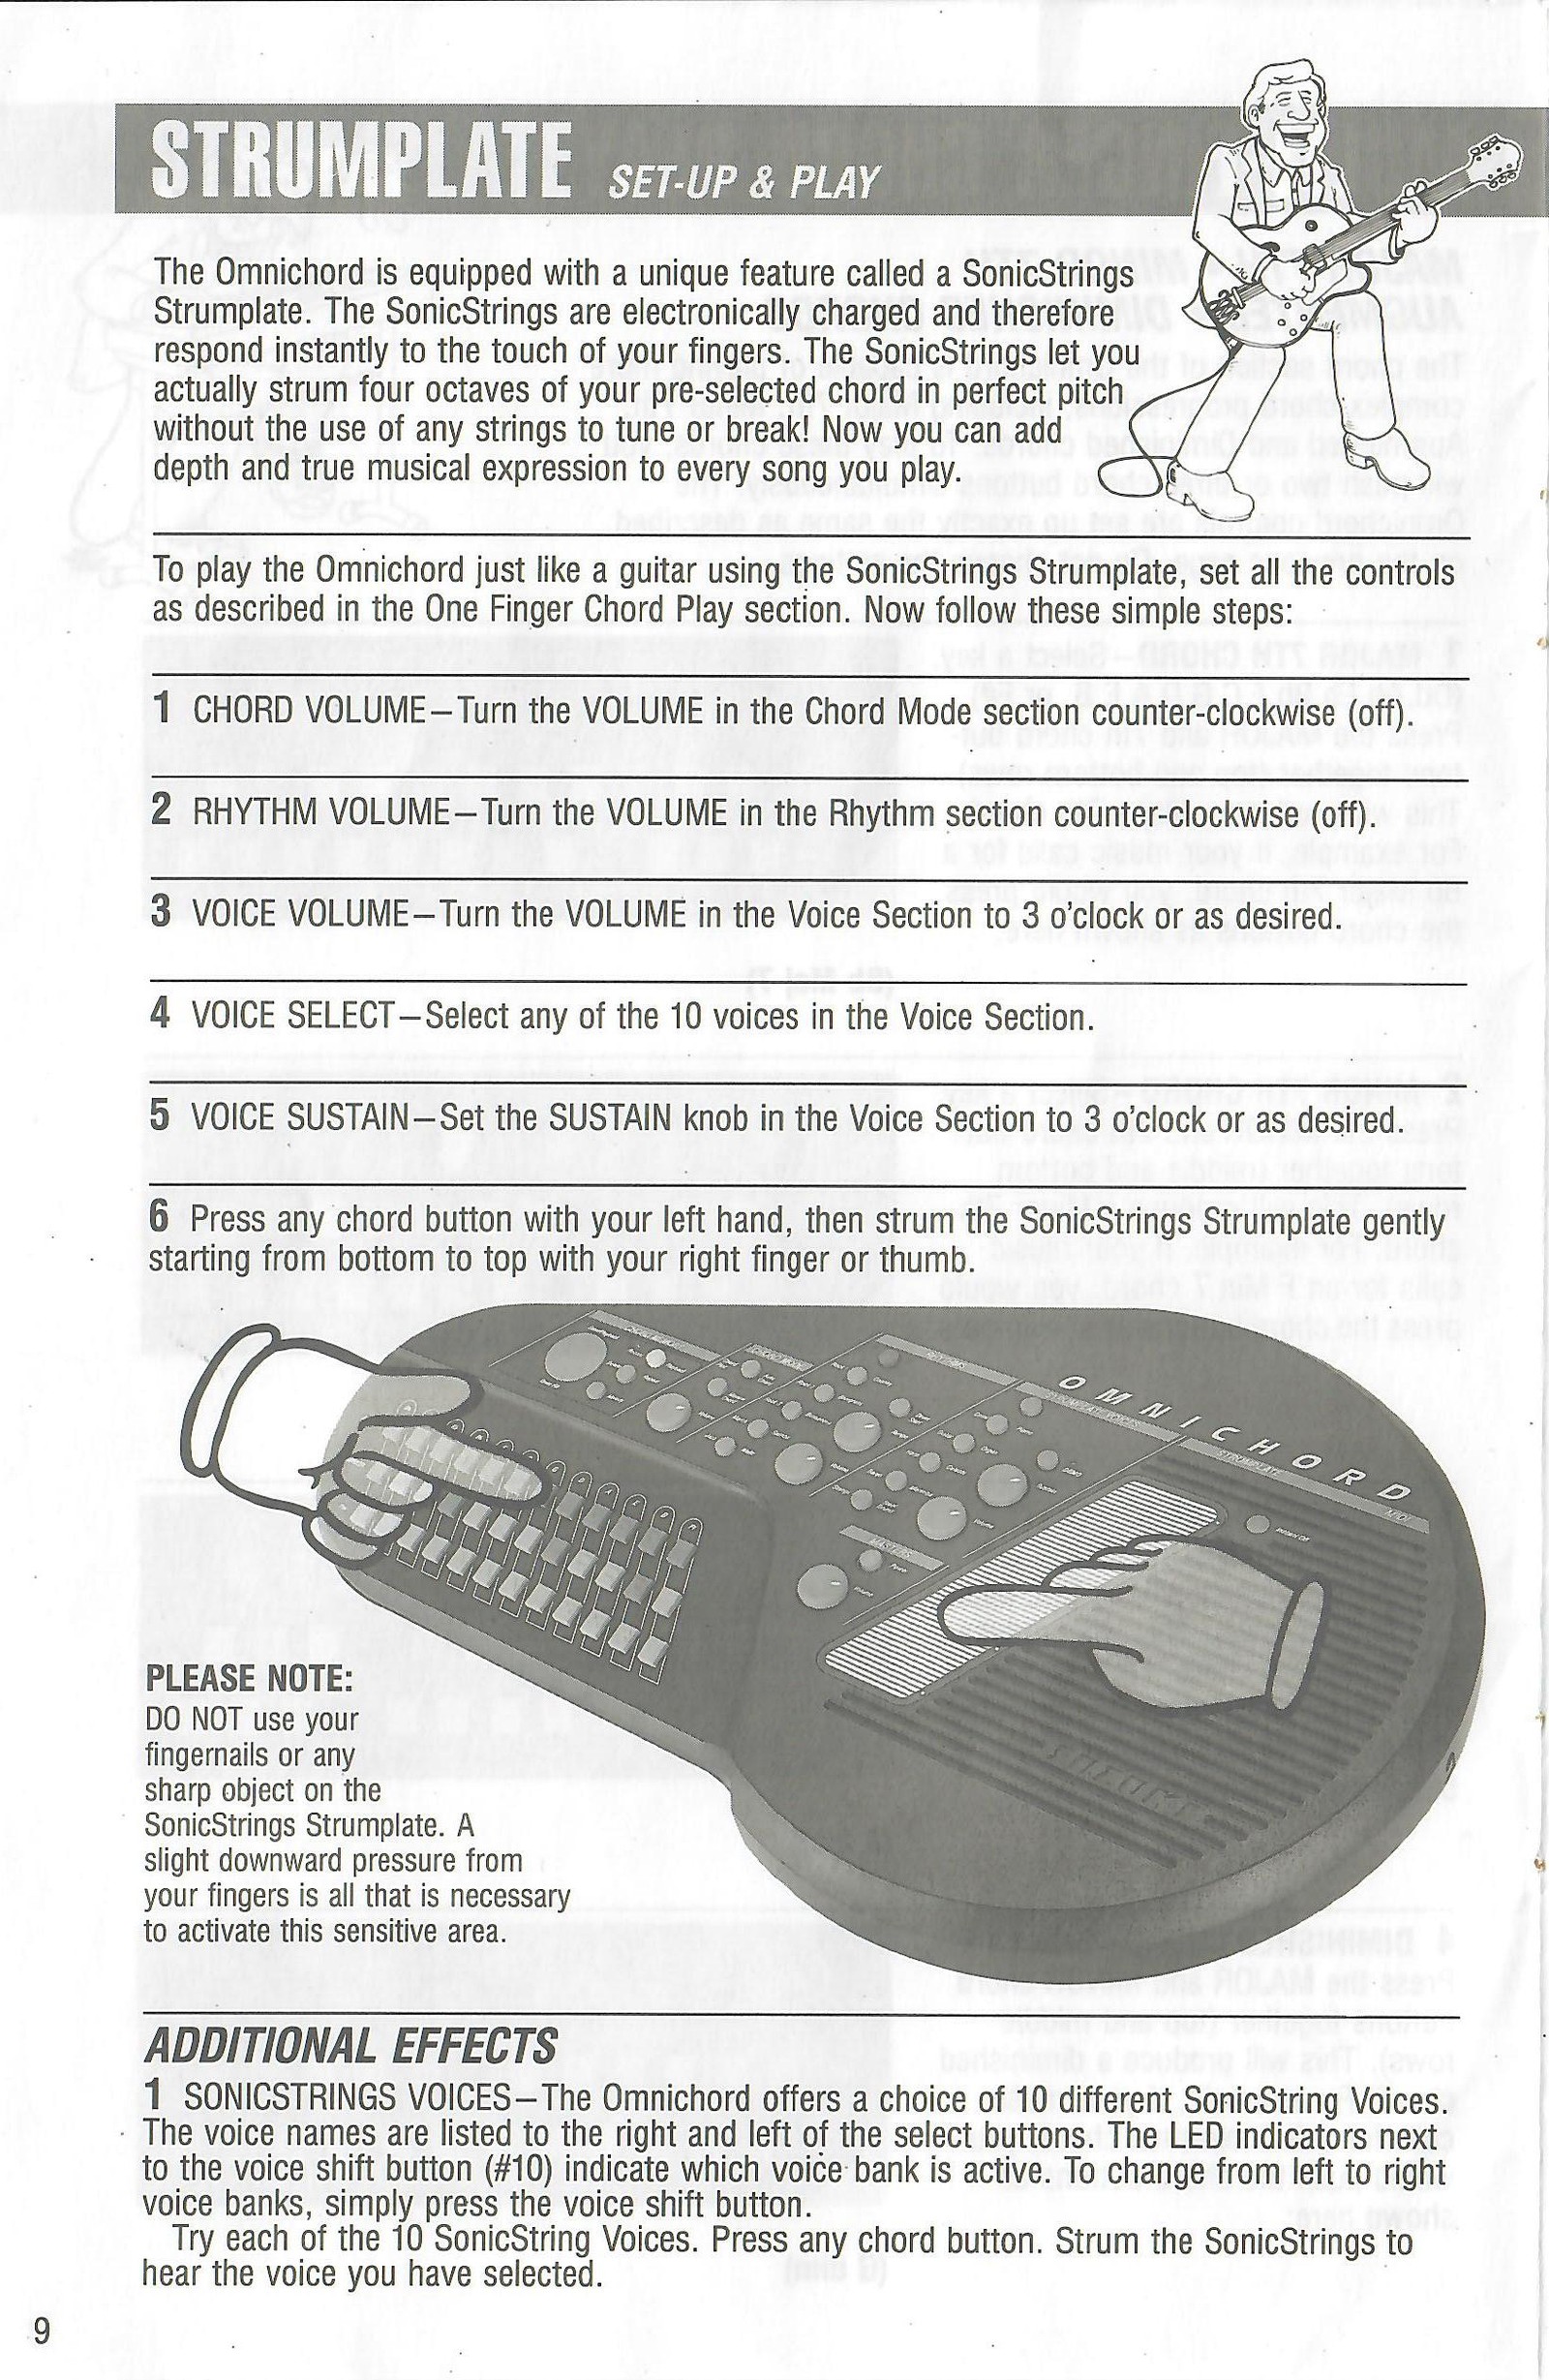
The SonicStrings Strumplate responds instantly to the touch of your fingers and lets you strum four octaves of the pre-selected chord in perfect pitch.
Set the controls as described in One Finger Chord Play, then follow these steps:
VOICE VOLUME - Set the Voice Section volume to 3 o'clock or as desired.
VOICE SELECT - Select any of the ten voices in the Voice Section.
VOICE SUSTAIN - Set the Voice Section sustain to 3 o'clock or as desired.
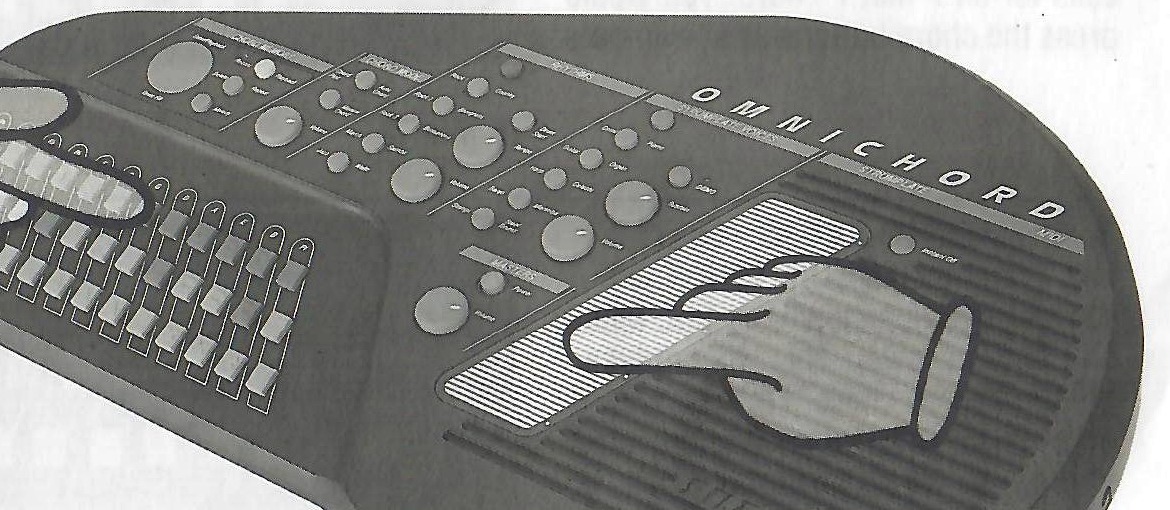
Press any chord button with your left hand, then gently strum from bottom to top with your right finger or thumb.
SonicStrings Voices
The Omnichord offers ten SonicStrings voices. Names are printed beside the selector buttons. The LED indicators beside VOICE SELECTOR SHIFT (#10) show which voice bank is active. Press the shift button to change banks, then press a chord and strum to hear each voice.
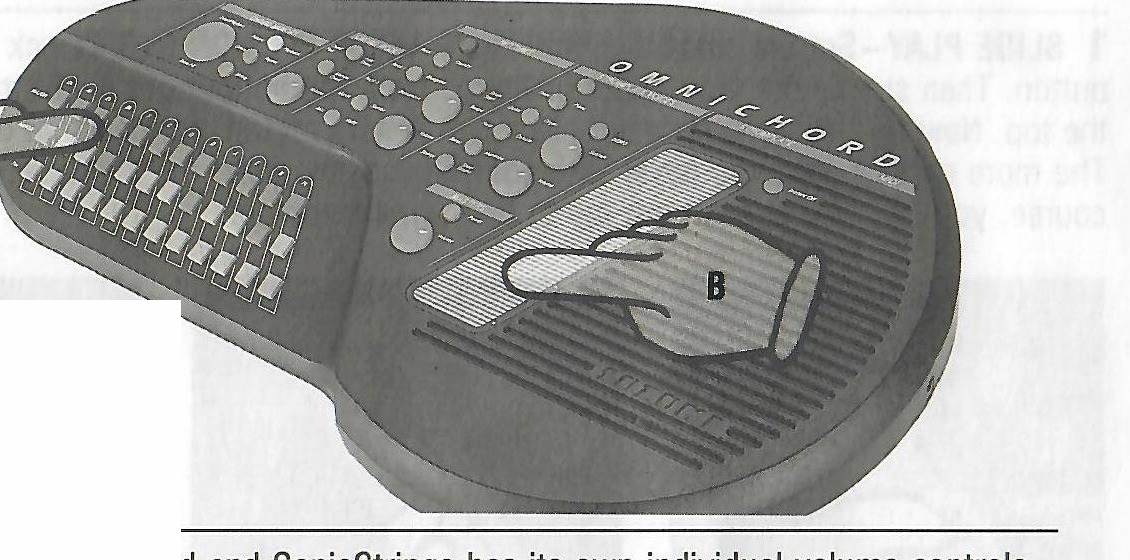
Hands selecting a chord and strumming the SonicStrings Strumplate, with the original safety callout.View original scanned 9Original 10
OM-300
SonicStrings Playing Techniques
Slide play and touch play
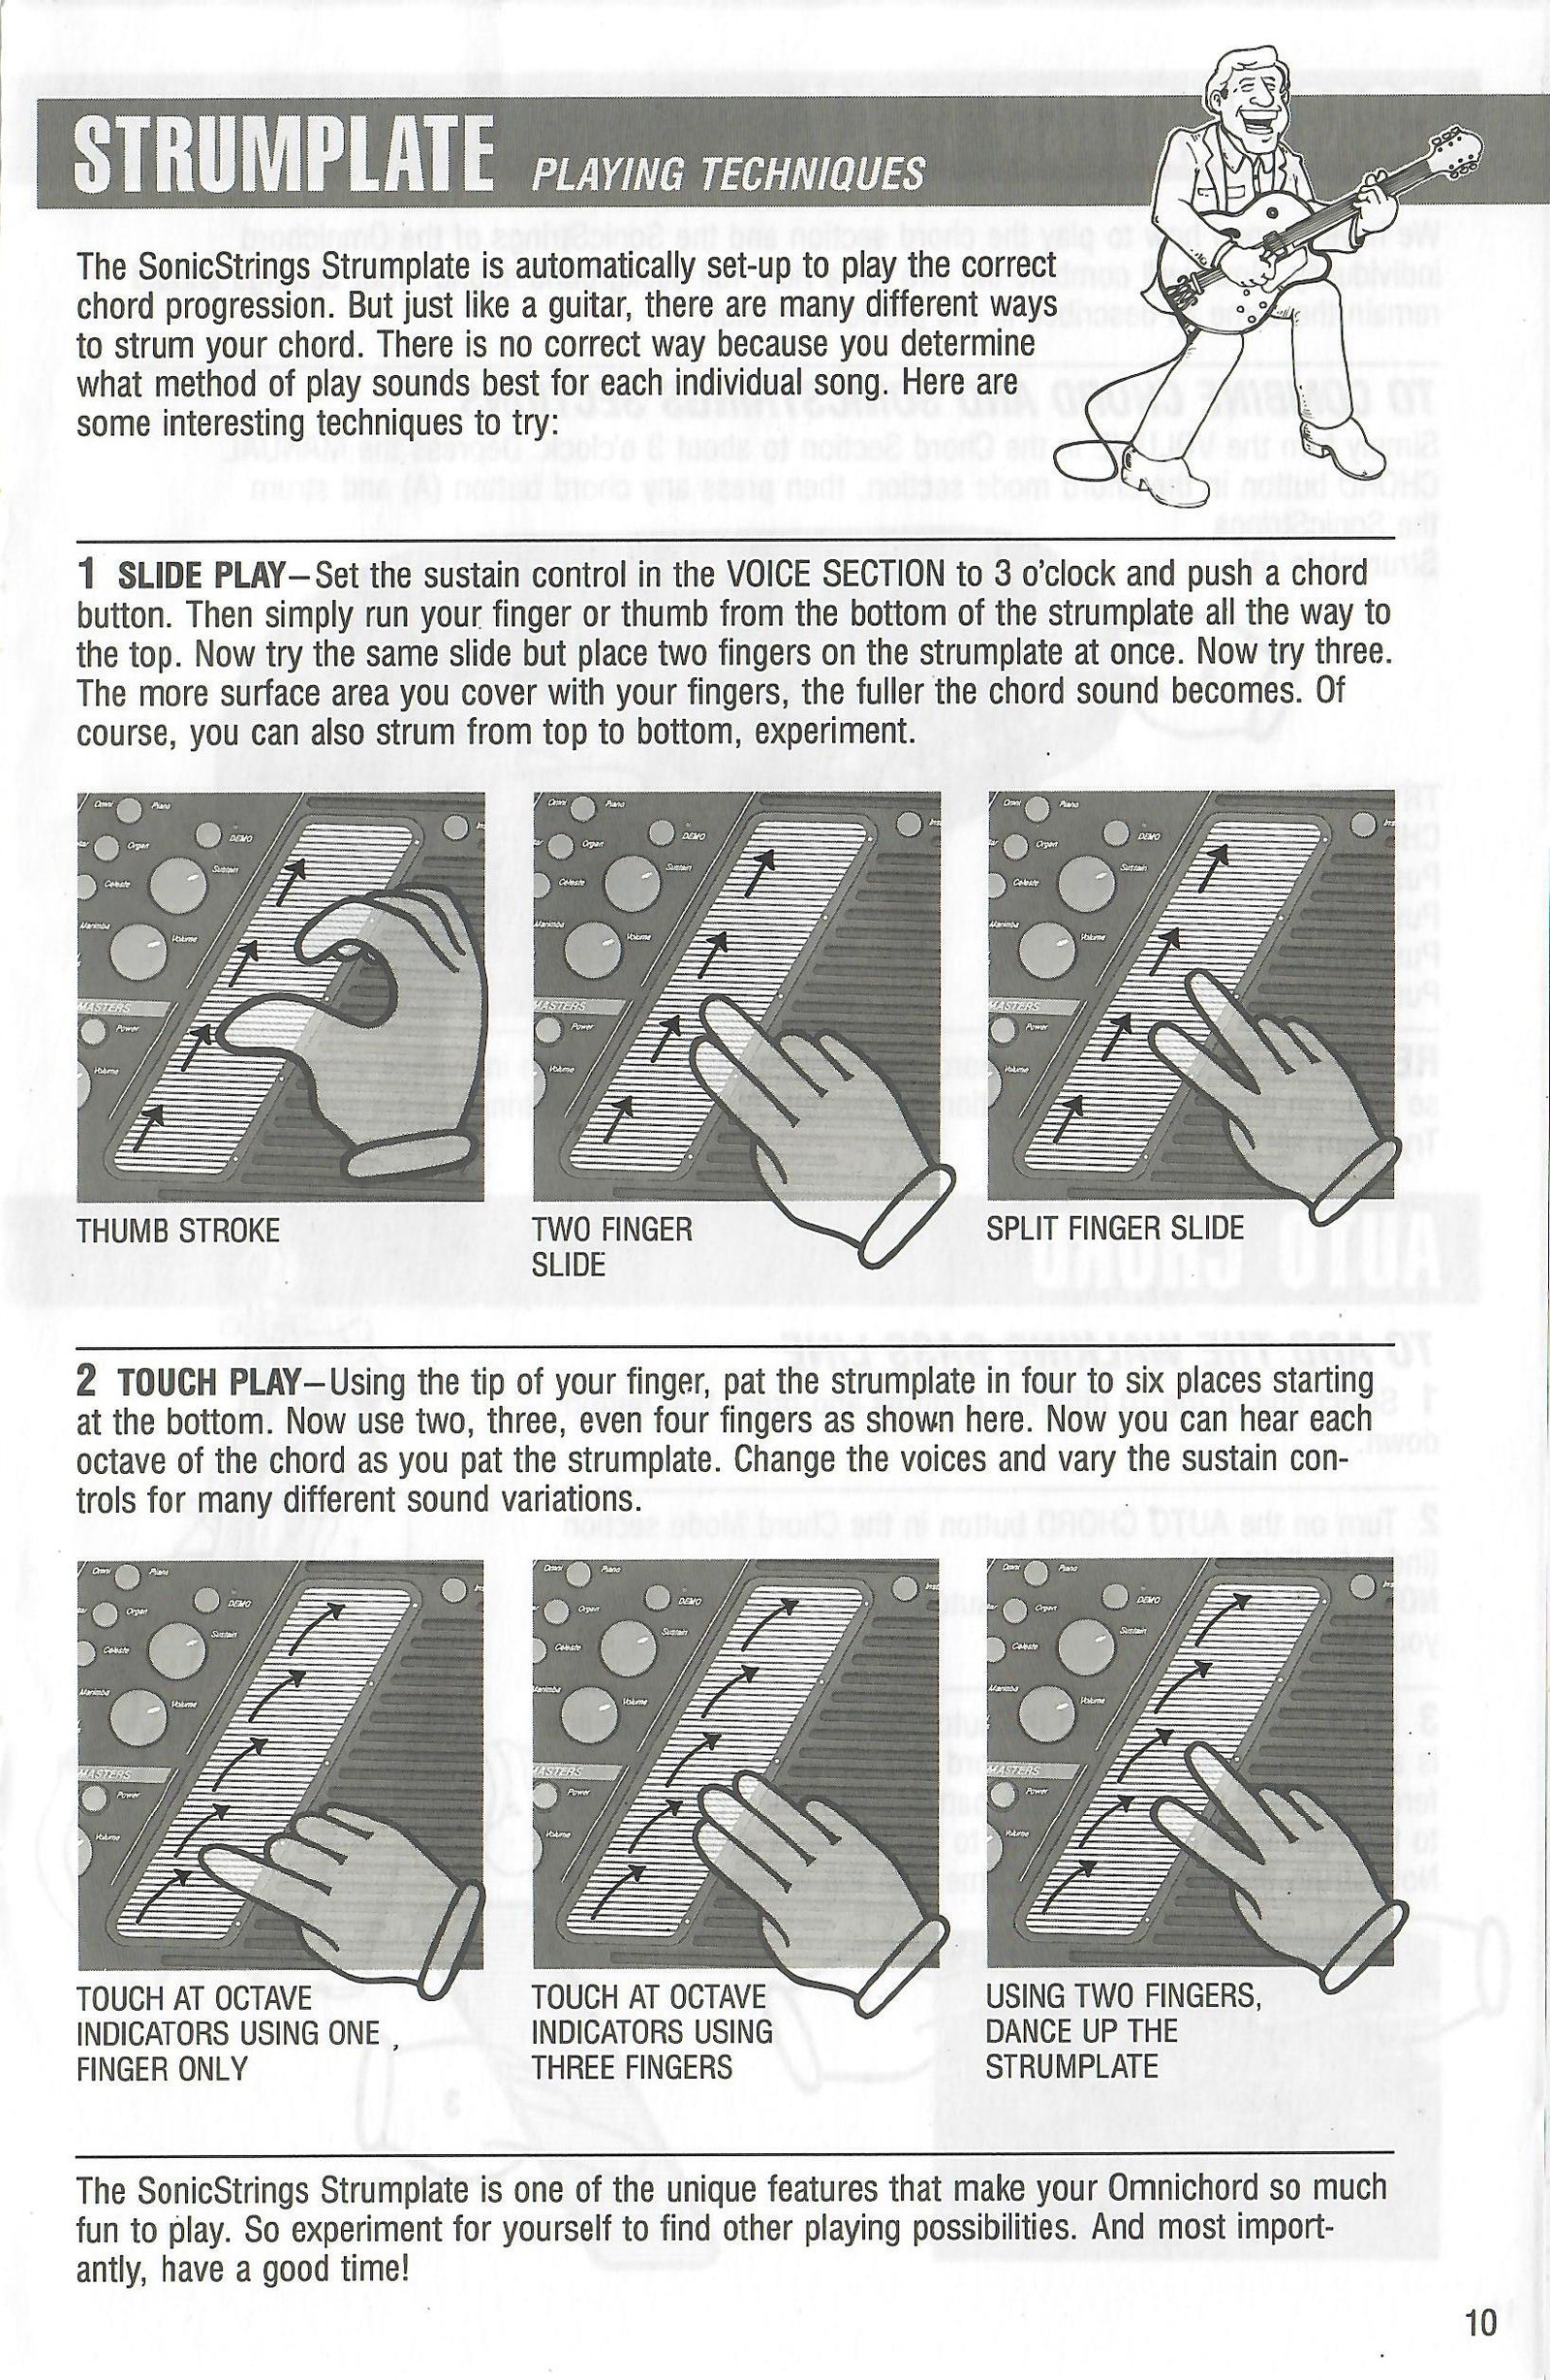
The SonicStrings Strumplate automatically plays the chord selected on the chord buttons. There is no single correct strumming method; use the technique that sounds best for each song.
Slide Play
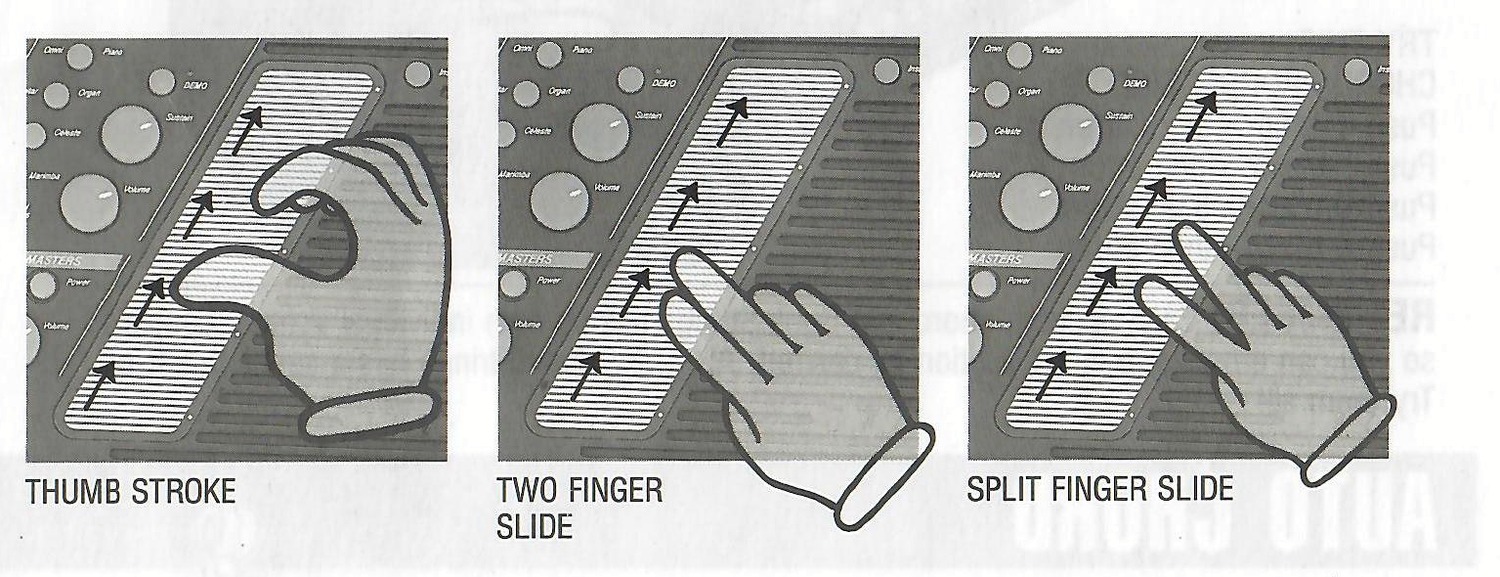
Set sustain in the Voice Section to 3 o'clock and press a chord. Run a finger or thumb from the bottom of the strumplate to the top. Try two fingers, then three; covering more surface produces a fuller chord. You can also strum from top to bottom.
Touch Play
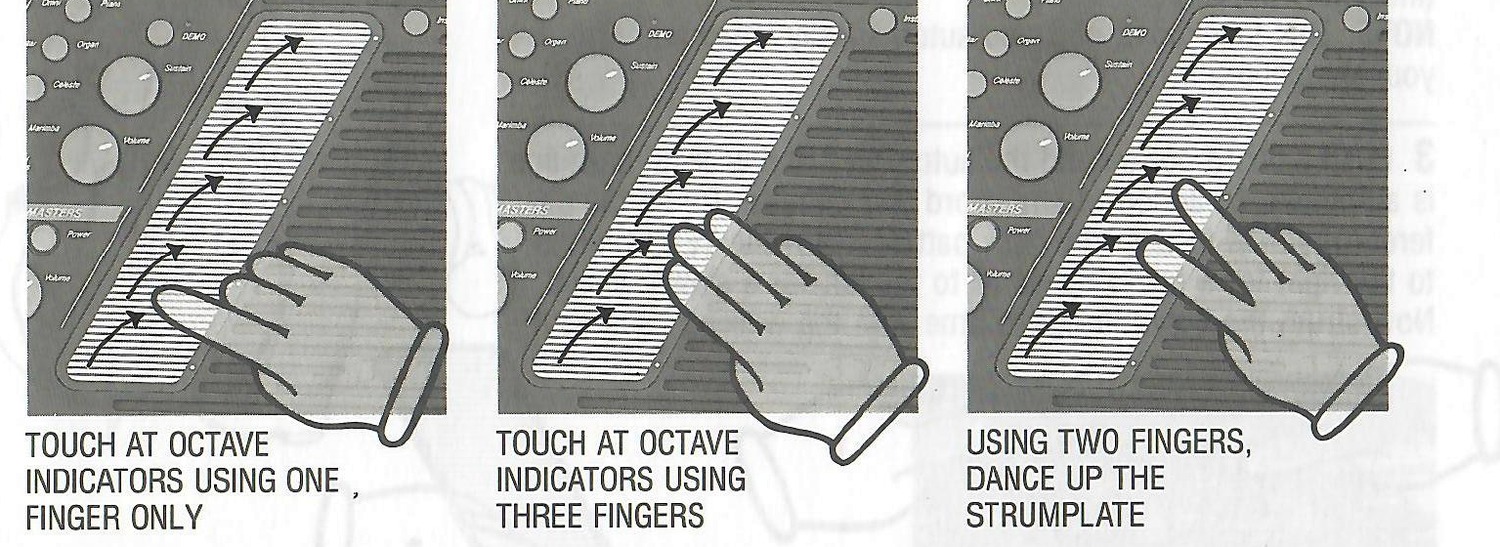
Using the fingertip, pat four to six places starting at the bottom. Try two, three or four fingers to hear the individual chord octaves. Change voices and sustain settings for different sounds.
Thumb, two-finger and split-finger SonicStrings slide techniques.One-, three- and two-finger SonicStrings touch-play techniques.View original scanned 10Original 11
OM-300
Combination Play & Walking Bass Line
Combining chord, SonicStrings and bass sections
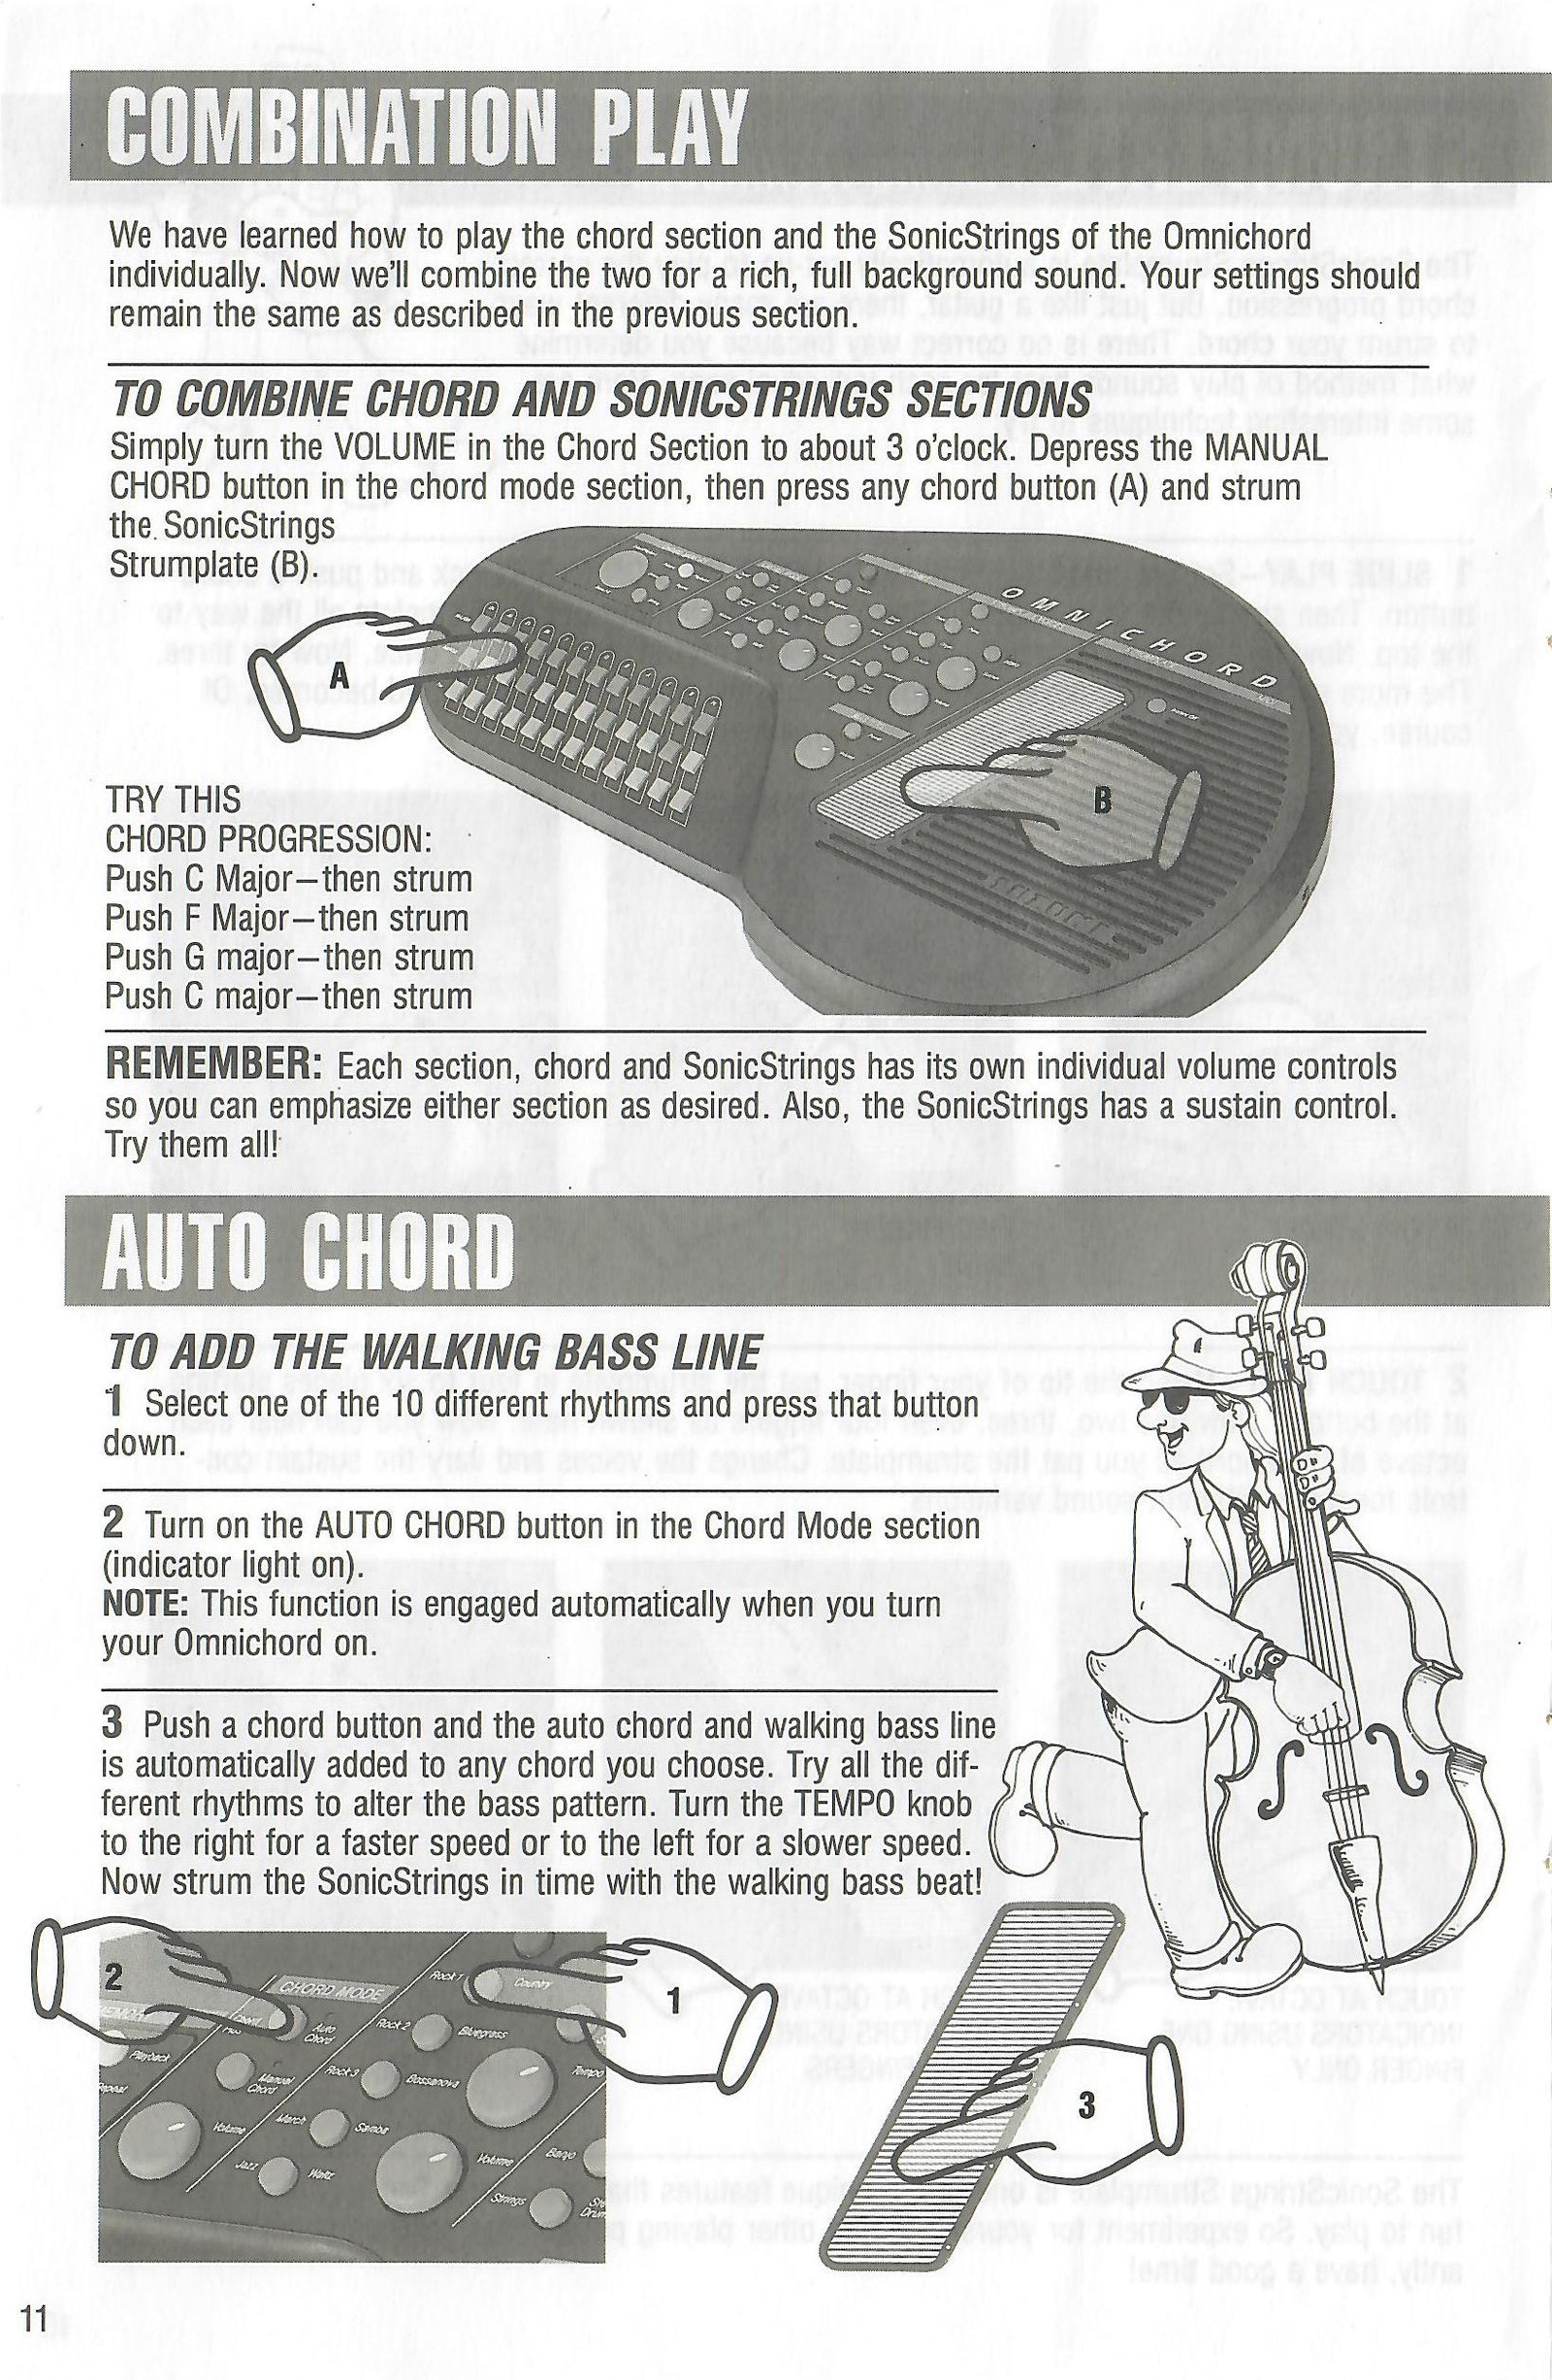
Combine Chord and SonicStrings Sections
Set the Chord Section volume to about 3 o'clock. Press MANUAL CHORD, select any chord button and strum the SonicStrings Strumplate.
Remember
The chord and SonicStrings sections have separate volume controls, and SonicStrings has a sustain control. Adjust each section independently.
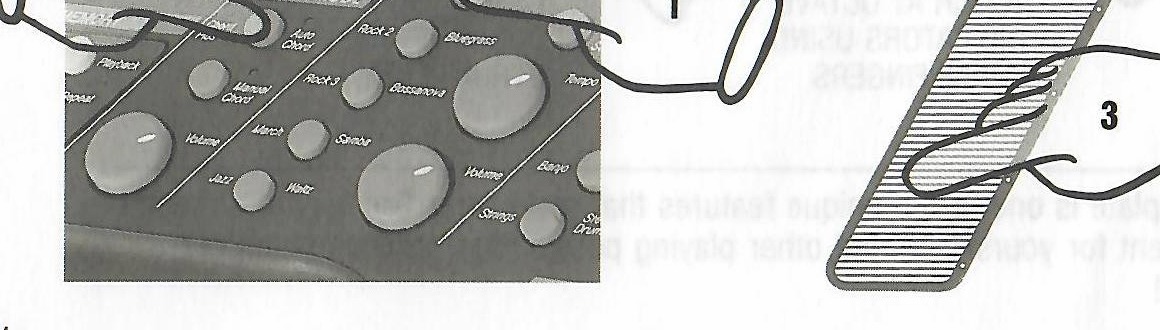
Add the Walking Bass Line
Select one of the ten rhythms and press its button.
Turn on AUTO CHORD in the Chord Mode section. Its indicator should be lit; this function is engaged automatically when the Omnichord is switched on.
Press a chord button. Auto chord and the walking bass line are added automatically. Try different rhythms and adjust TEMPO; strum in time with the walking-bass beat.
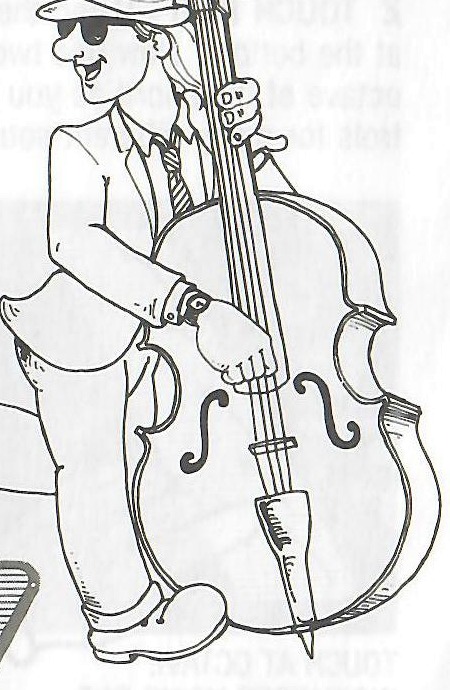
Hands selecting a chord and strumming for combination play.Original walking-bass player illustration.Hands selecting rhythm and auto bass, then strumming the SonicStrings.View original scanned 11Original 12
OM-300
Drums & Drum Introductions
Using the Rhythm Section
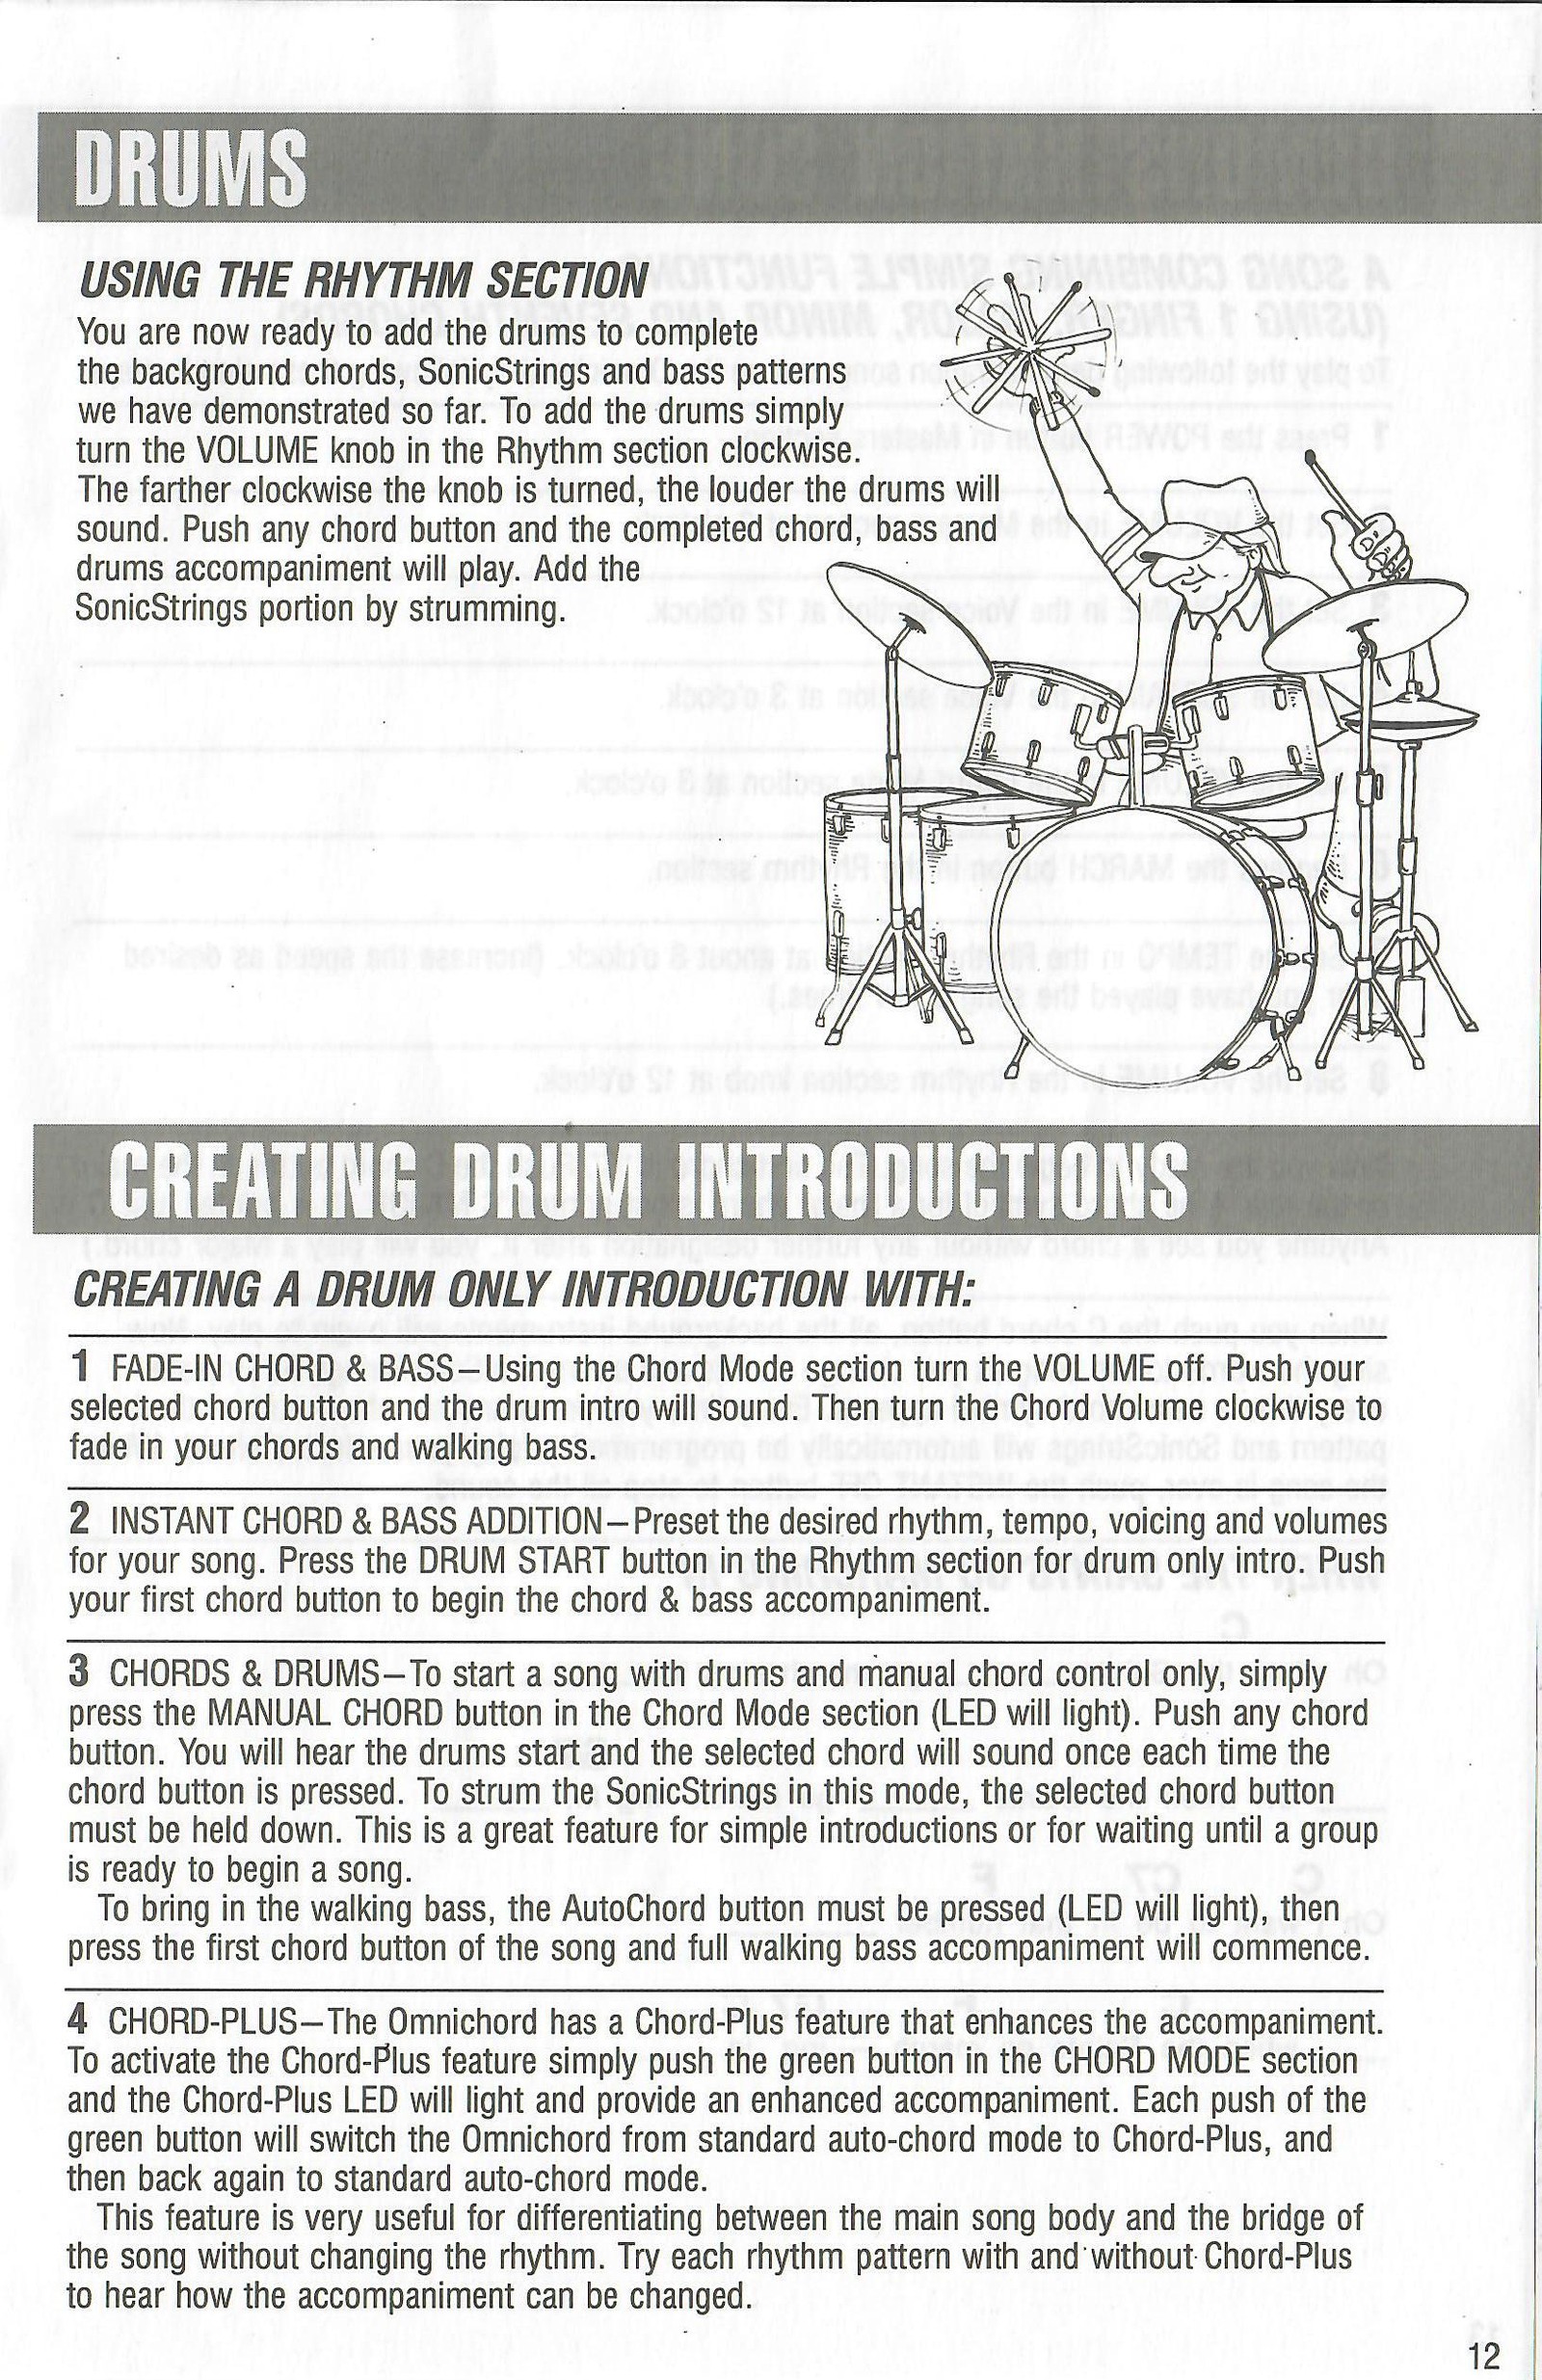
To add drums to the chord, SonicStrings and bass patterns, turn the Rhythm Section volume clockwise. Press any chord button to play the completed accompaniment and add SonicStrings by strumming.
Fade-In Chord & Bass
Turn the Chord Mode volume off, press the selected chord so the drum introduction sounds, then turn the chord volume clockwise to fade in the chords and walking bass.
Instant Chord & Bass Addition
Preset the rhythm, tempo, voicing and volumes. Press SYNC START for a drums-only introduction, then press the first chord button to begin chord and bass accompaniment.
Chords & Drum
Set AUTO BASS to manual chord (indicator off), then press a chord button. Only the selected chord and drums will sound; the SonicStrings remains active. Press AUTO BASS again to add the walking bass.
Chord-Plus
Press the green CHORD-PLUS button in the Chord Mode section to enhance the accompaniment. Each press alternates between standard Auto Chord and Chord-Plus. Use the contrast to distinguish a song's main body from its bridge without changing rhythm.
Original drummer illustration from the Rhythm Section page.View original scanned 12Original 13
OM-300
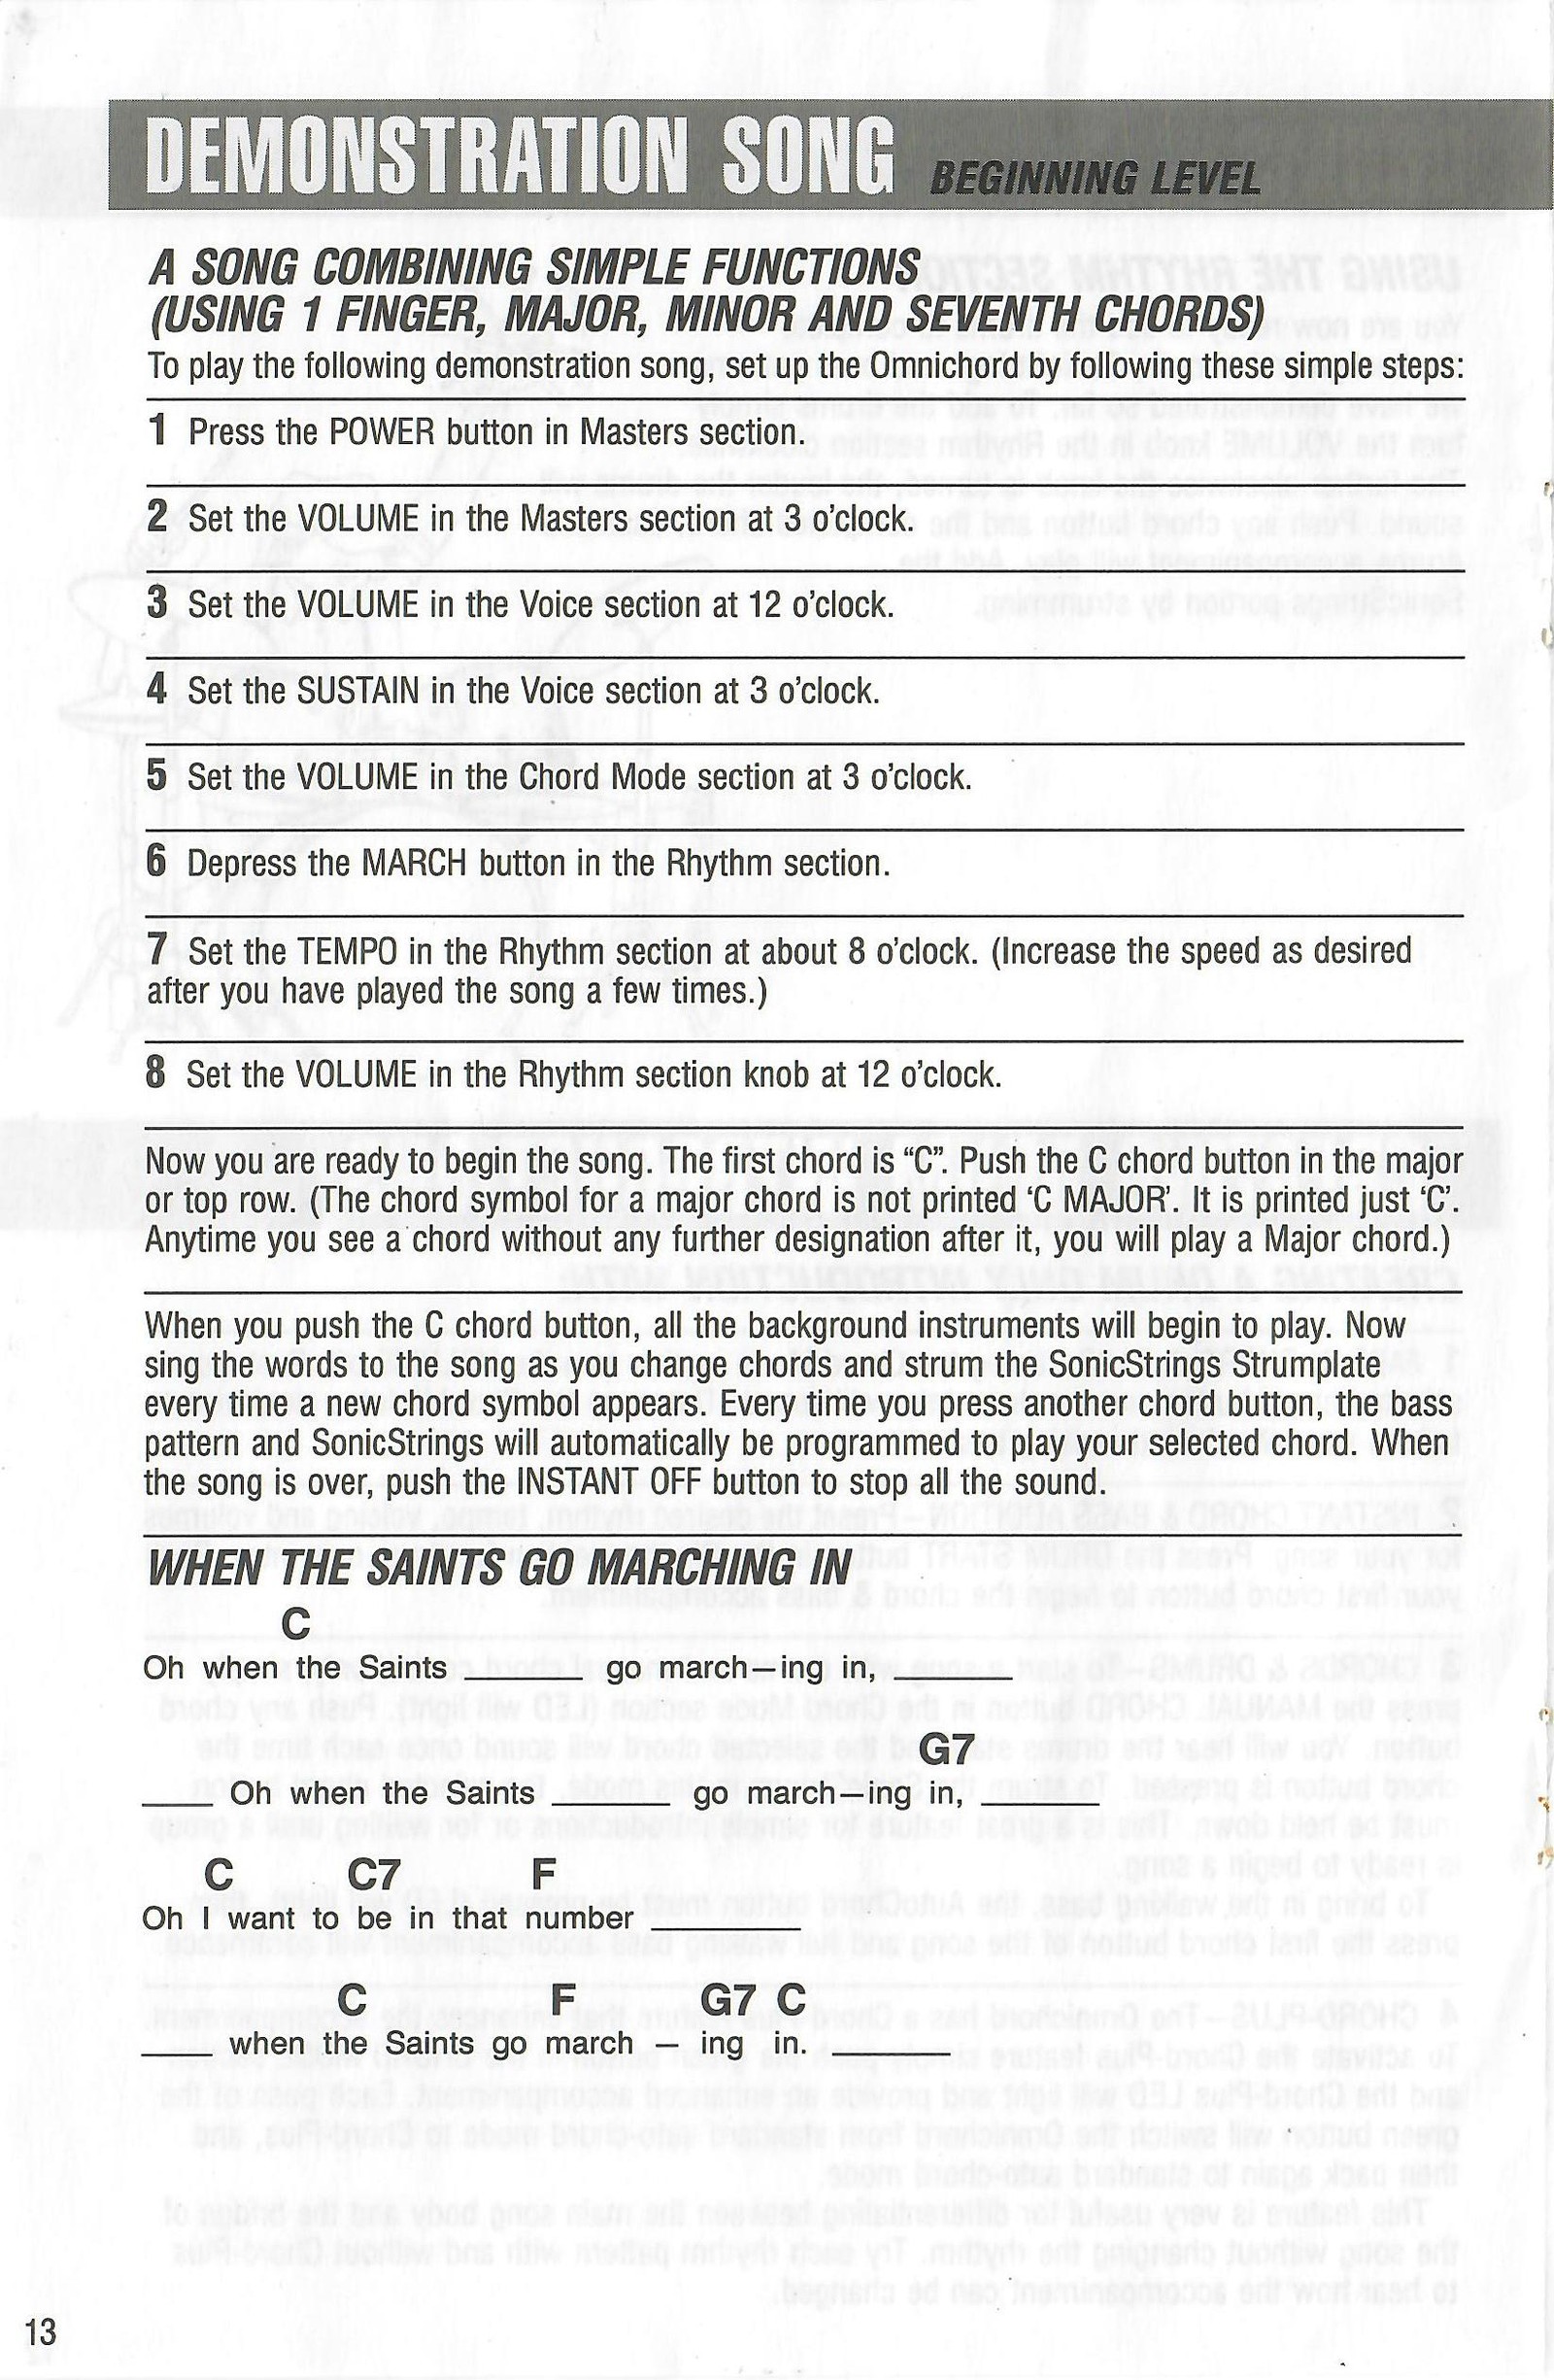
Demonstration Song - Beginning Level
When the Saints Go Marching In
This song combines simple functions using one-finger major, minor and seventh chords. Set up the OM-300 as follows:
Press POWER in the Masters section.
Set Masters VOLUME to 3 o'clock.
Set Voice VOLUME to 12 o'clock.
Set Voice SUSTAIN to 3 o'clock.
Set Chord Mode VOLUME to 3 o'clock.
Press MARCH in the Rhythm section.
Set Rhythm TEMPO to about 8 o'clock; increase the speed after playing the song a few times.
Set Rhythm VOLUME to 12 o'clock.
How to Begin
The first chord is C. Press the C chord button in the major or top row. A chord symbol printed without any further designation means a major chord.
Pressing C starts the background instruments. Sing the words while changing chords and strumming the SonicStrings whenever a new chord symbol appears. Each new chord automatically changes the bass pattern and SonicStrings harmony. Press INSTANT OFF when the song ends.
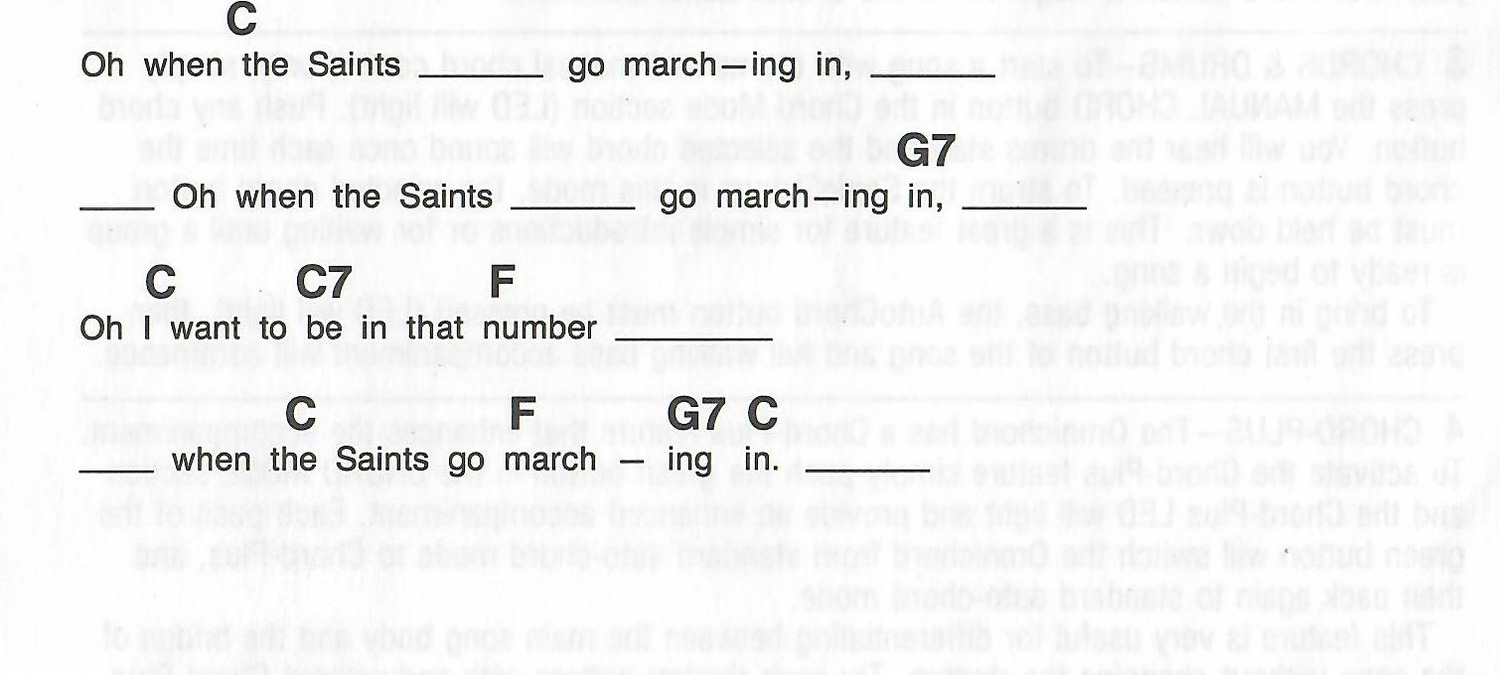
When the Saints Go Marching In
The original top-line chord-and-lyric layout is retained as an image so the chord changes remain aligned with the words.
Original top-line chord and lyric layout for When the Saints Go Marching In.View original scanned 13Original 14
OM-300
Chord Memory
Memory programming
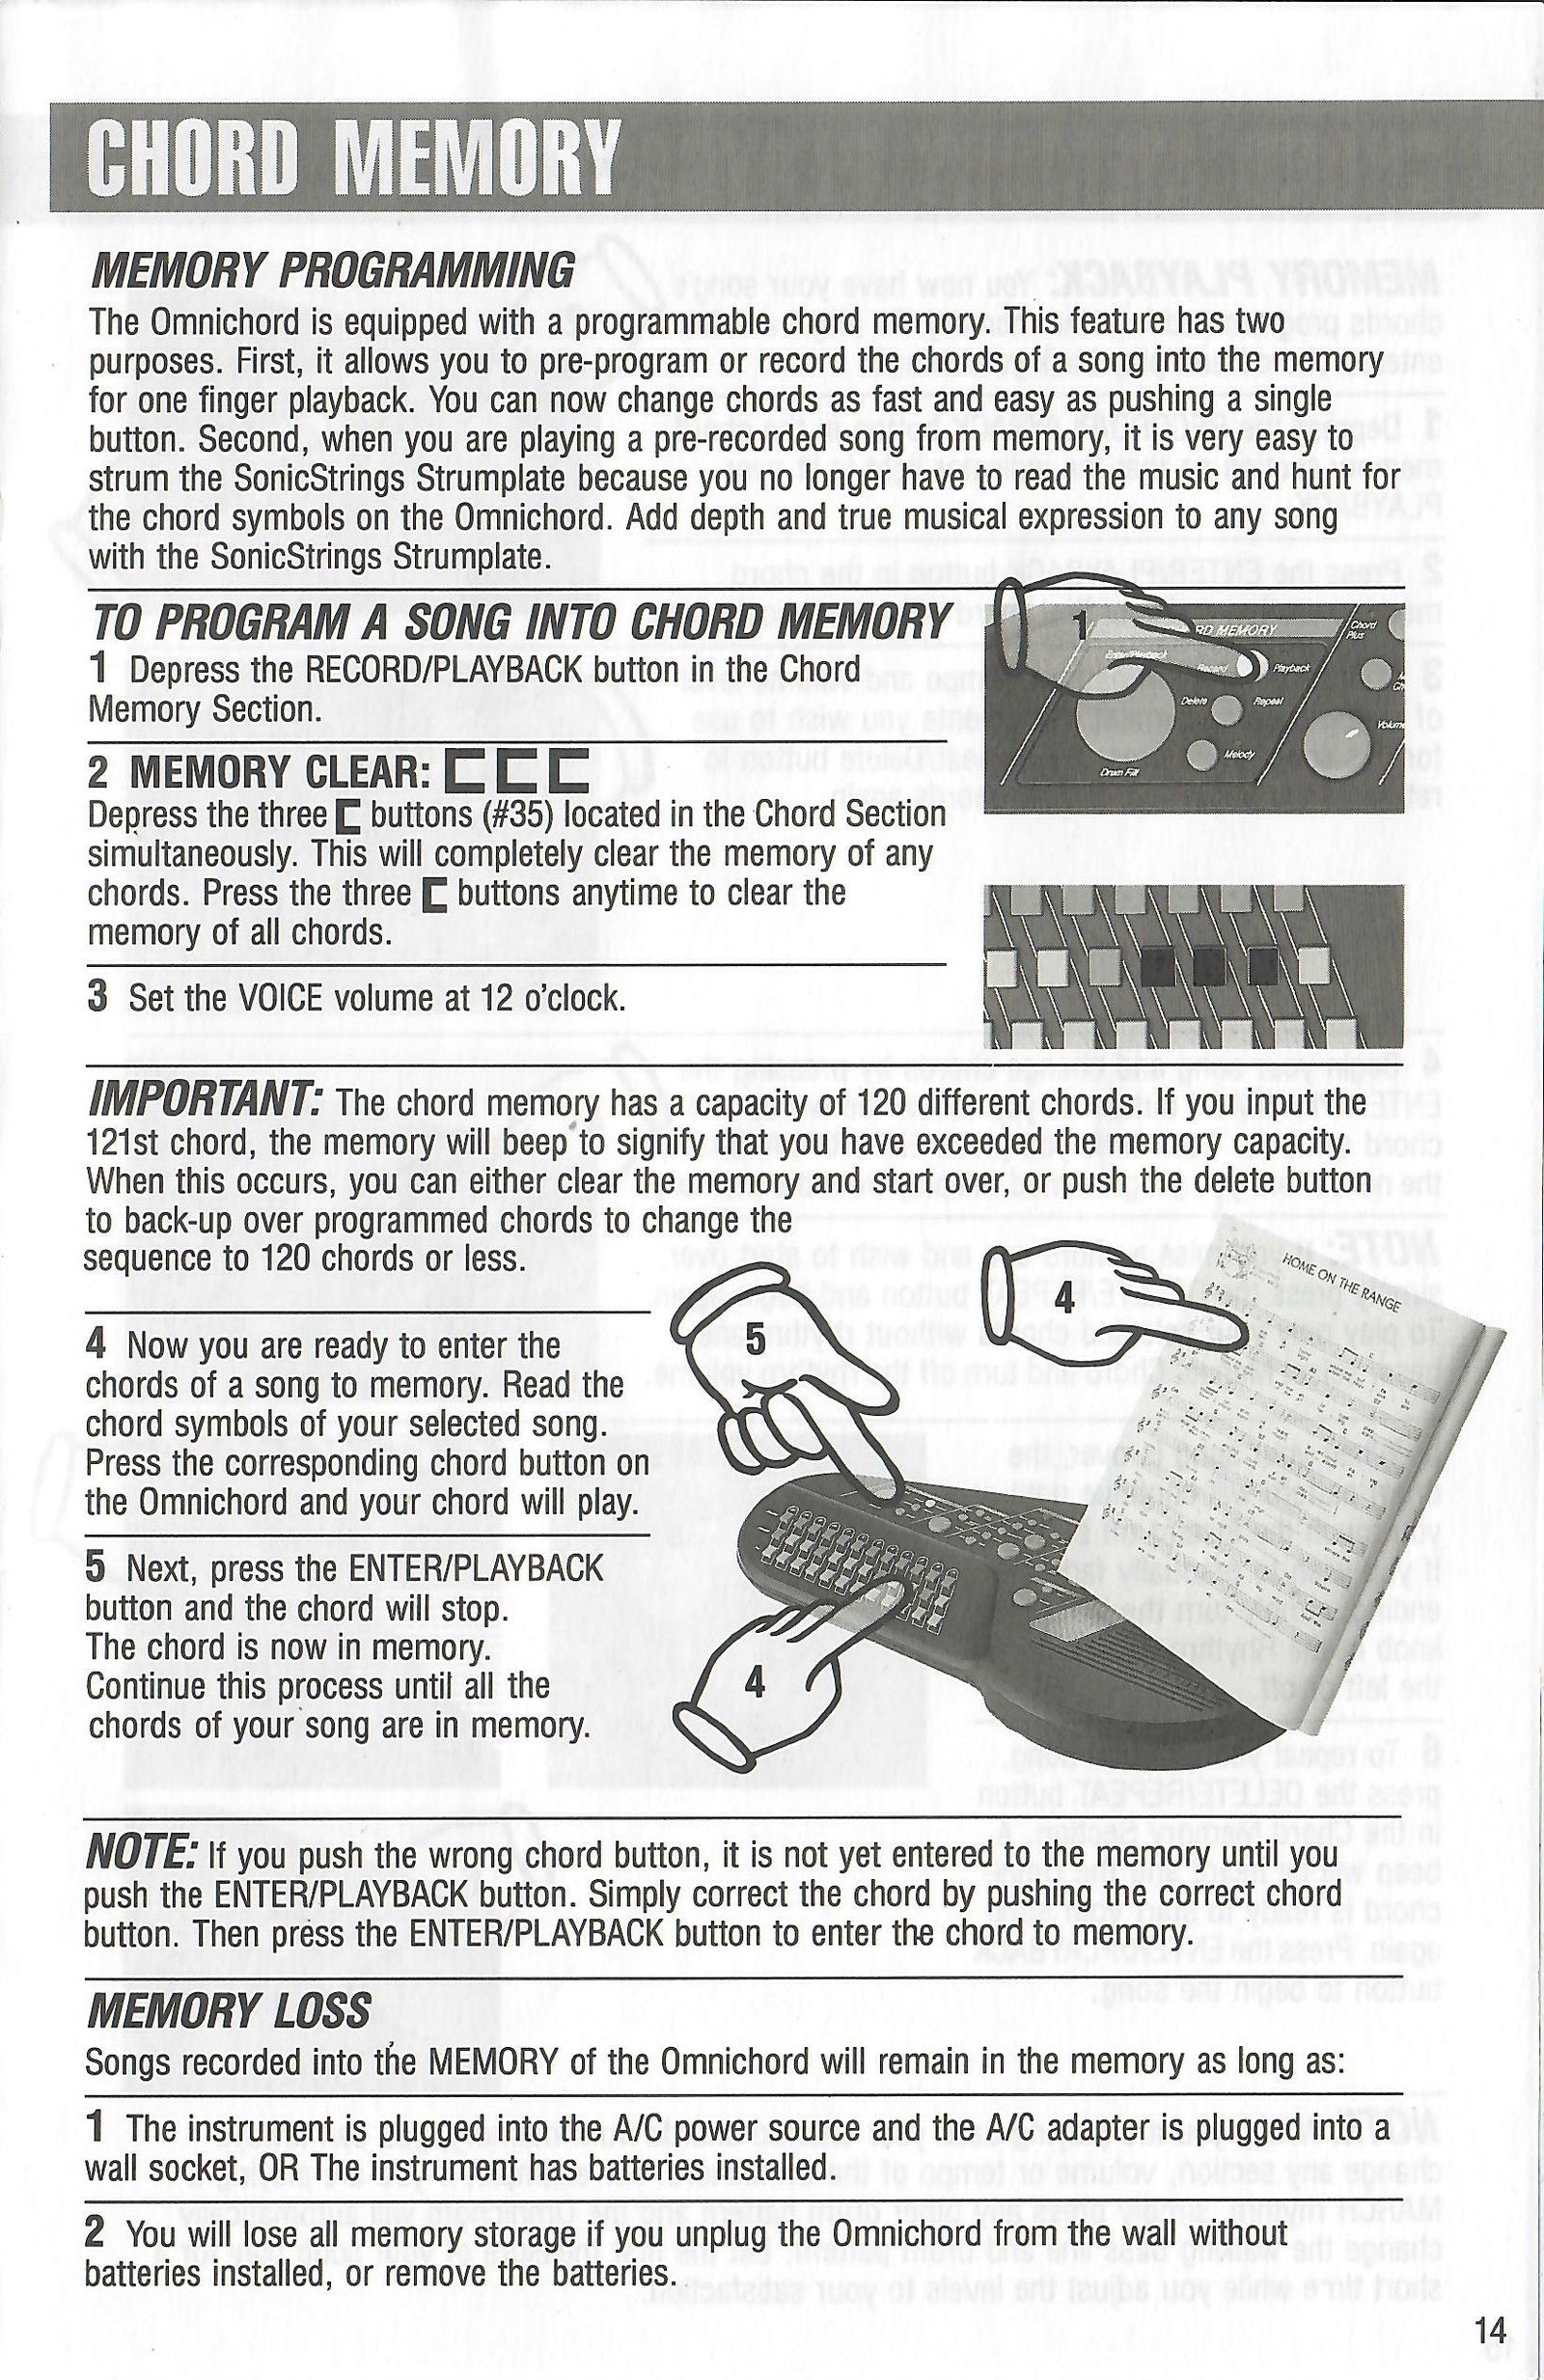
The OM-300's programmable chord memory has two purposes. It lets you pre-program a song's chords for one-finger playback, and it makes the SonicStrings easier to strum because you no longer need to read the music and hunt for each chord button during playback.
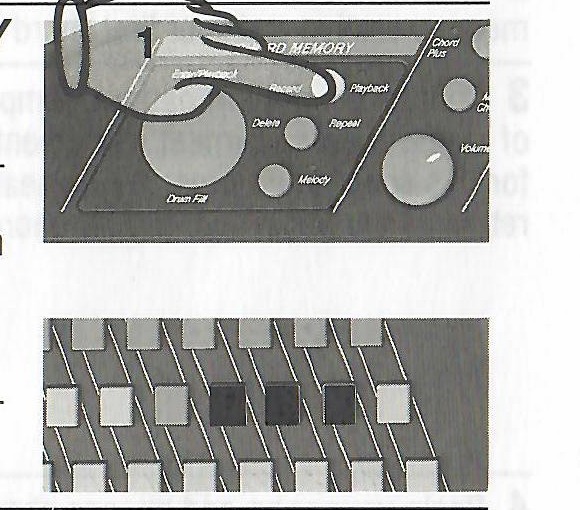
Press RECORD/PLAYBACK in the Chord Memory section.
MEMORY CLEAR - Press the three CLEAR MEMORY buttons (#35) simultaneously. This removes all stored chords.
Set Voice volume to 12 o'clock.
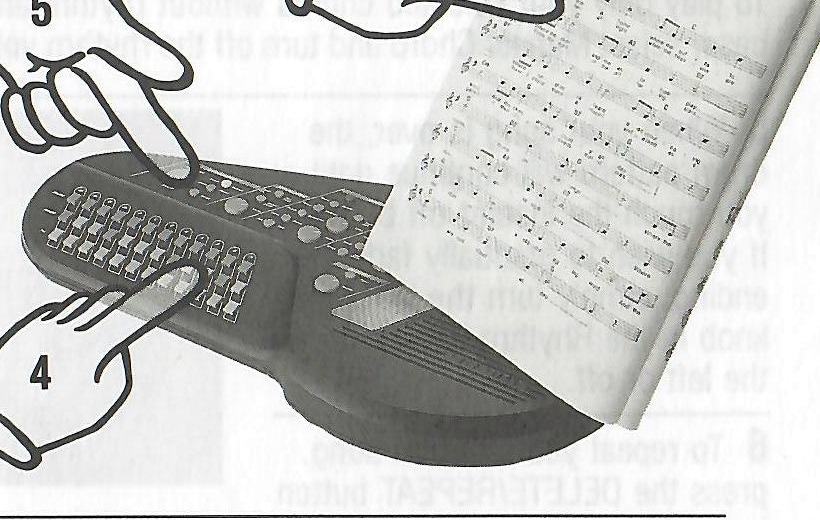
Read the chord symbols of the selected song and press the corresponding chord button.
Press ENTER/PLAYBACK. A beep sounds, the chord stops and the chord is stored. Continue until the song is complete.
Memory Loss
Stored songs remain in memory while the A/C adapter remains connected to a powered wall socket, or while the instrument has battery power.
Memory is lost if the adapter is disconnected without batteries installed, or if the batteries are removed.
Chord-memory record/playback and three-button memory-clear controls.Hands selecting a chord from sheet music and entering it into memory.View original scanned 14Original 15
OM-300
Chord Memory Playback
Playing back recorded chord sequences
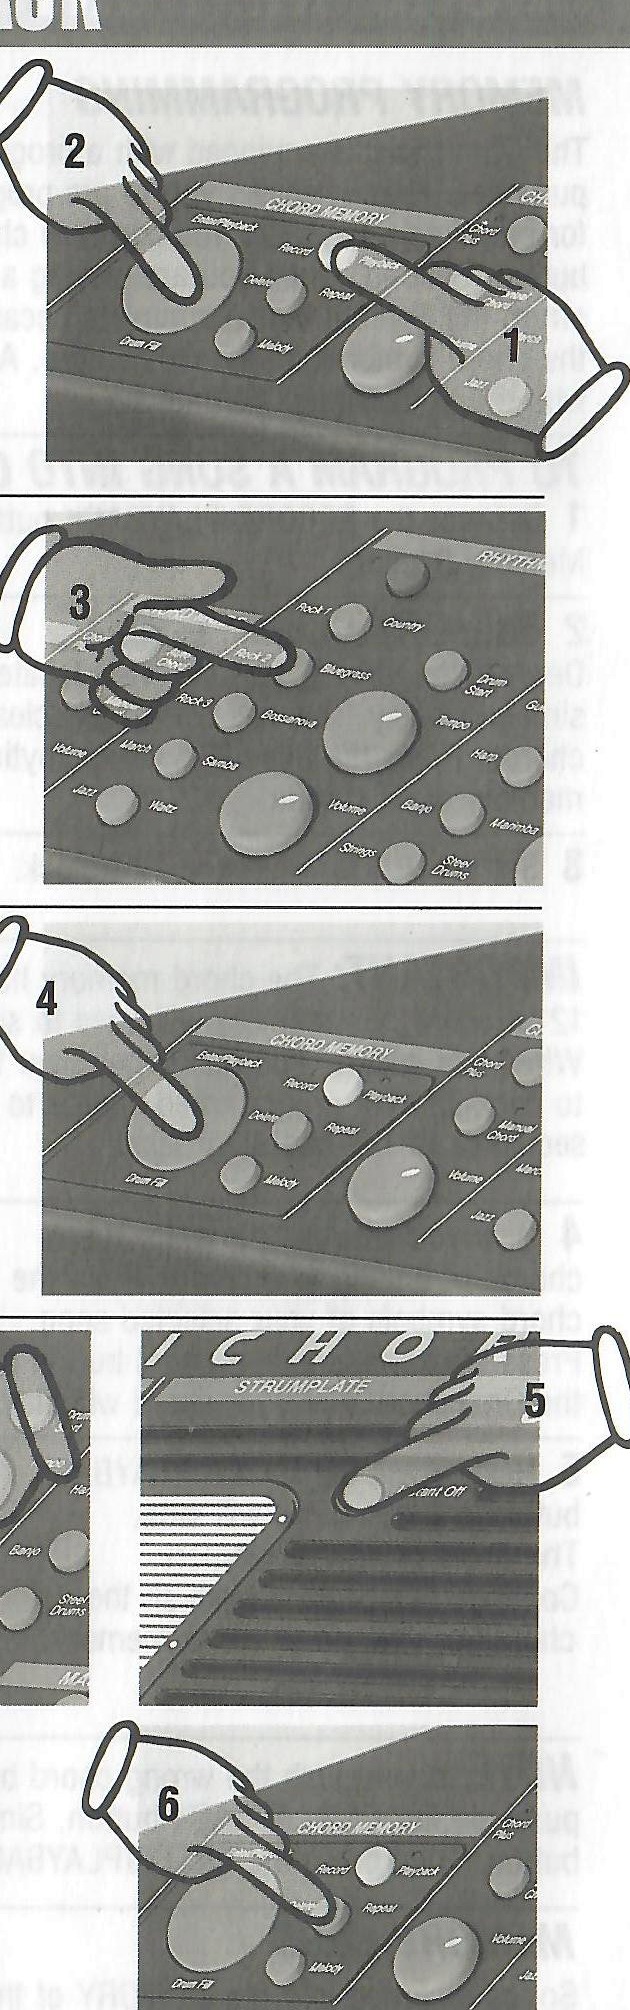
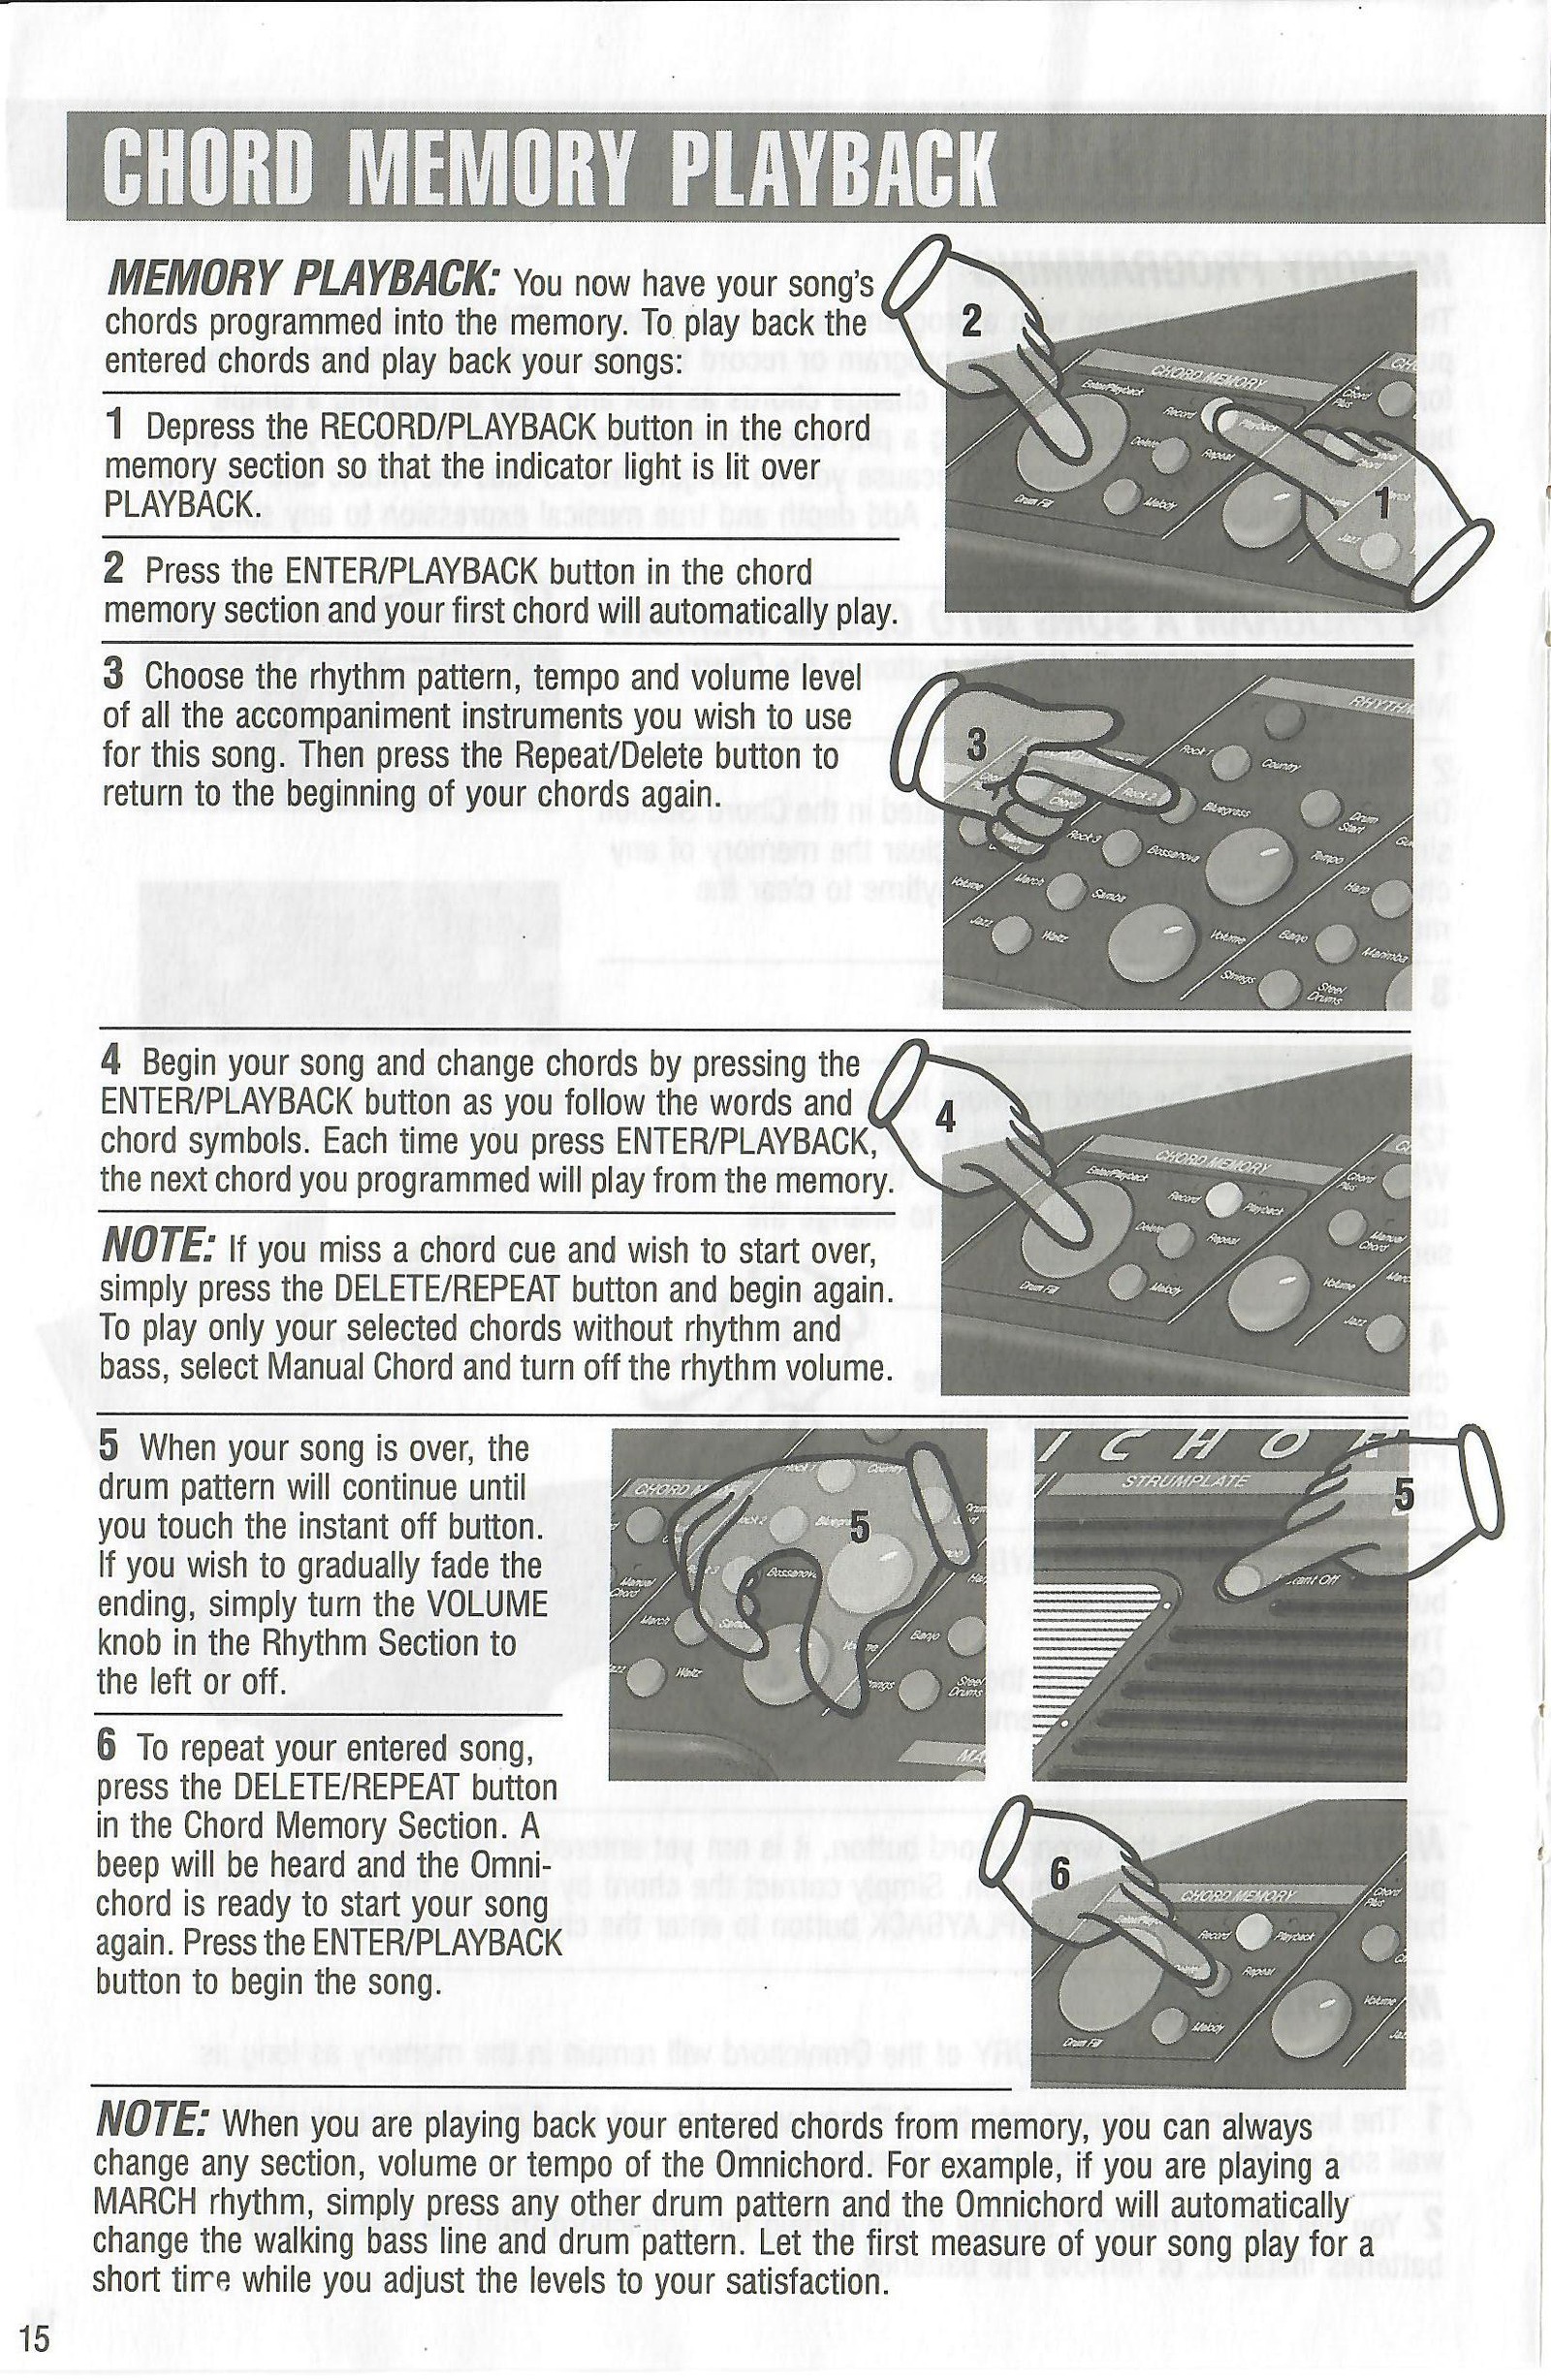
Press RECORD/PLAYBACK so the PLAYBACK indicator is lit.
Press ENTER/PLAYBACK; the first stored chord plays automatically.
Choose the rhythm, tempo and accompaniment levels for the song, then press DELETE/REPEAT to return to the beginning.
Begin the song and press ENTER/PLAYBACK for each chord cue. Each press advances to the next stored chord.
At the end, the drum pattern continues until INSTANT OFF is touched. To fade the ending, turn the Rhythm Section volume down.
To repeat the song, press DELETE/REPEAT, wait for the beep, then press ENTER/PLAYBACK.
Original sequence of record/playback, accompaniment, repeat, fade and instant-off controls.View original scanned 15Original 16
OM-300
Fixing Memory Errors
Delete and Skip
Delete - Insert or Replace a Chord
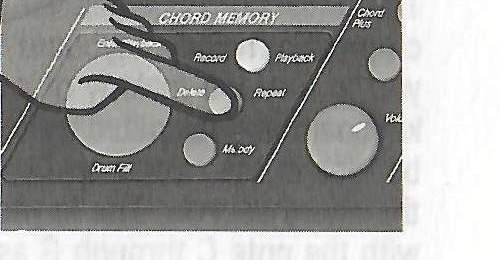
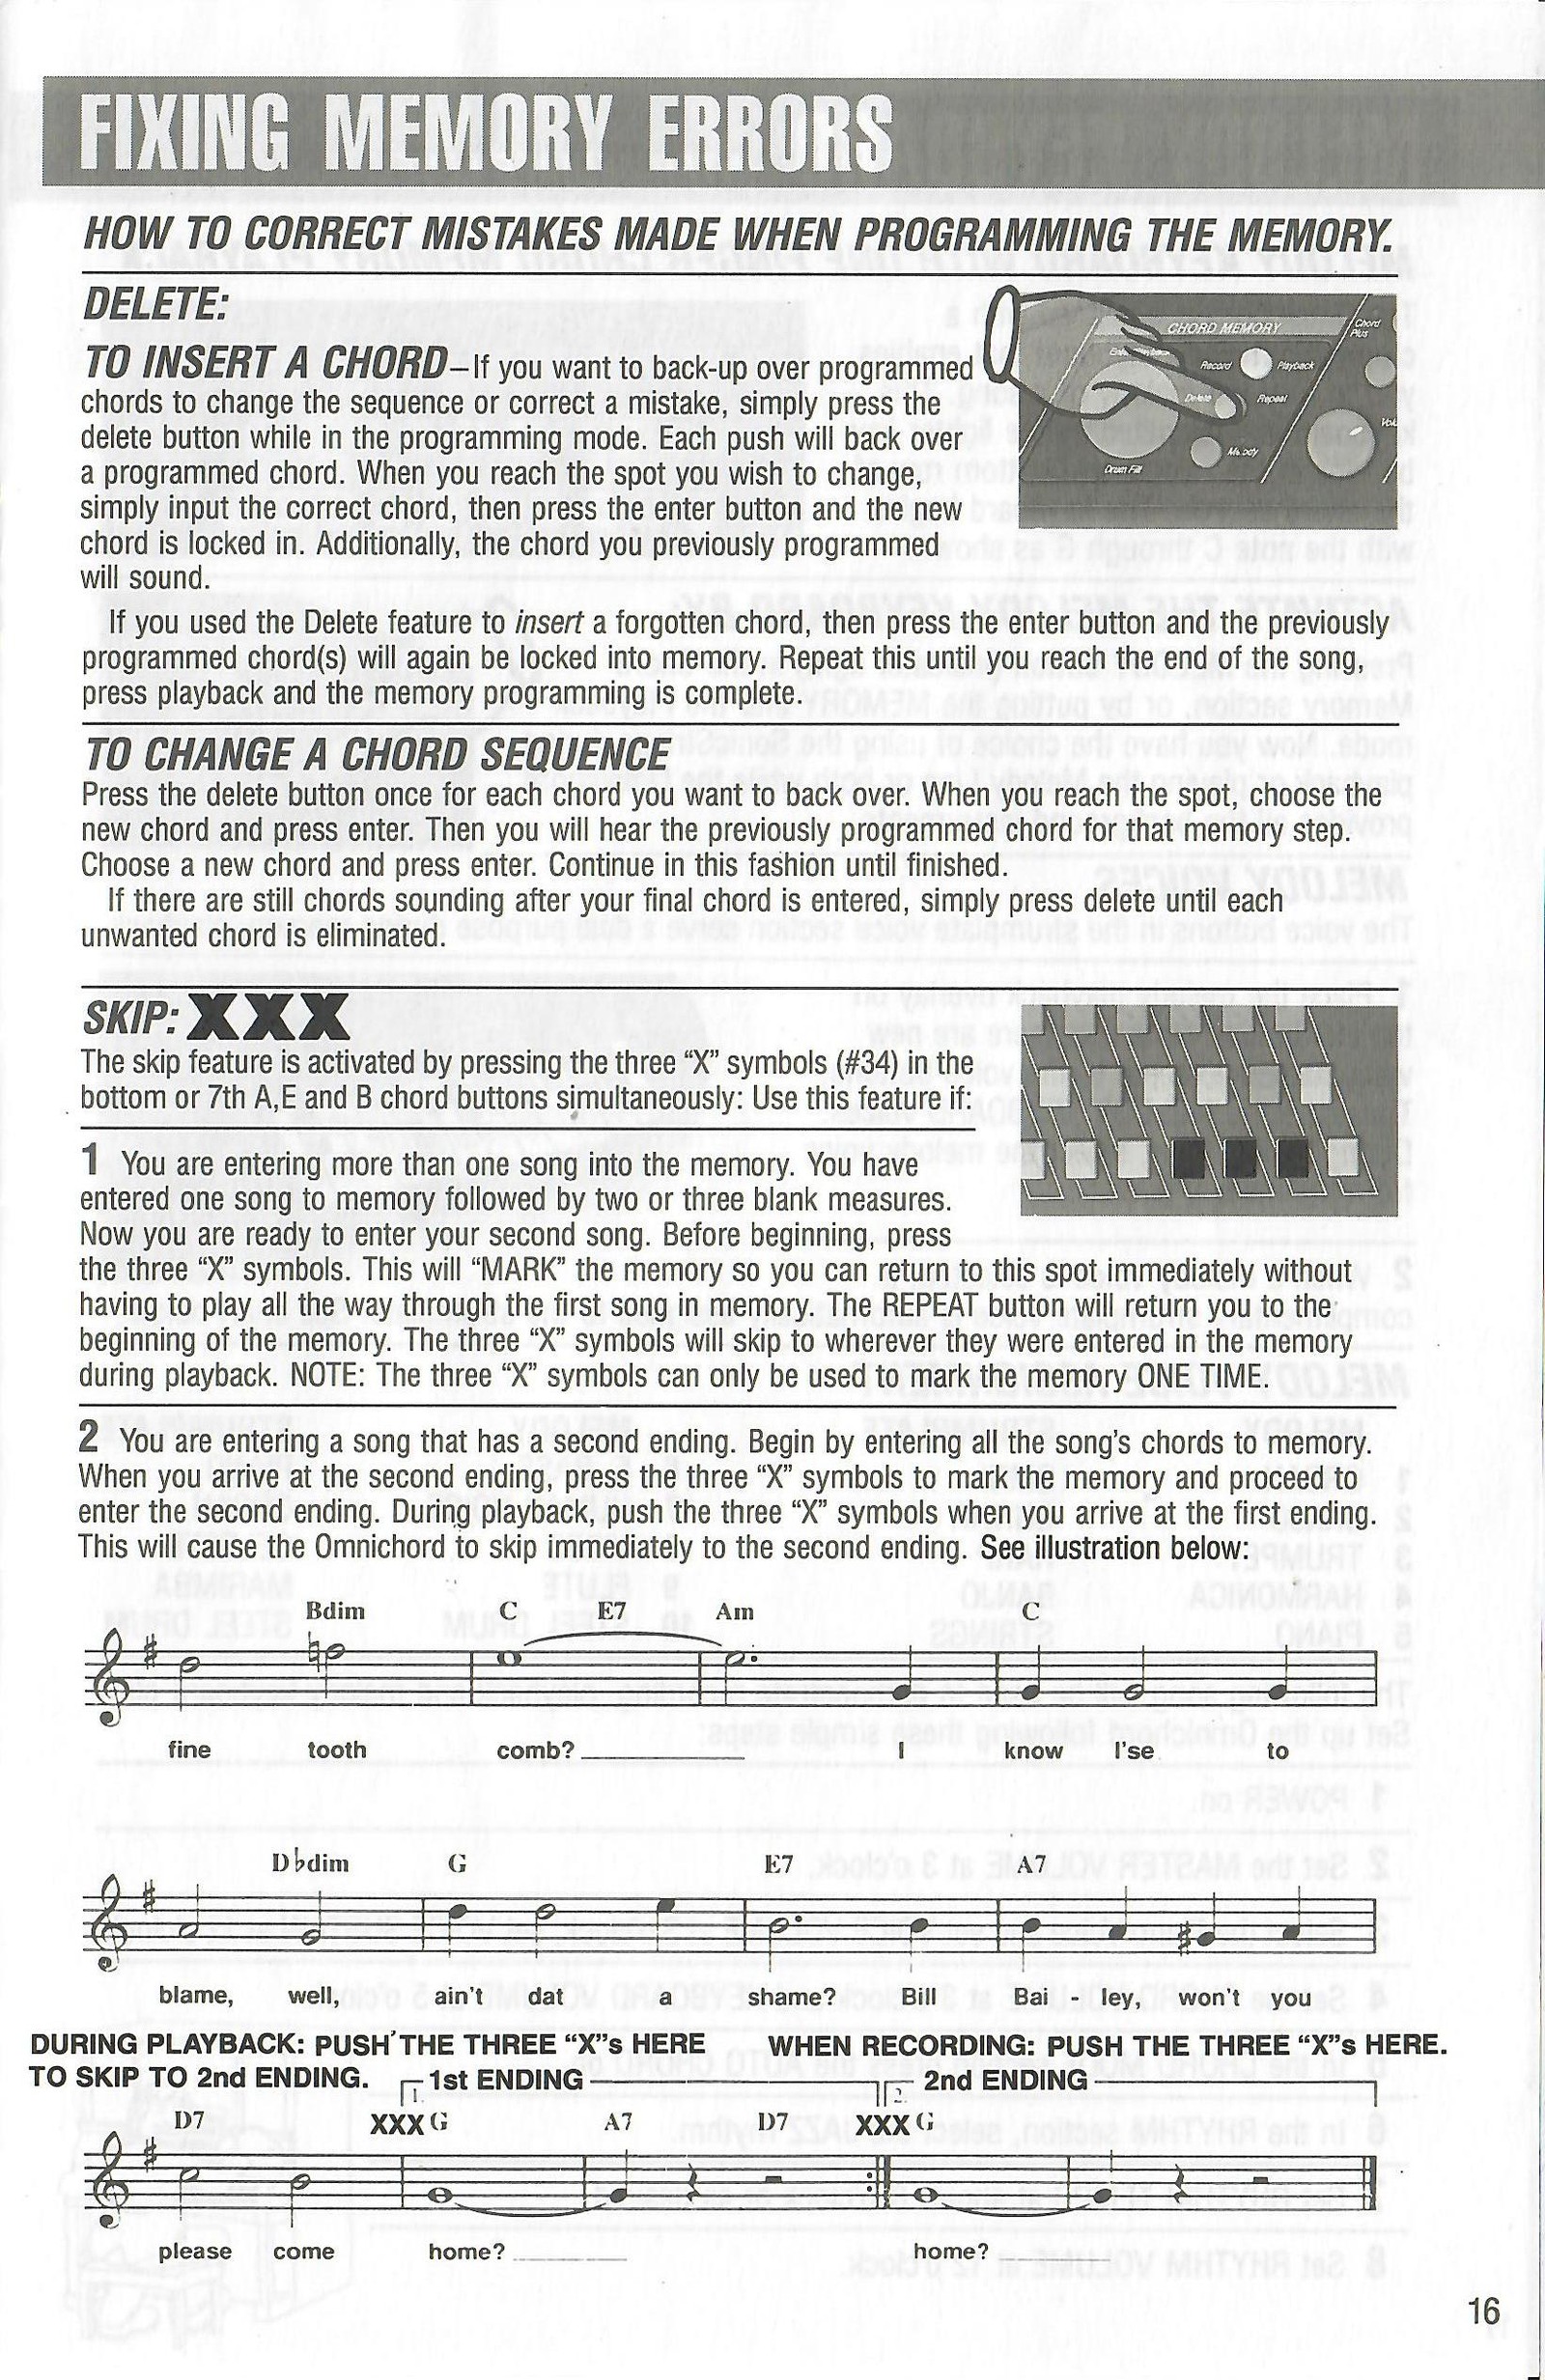
In RECORD mode, press DELETE once for each stored chord you need to move back over. When the required point is reached, select the corrected chord and press ENTER/PLAYBACK. Continue entering or accepting the following chords until the end of the song, then return to PLAYBACK.
If unwanted chords remain after the intended ending, continue pressing DELETE until each one has been removed.
Skip
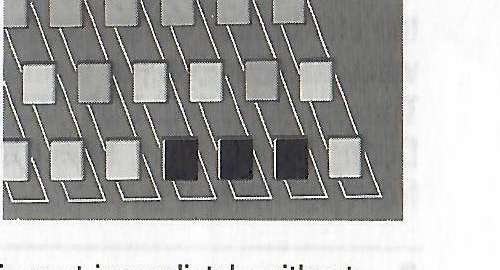
SKIP is activated by pressing the three X-marked A, E and B buttons in the bottom or seventh-chord row simultaneously.
For two songs in memory, store the first song followed by two or three blank measures. Press the three X buttons before entering the second song. During playback, the X buttons jump directly to this mark. Only one Skip mark can be stored.
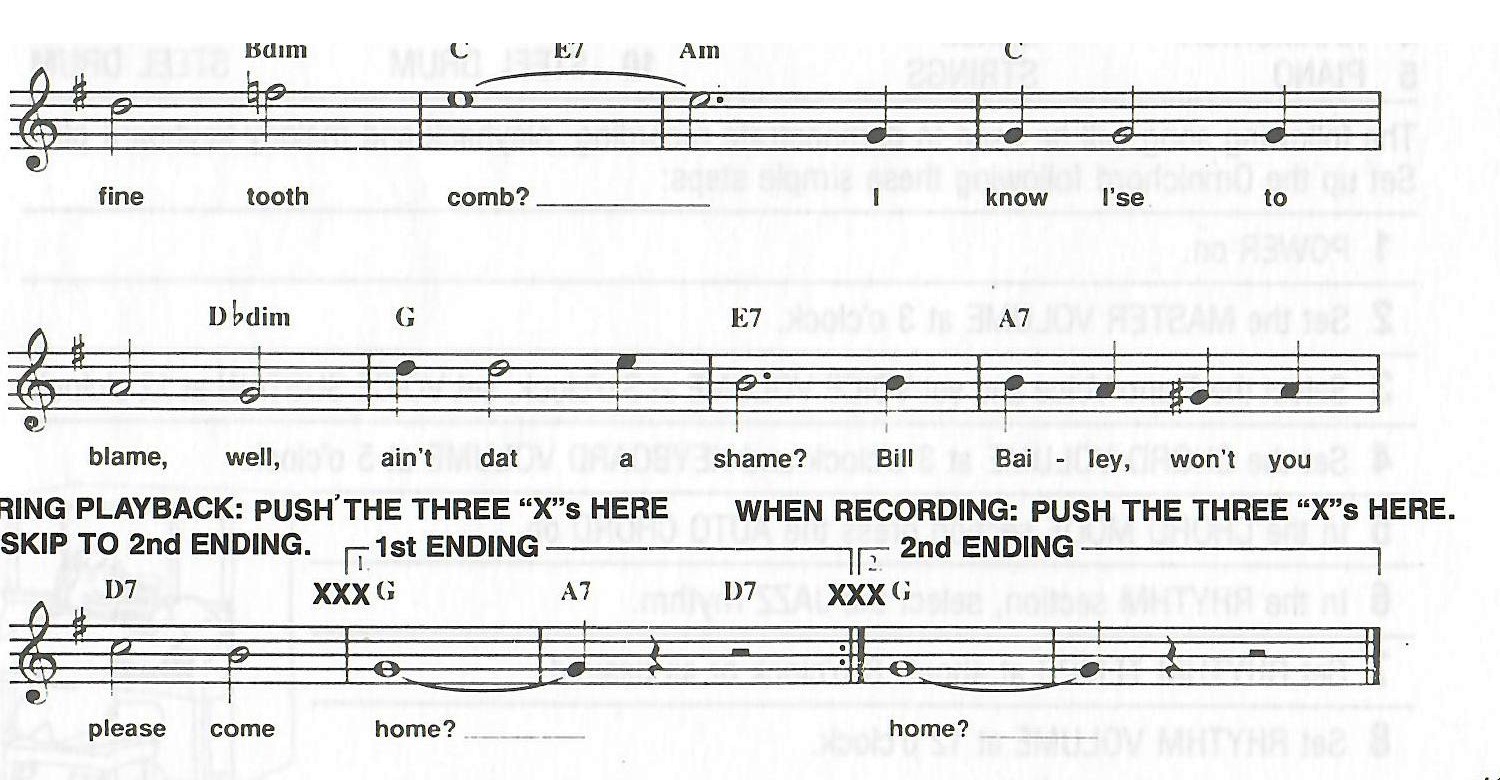
For a song with a second ending, store all chords through the second ending and place the X mark at its beginning. During playback, press the X buttons at the first ending to jump to the second ending.
Delete button control illustration.Three X-marked Skip buttons.Original musical example showing a Skip marker used for a second ending.View original scanned 16Original 17
OM-300
Melody Keyboard - Intermediate Level
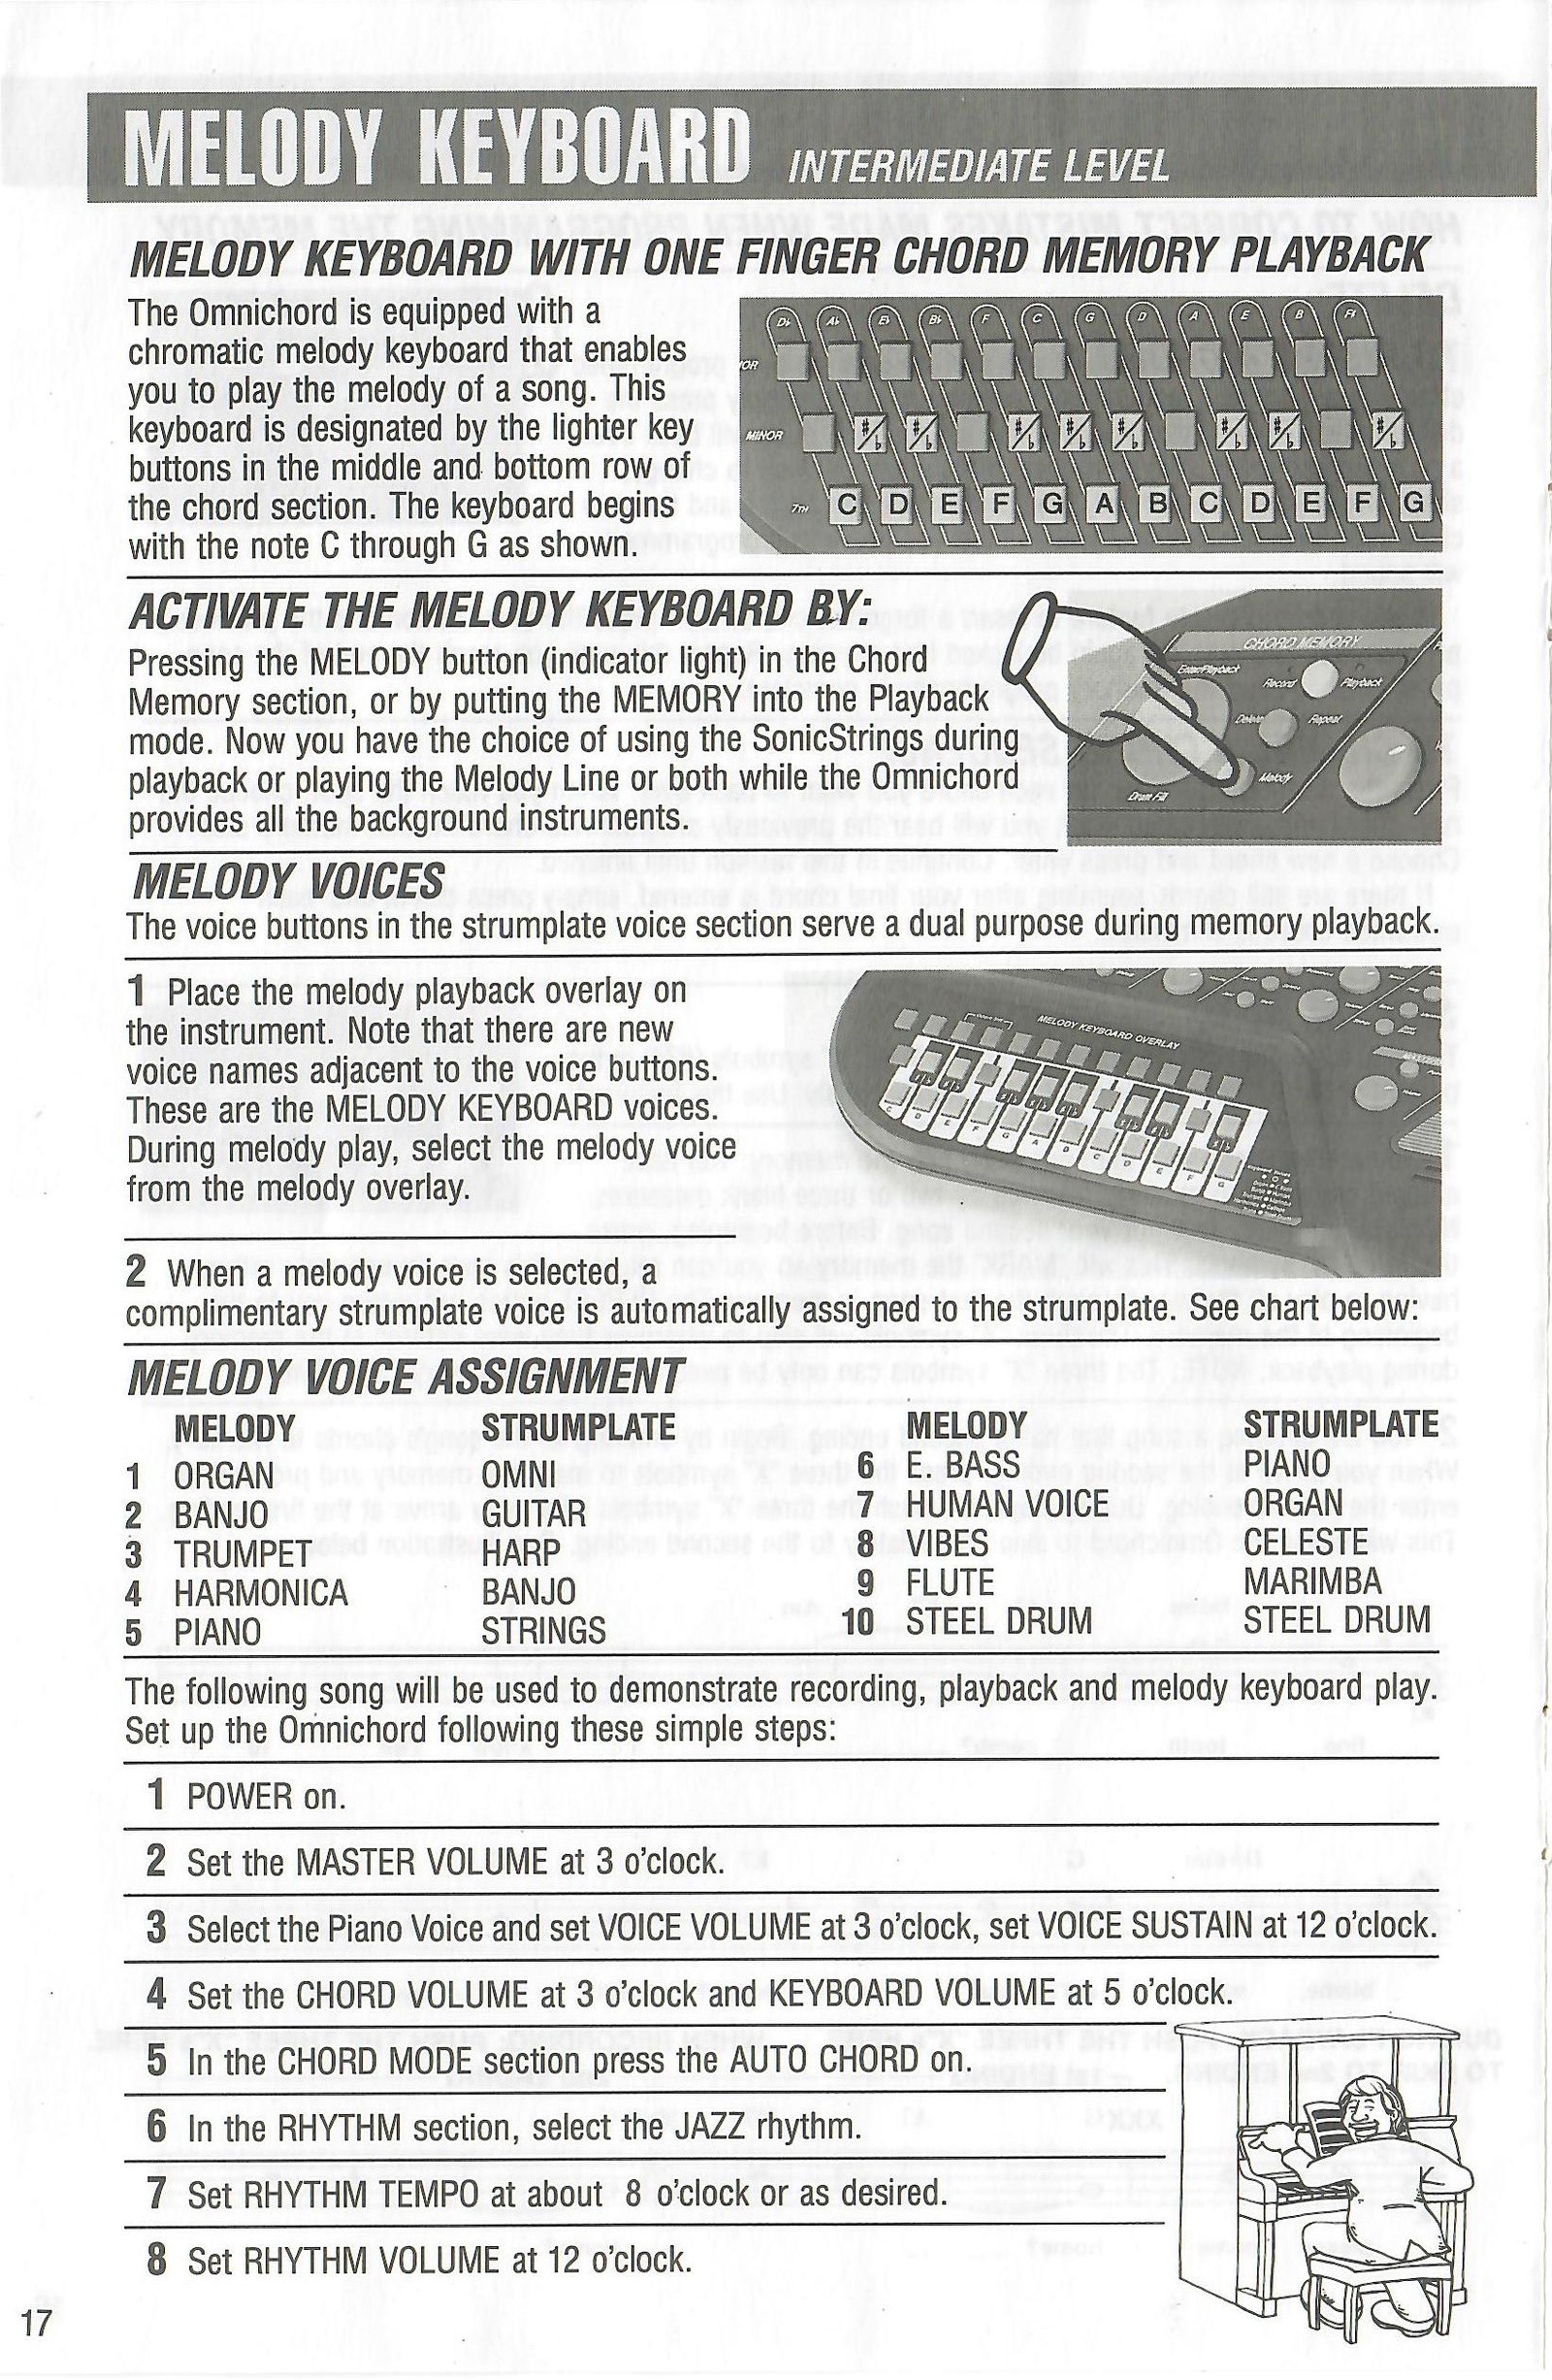
Melody keyboard with one-finger chord-memory playback
The OM-300 has a chromatic melody keyboard formed by the lighter buttons in the middle and bottom chord rows, ranging from C through G. Activate it with the MELODY button or by placing Chord Memory in PLAYBACK mode. You may then use SonicStrings, the melody keyboard or both while the Omnichord supplies the accompaniment.
Fit the melody-keyboard overlay to reveal the ten melody voice names. Selecting a melody voice automatically assigns the paired SonicStrings voice.
Melody/SonicStrings assignments: Organ/Omni; Banjo/Guitar; Trumpet/Harp; Harmonica/Banjo; Piano/Strings; Electric Bass/Piano; Human Voice/Organ; Vibes/Celeste; Flute/Marimba; Steel Drum/Steel Drum.
Turn POWER on.
Set MASTER VOLUME to 3 o'clock.
Select Piano; set Voice VOLUME to 3 o'clock and Voice SUSTAIN to 12 o'clock.
Set CHORD VOLUME to 3 o'clock and KEYBOARD VOLUME to 5 o'clock.
Turn AUTO CHORD on in the Chord Mode section.
Select JAZZ in the Rhythm section.
Set Rhythm TEMPO to about 8 o'clock or as desired.
Set Rhythm VOLUME to 12 o'clock.
Chromatic melody-keyboard notes marked on the OM-300 chord buttons.View original scanned 17Original 18
OM-300
Demonstration Song - Intermediate Level
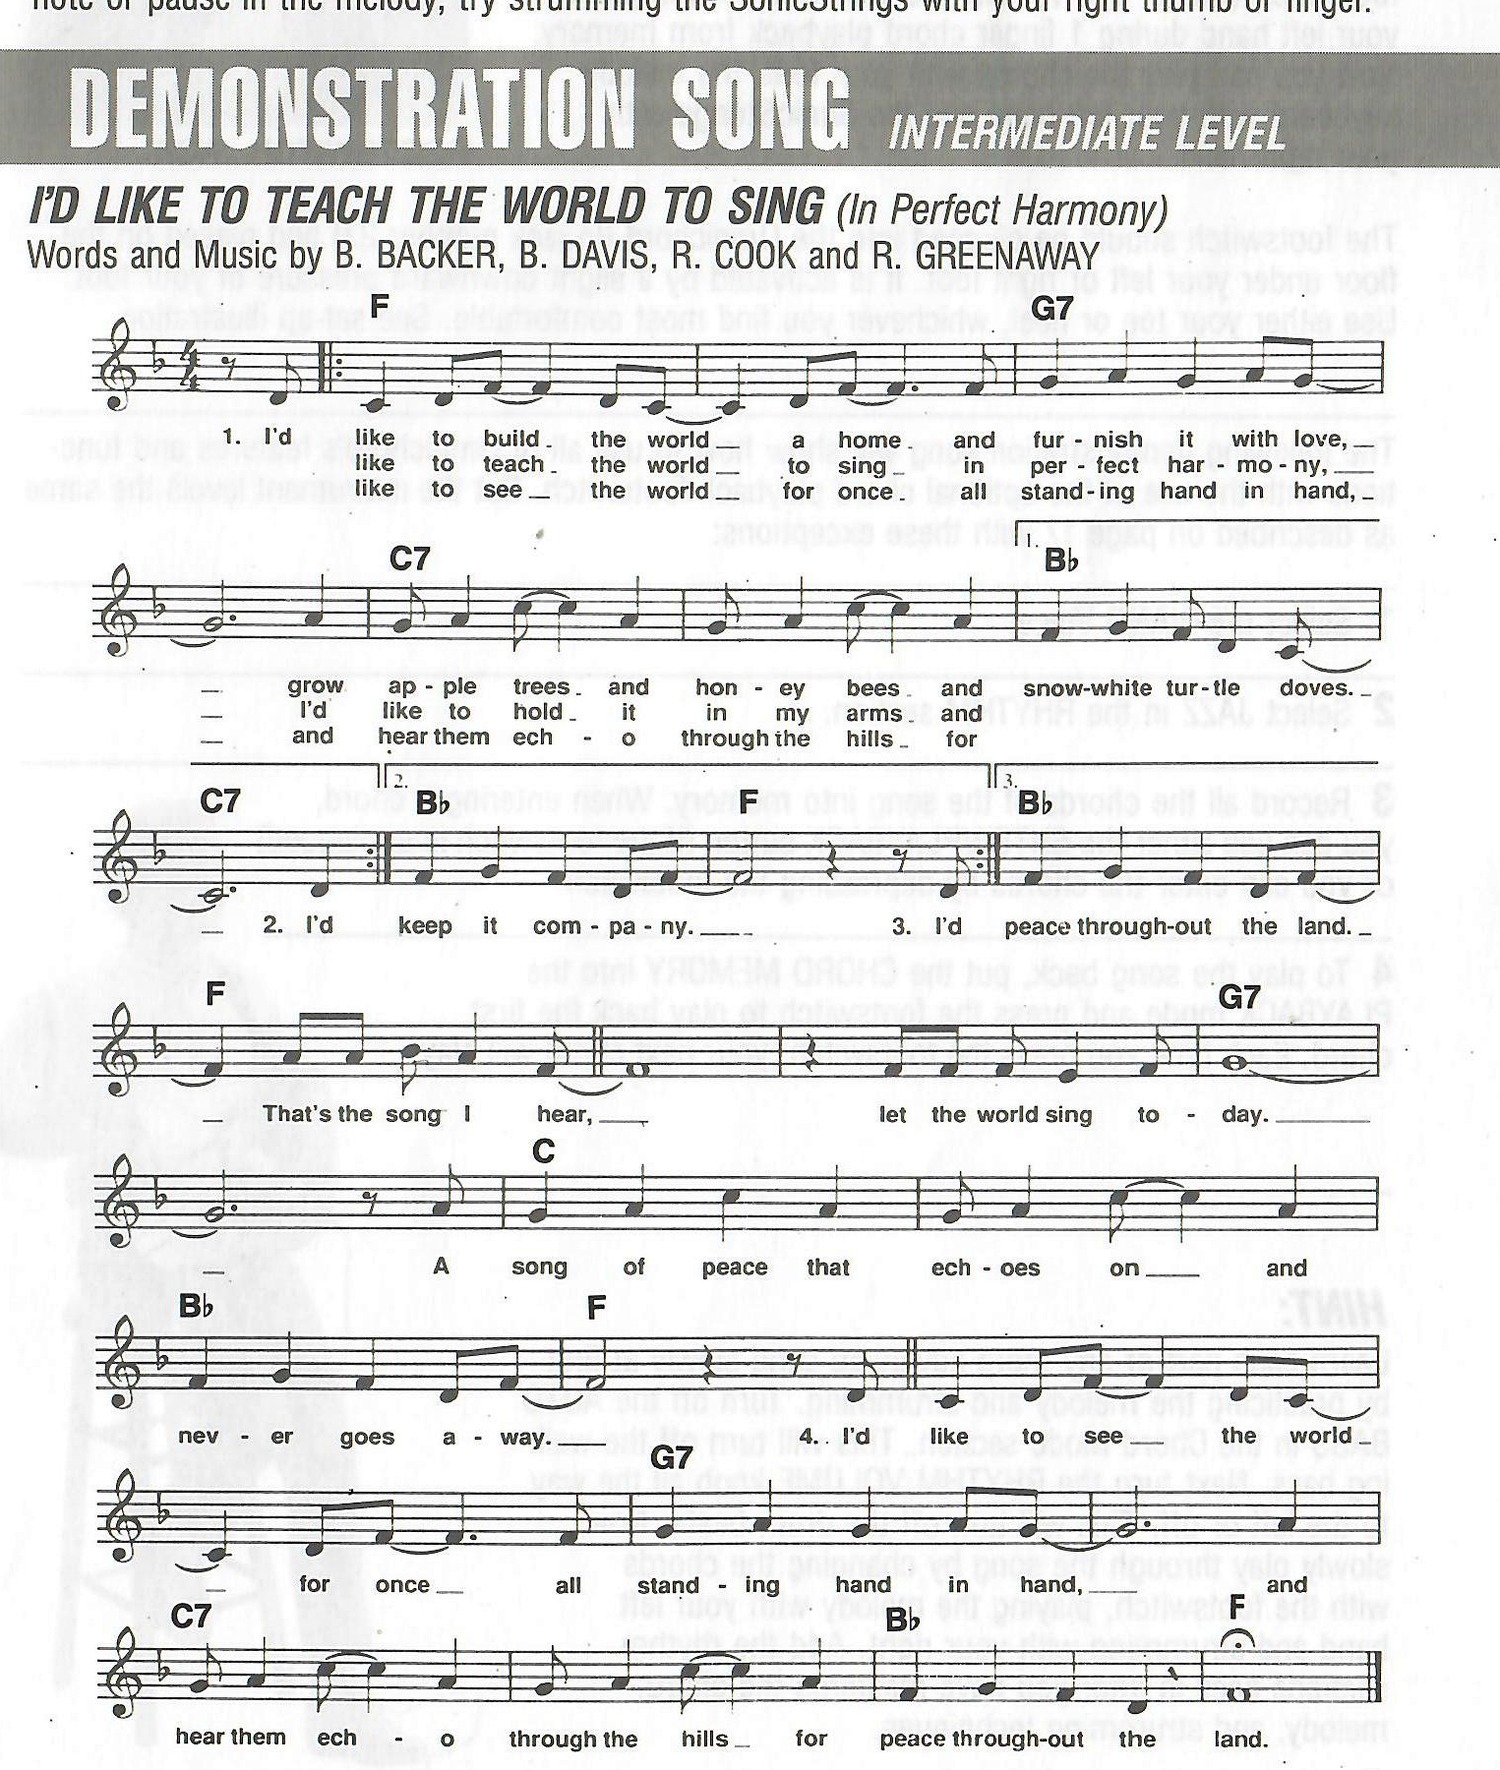
I'd Like to Teach the World to Sing (In Perfect Harmony)
Continue the intermediate demonstration-song preparation:
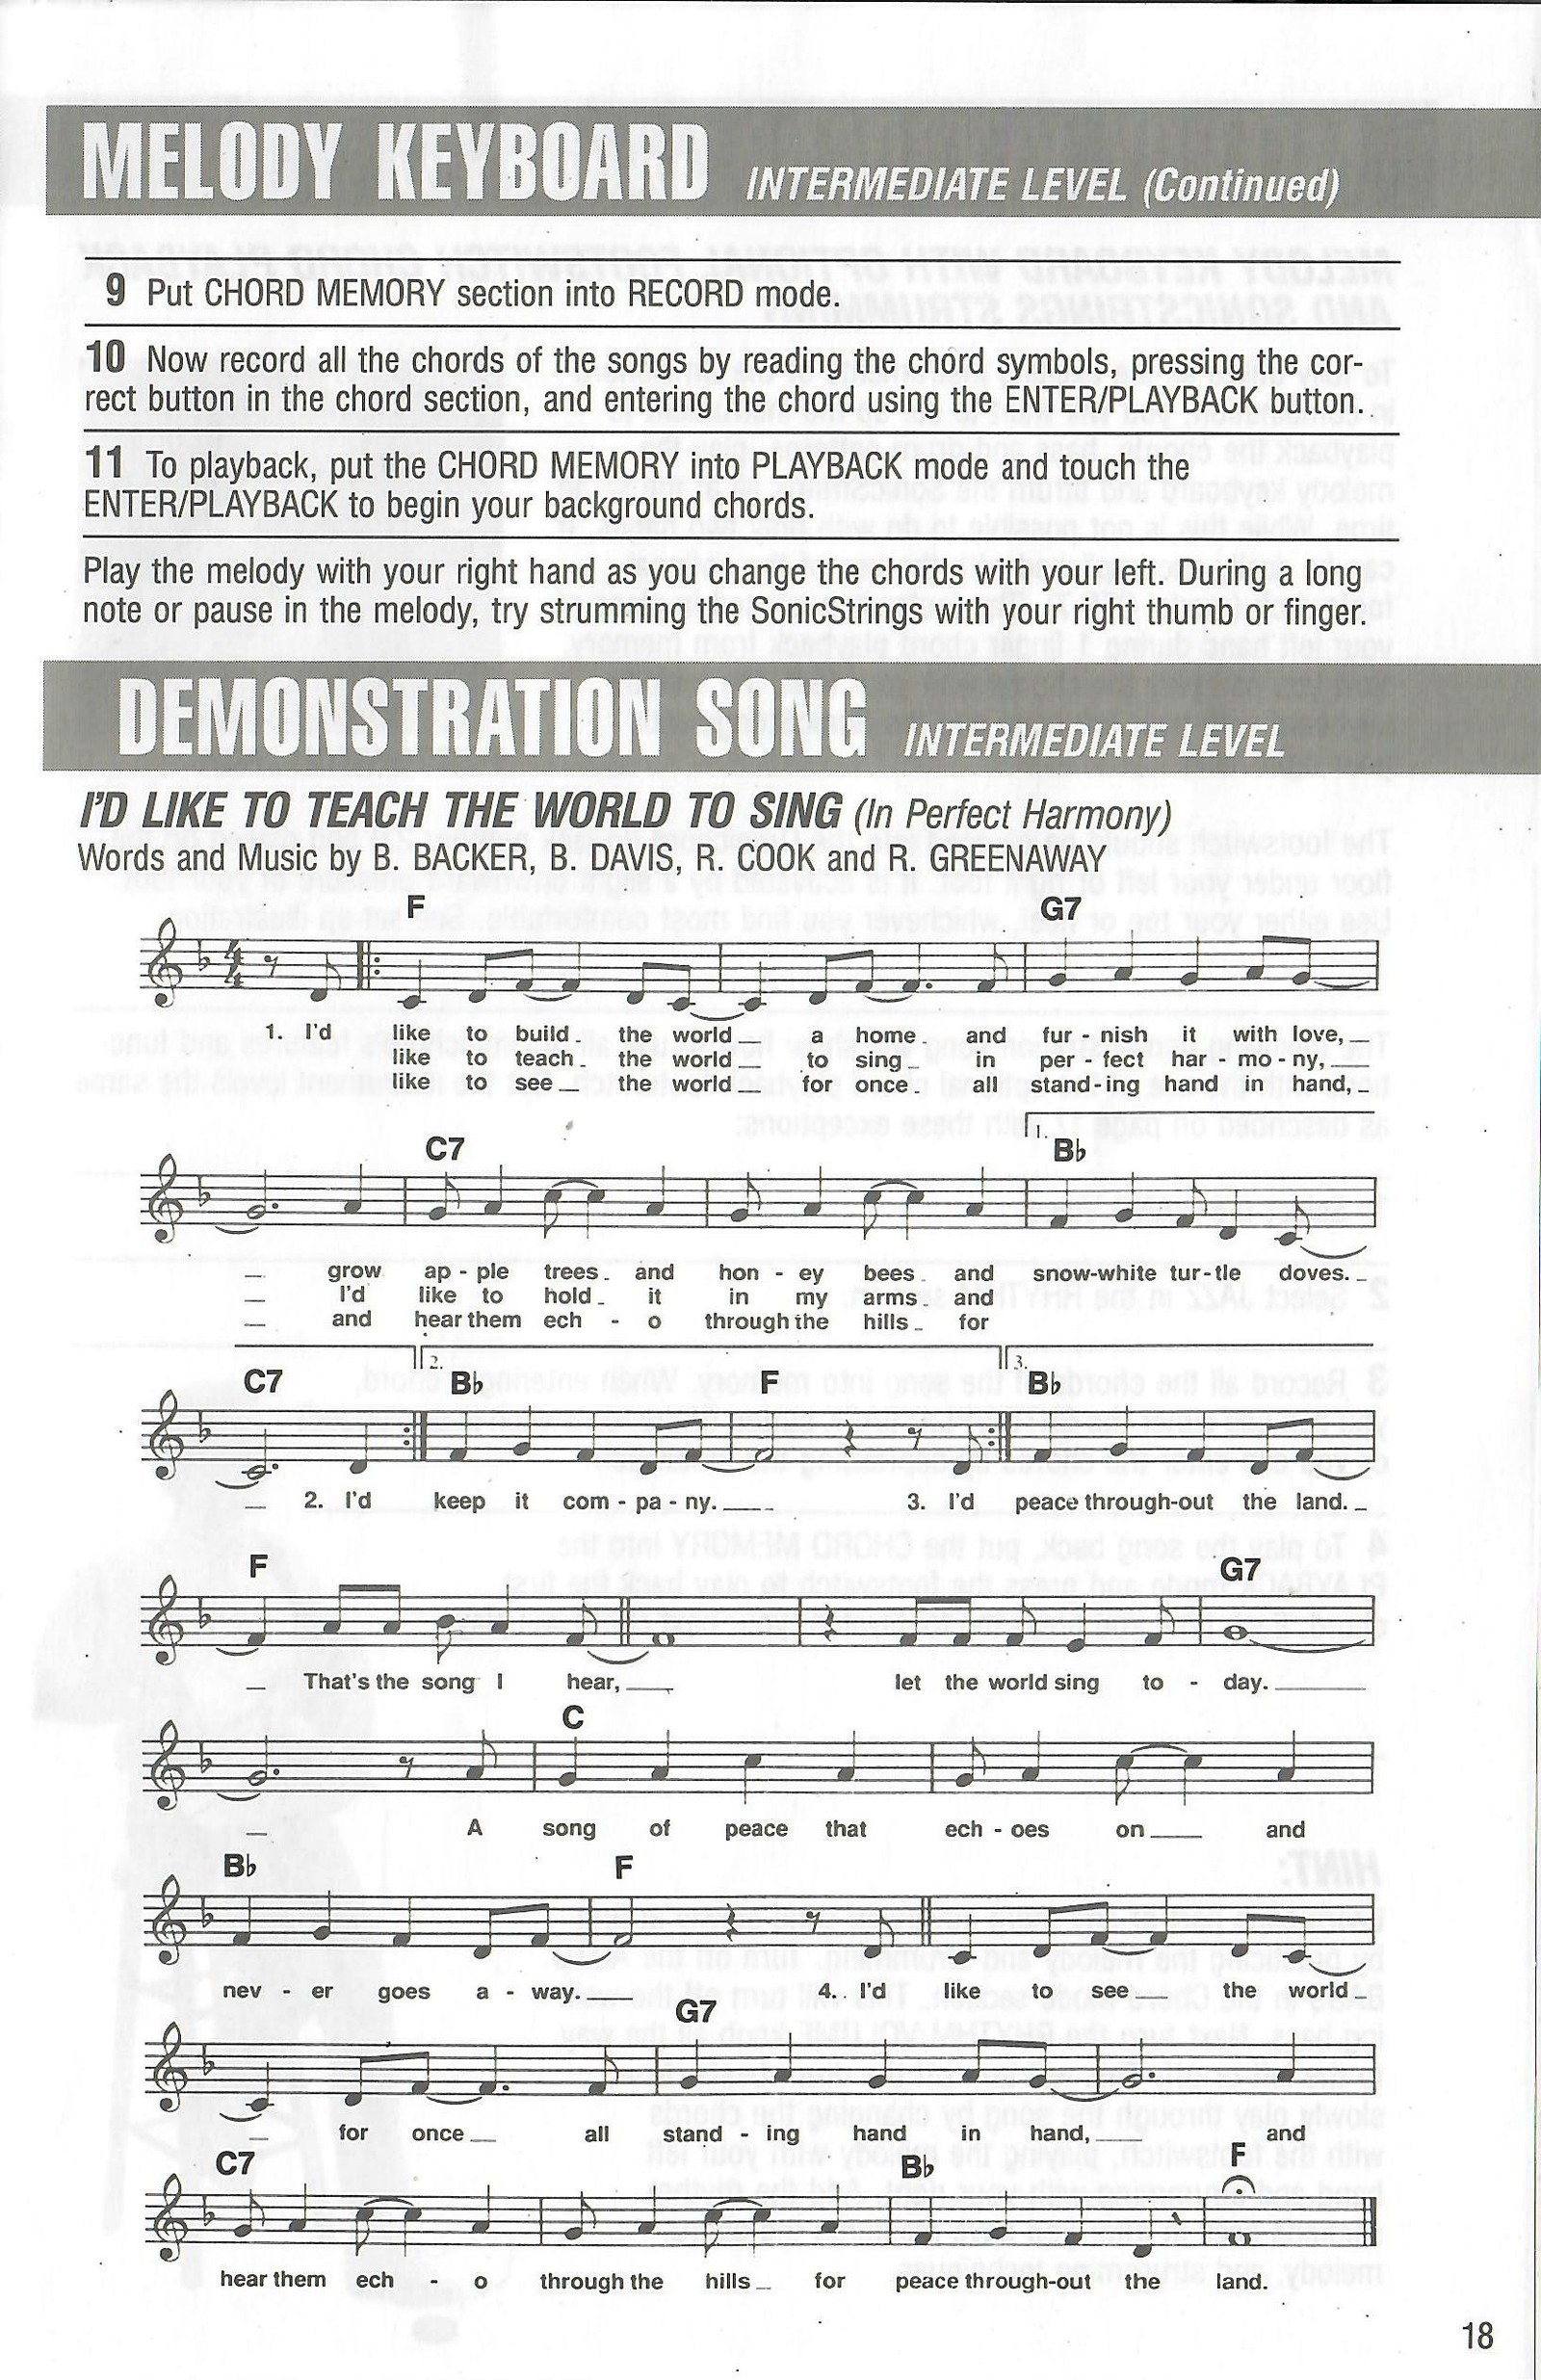
Words and music by B. Backer, B. Davis, R. Cook and R. Greenaway. The complete score, lyrics and chord alignment are retained as an image.
Put Chord Memory into RECORD mode.
Record the song's chords, pressing ENTER/PLAYBACK after each selection.
Put Chord Memory into PLAYBACK and press ENTER/PLAYBACK to begin. Play melody with the right hand while changing chords with the left; strum during long notes or pauses.
Original score for I'd Like to Teach the World to Sing with melody, lyrics and chord symbols.View original scanned 18Original 19
OM-300
Melody Keyboard - Advanced Level
Optional footswitch chord playback and SonicStrings strumming
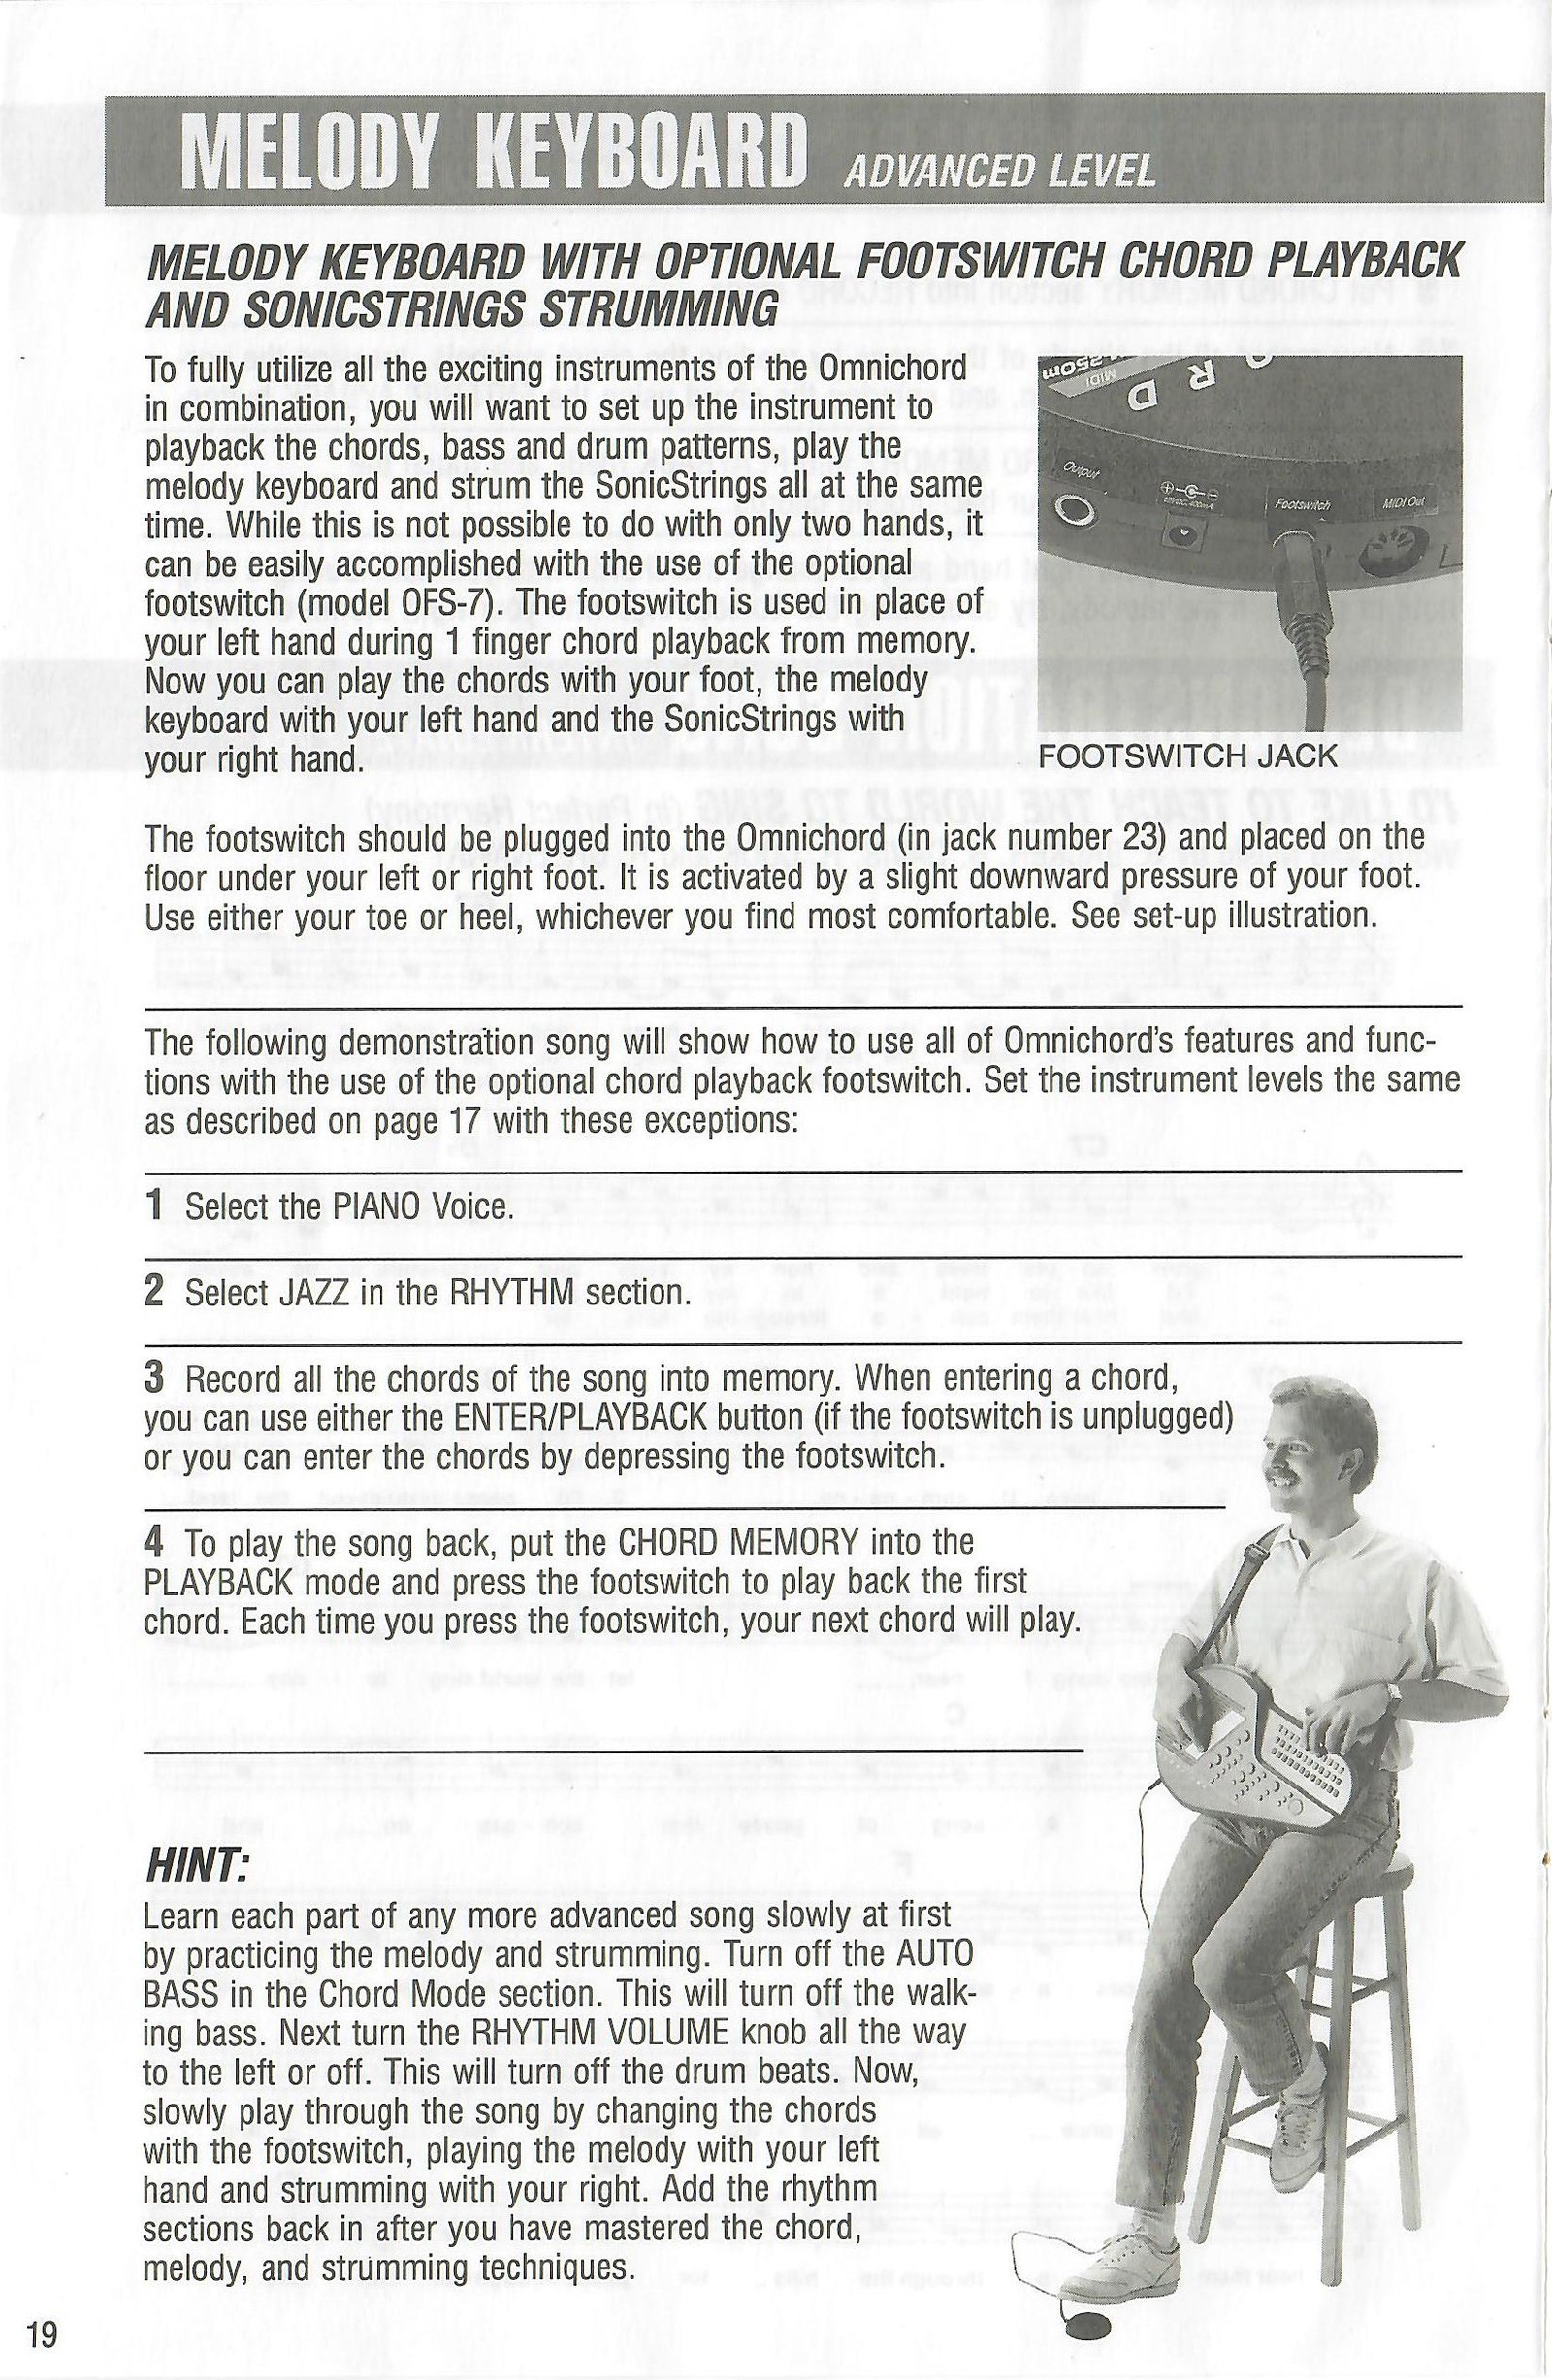
The optional OFS-7 footswitch replaces the left hand during chord-memory playback, allowing chords to be advanced with the foot while the left hand plays the melody keyboard and the right hand strums SonicStrings.
Connect the footswitch to jack 23 and place it under either foot. Slight pressure with the toe or heel activates it.
Use the page 17 settings with these exceptions:
Select Piano voice.
Select JAZZ in the Rhythm section.
Record the song's chords into memory. Enter chords with ENTER/PLAYBACK, or with the footswitch when connected.
For playback, put Chord Memory in PLAYBACK mode and press the footswitch for the first and each subsequent chord.
OFS-3 footswitch connected to the OM-300 footswitch jack.View original scanned 19Original 20
OM-300
Demonstration Song - Advanced Level
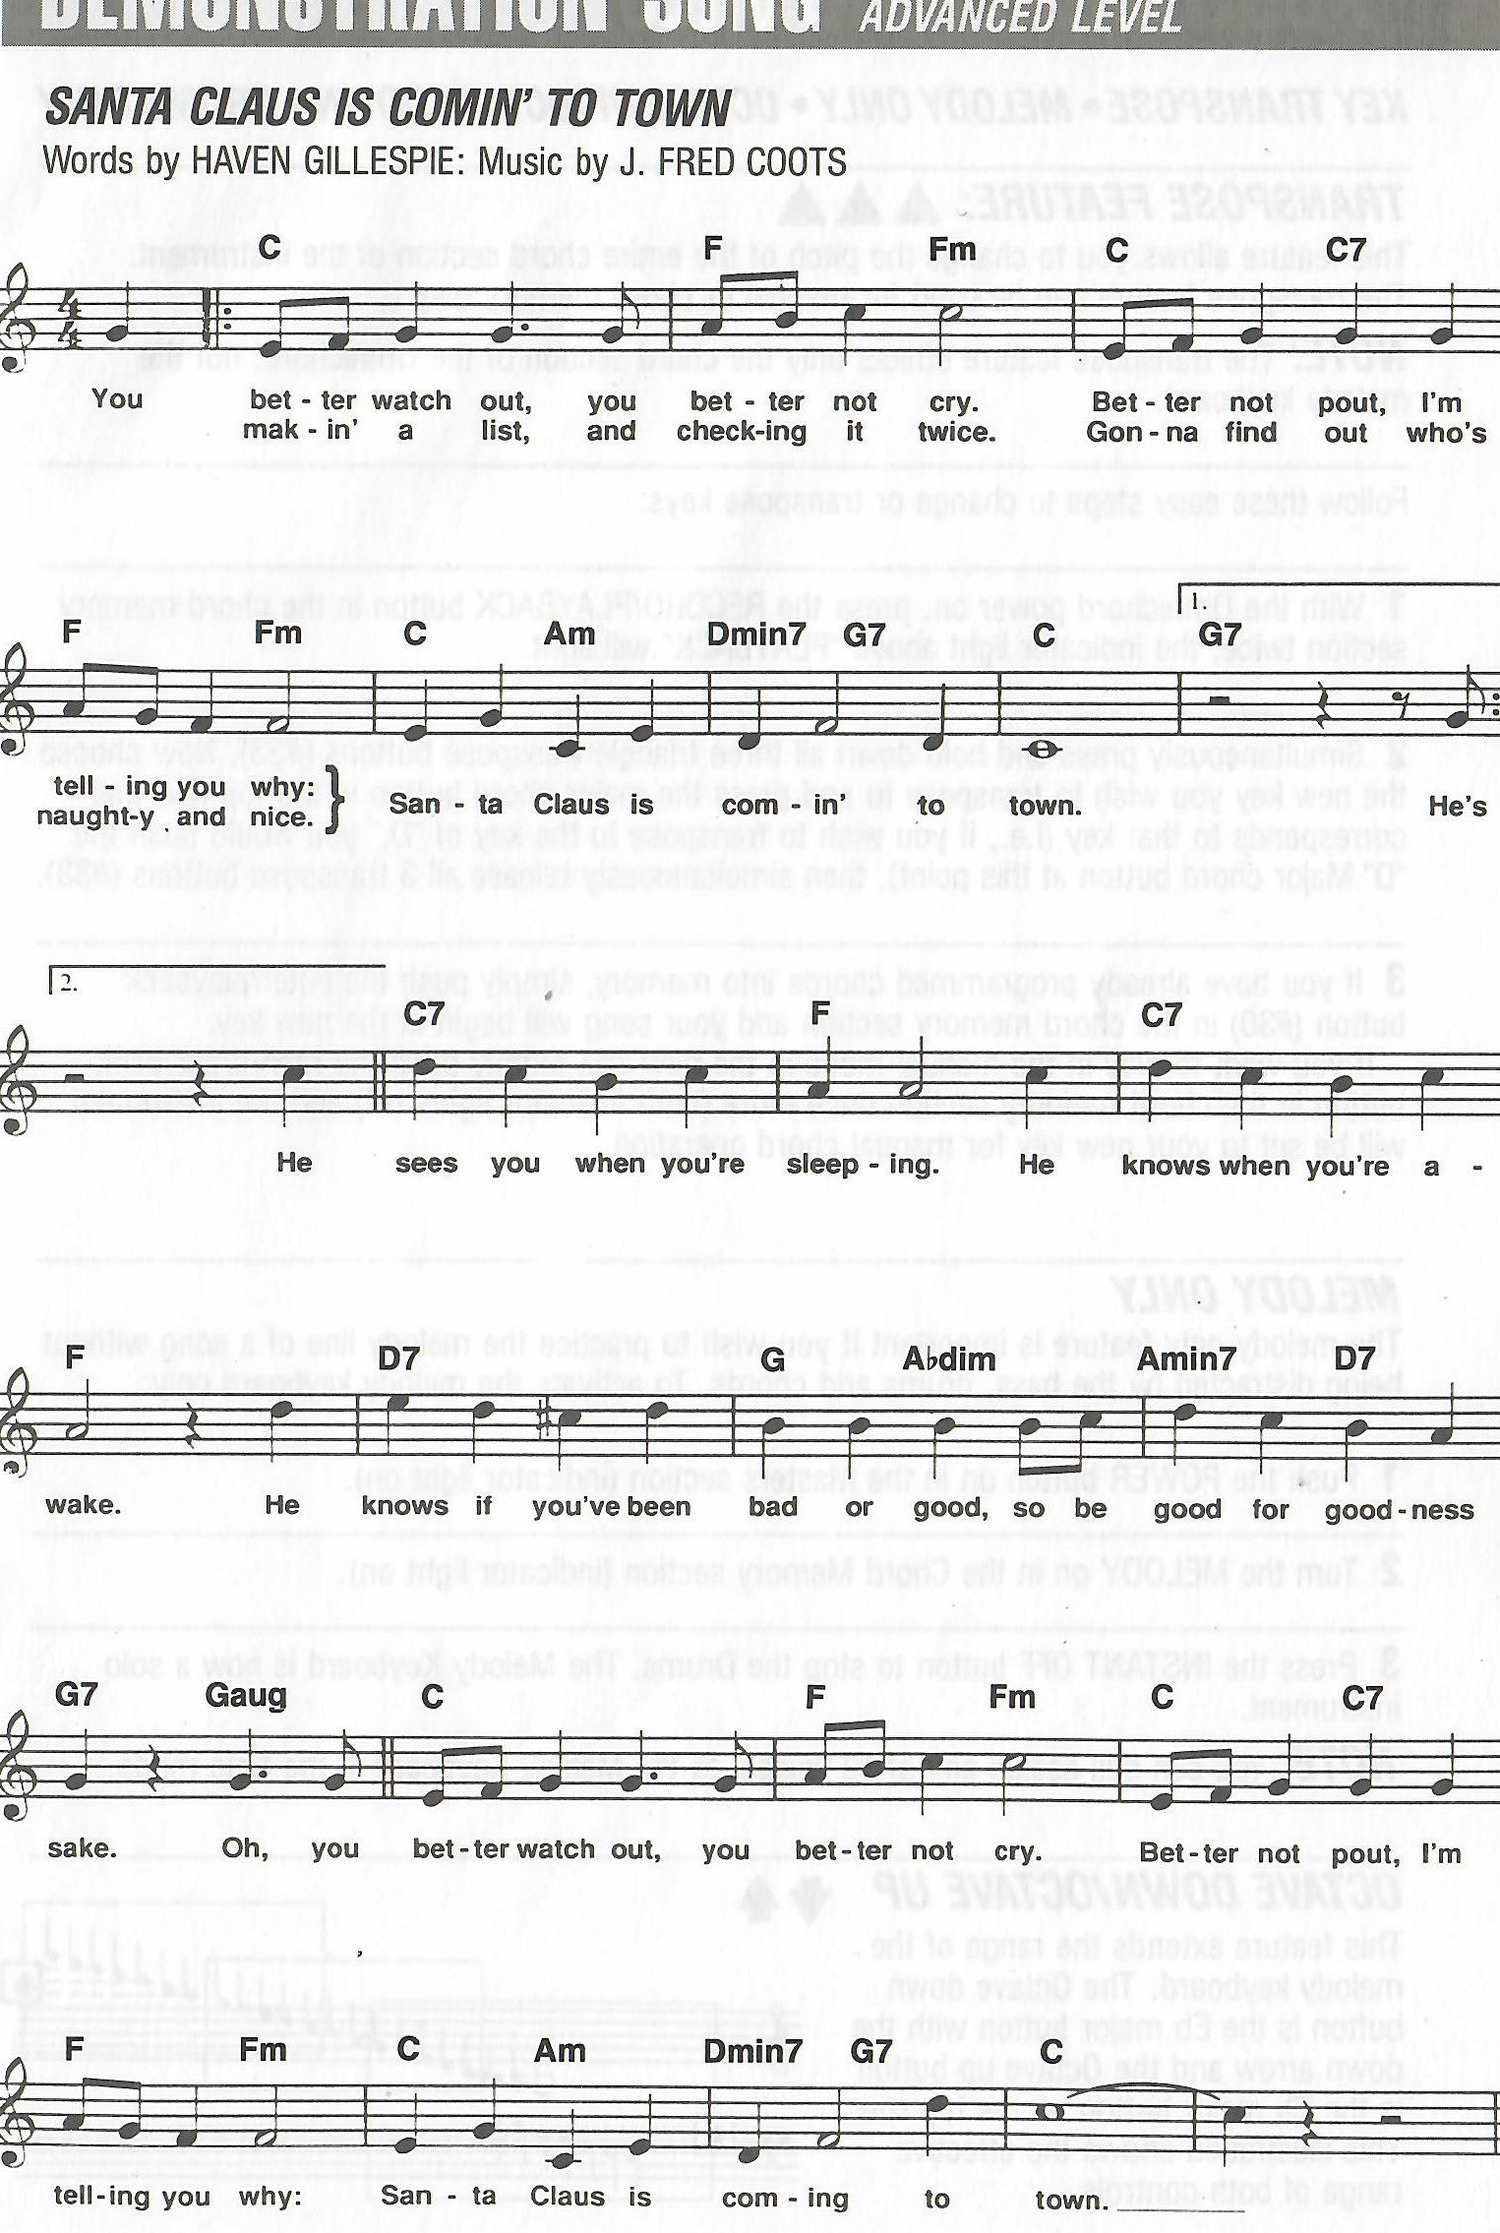
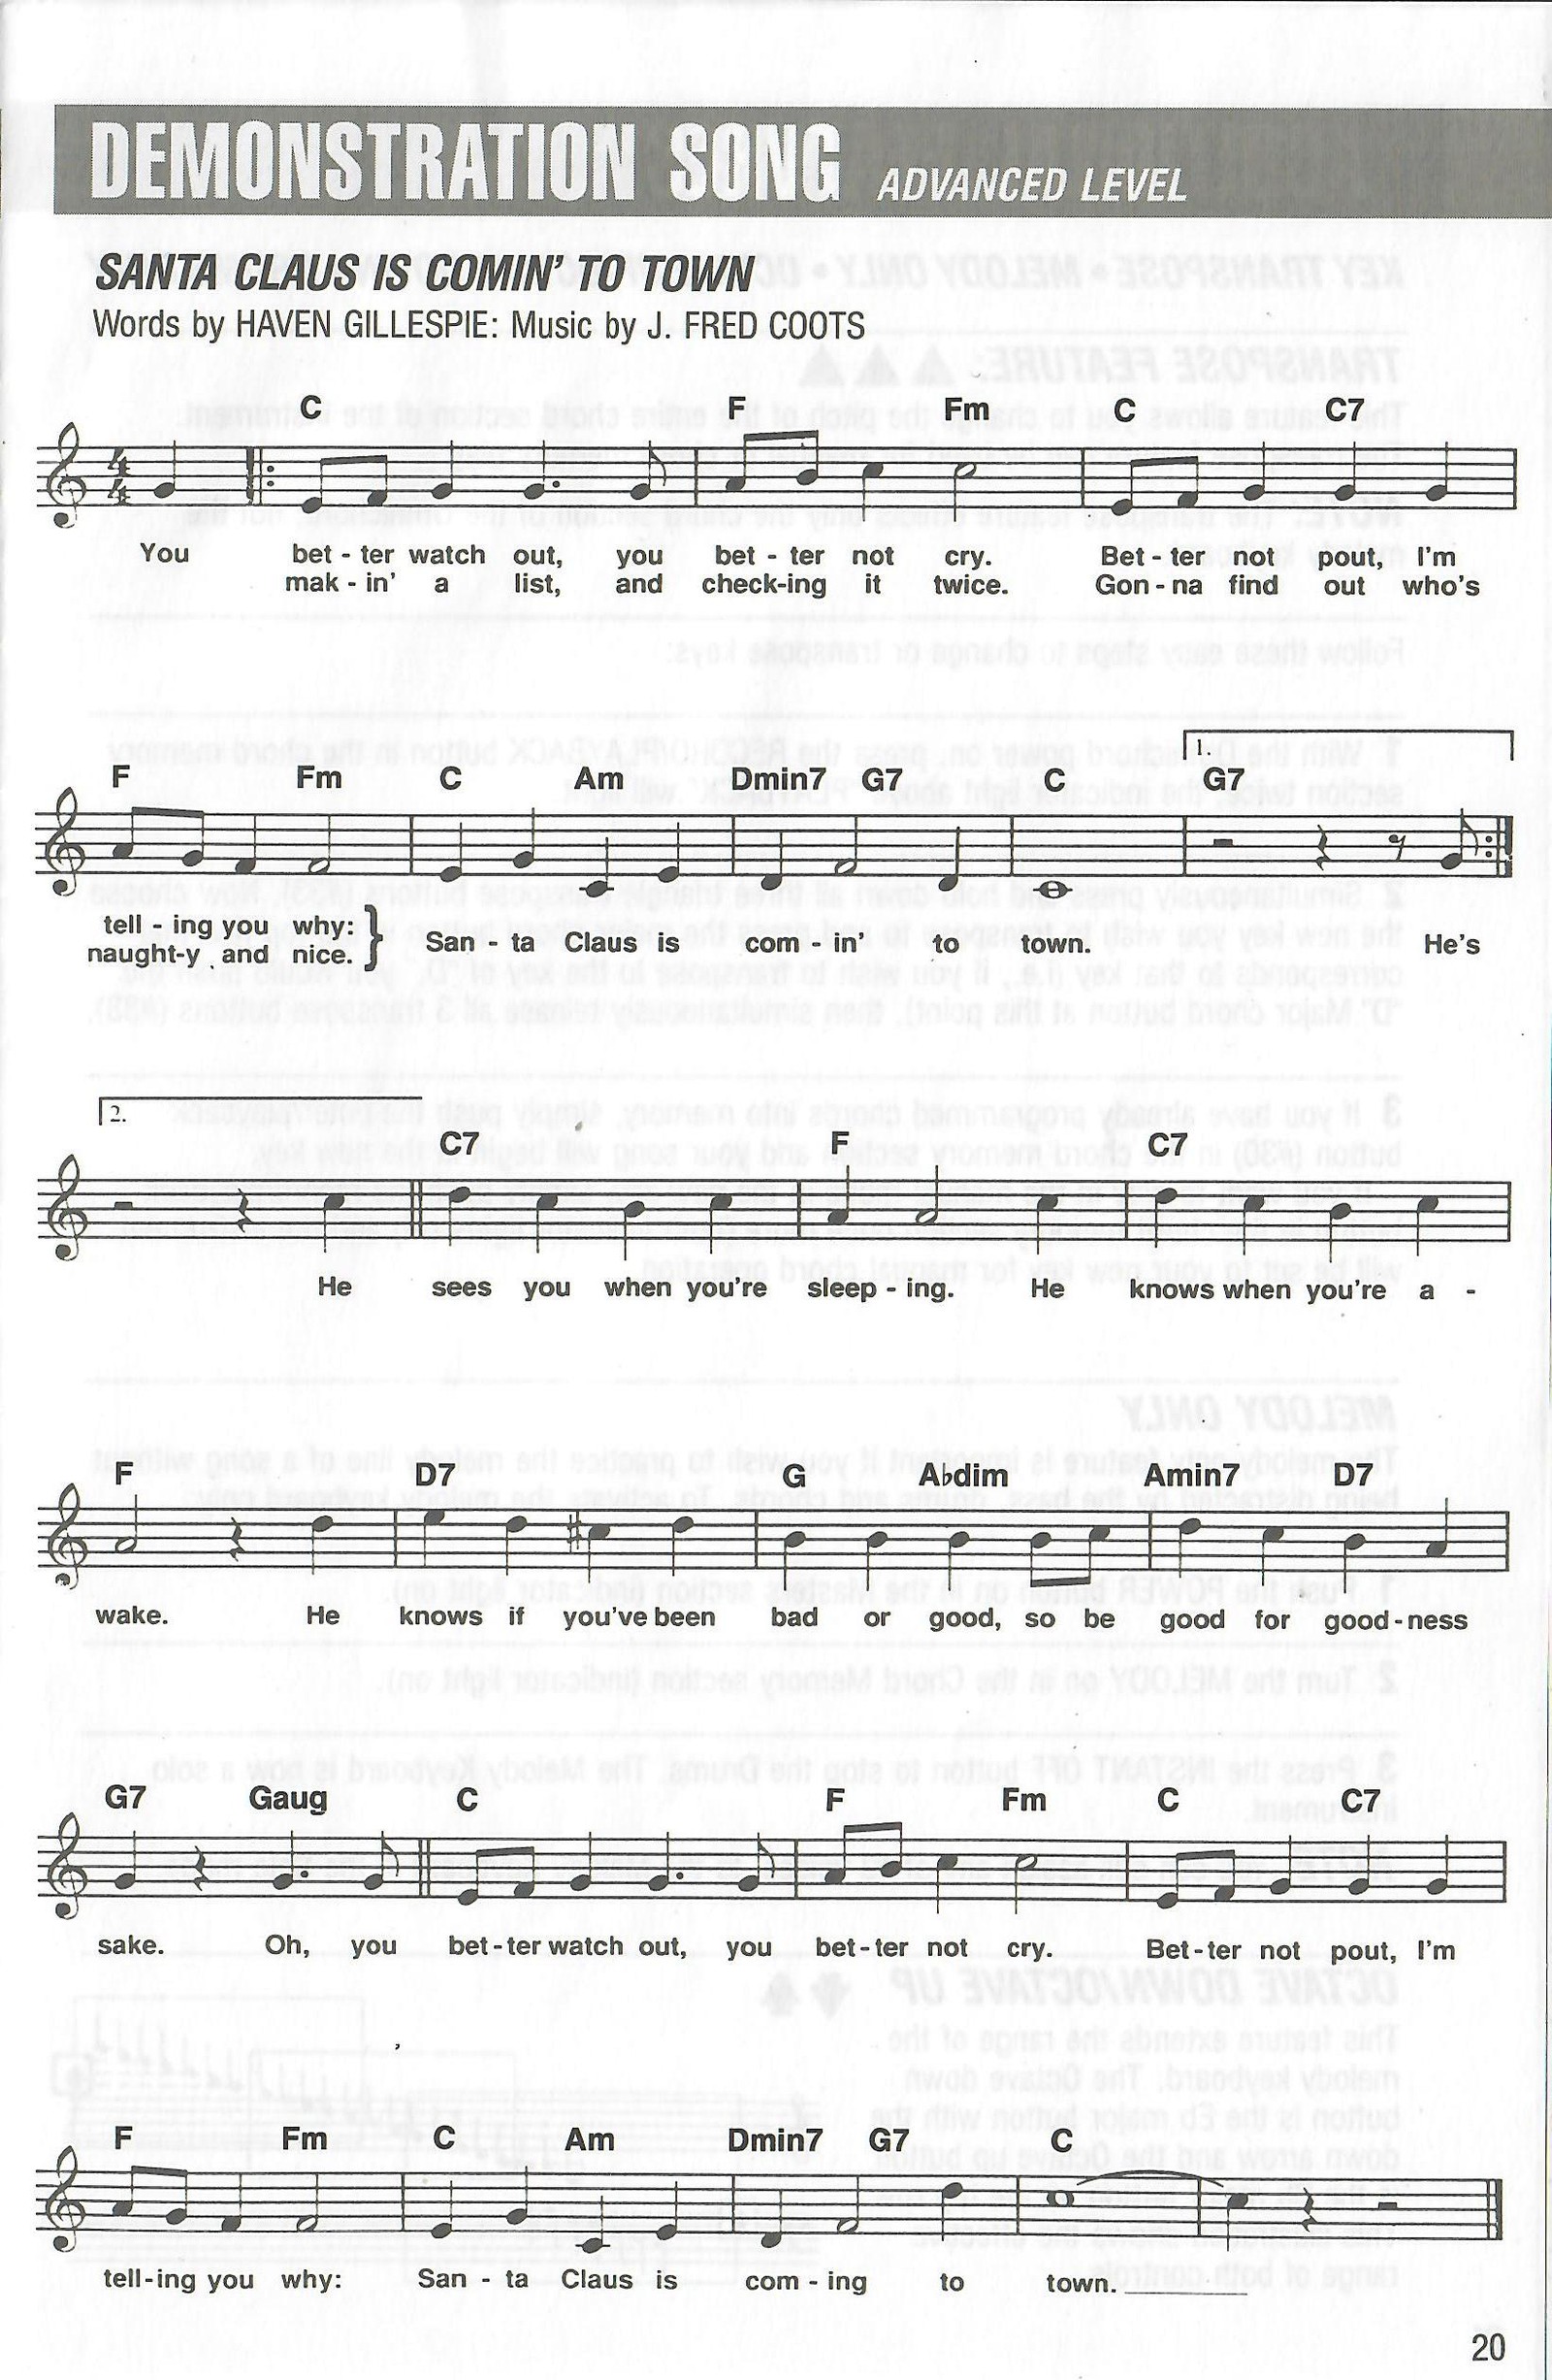
Santa Claus Is Comin' to Town
Words by Haven Gillespie; music by J. Fred Coots. The complete score, lyrics and chord alignment are retained as an image.
Original score for Santa Claus Is Comin' to Town with melody, lyrics and chord symbols.View original scanned 20Original 21
OM-300
Additional Features
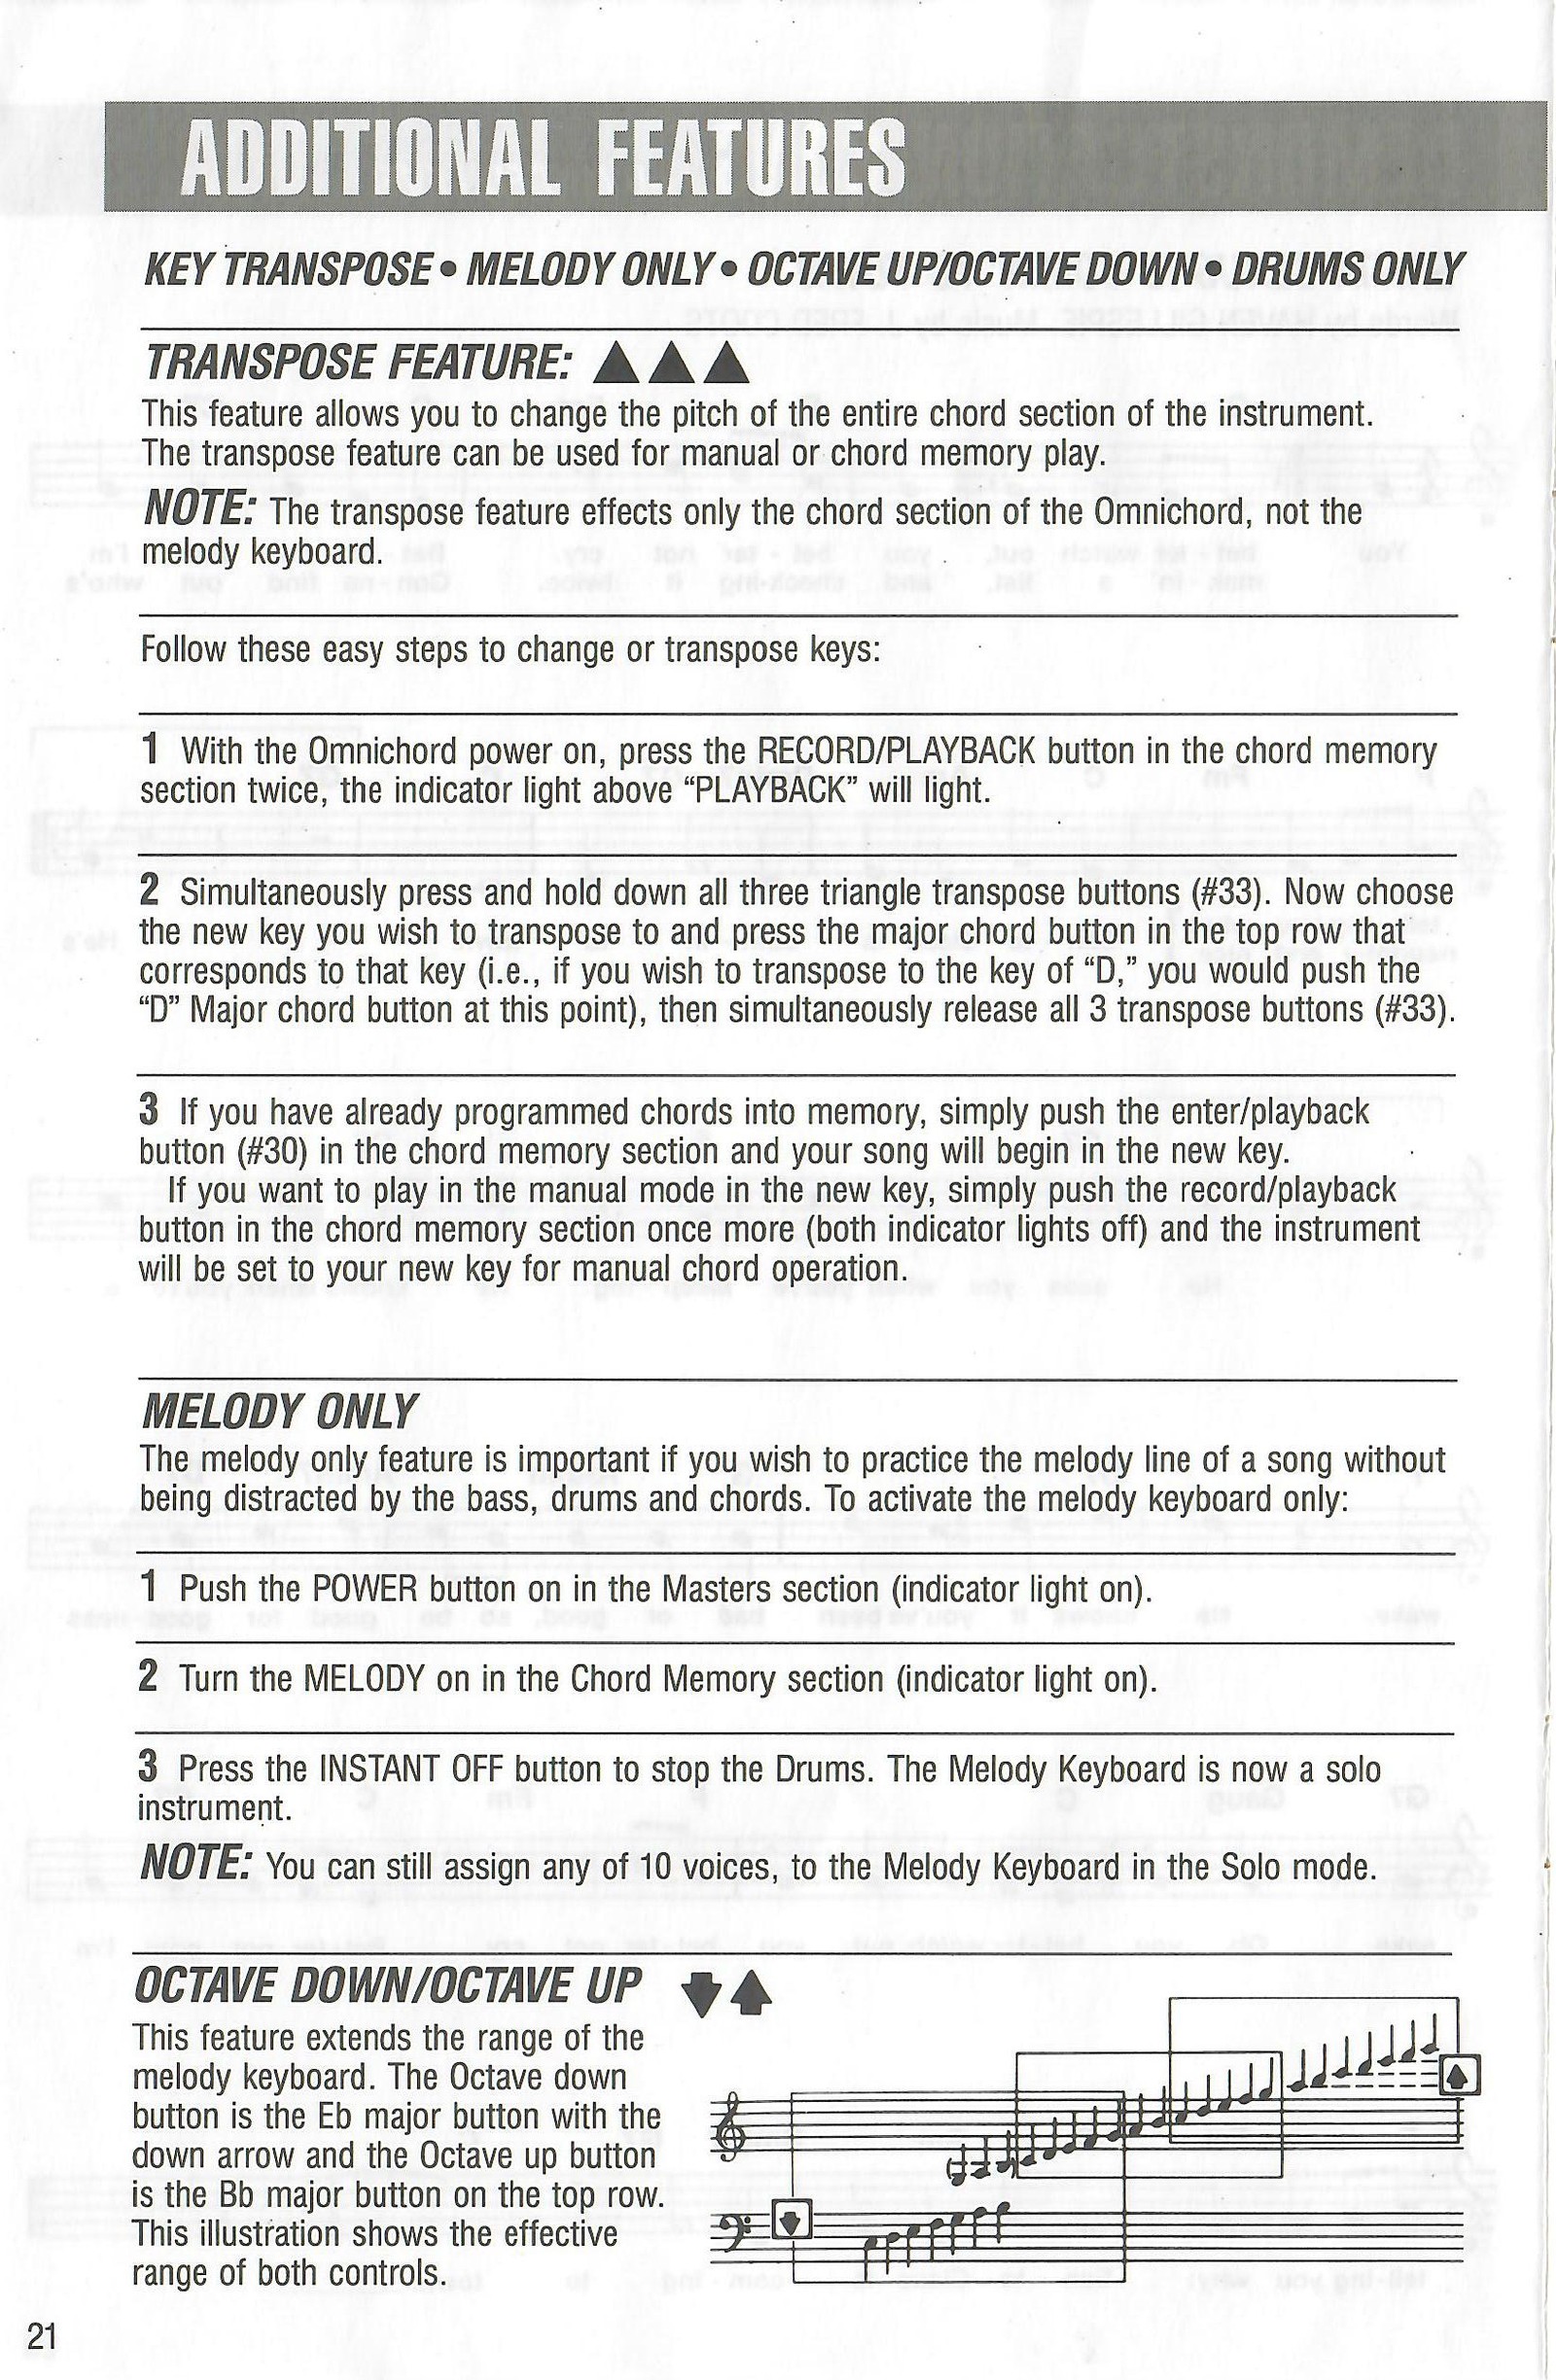
Key transpose, melody only and octave controls
Transpose
Transpose changes the pitch of the chord section for manual or chord-memory play; it does not affect the melody keyboard.
With power on, press RECORD/PLAYBACK twice so PLAYBACK is lit.
Press and release all three triangle transpose buttons together.
Press the top-row major chord button for the desired new key.
For stored chords, press ENTER/PLAYBACK to begin in the new key. For manual play, press RECORD/PLAYBACK again so both mode indicators are off.
Melody Only
Turn POWER on.
Turn MELODY on in the Chord Memory section.
Press INSTANT OFF to stop the drums. The melody keyboard is now solo; its ten voices, sustain and vibrato remain available.
Octave Down/Octave Up
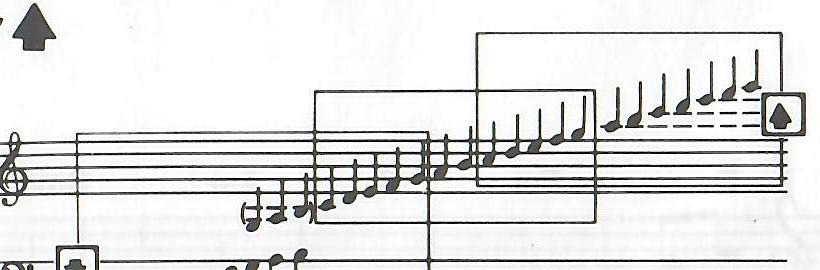
The octave controls extend the melody keyboard range. Octave Down is the Eb major button marked with a down arrow; Octave Up is the Bb major button marked with an up arrow.
Original notation diagram showing the effective Octave Down and Octave Up melody ranges.View original scanned 21Original 22
OM-300
Additional Features - Continued
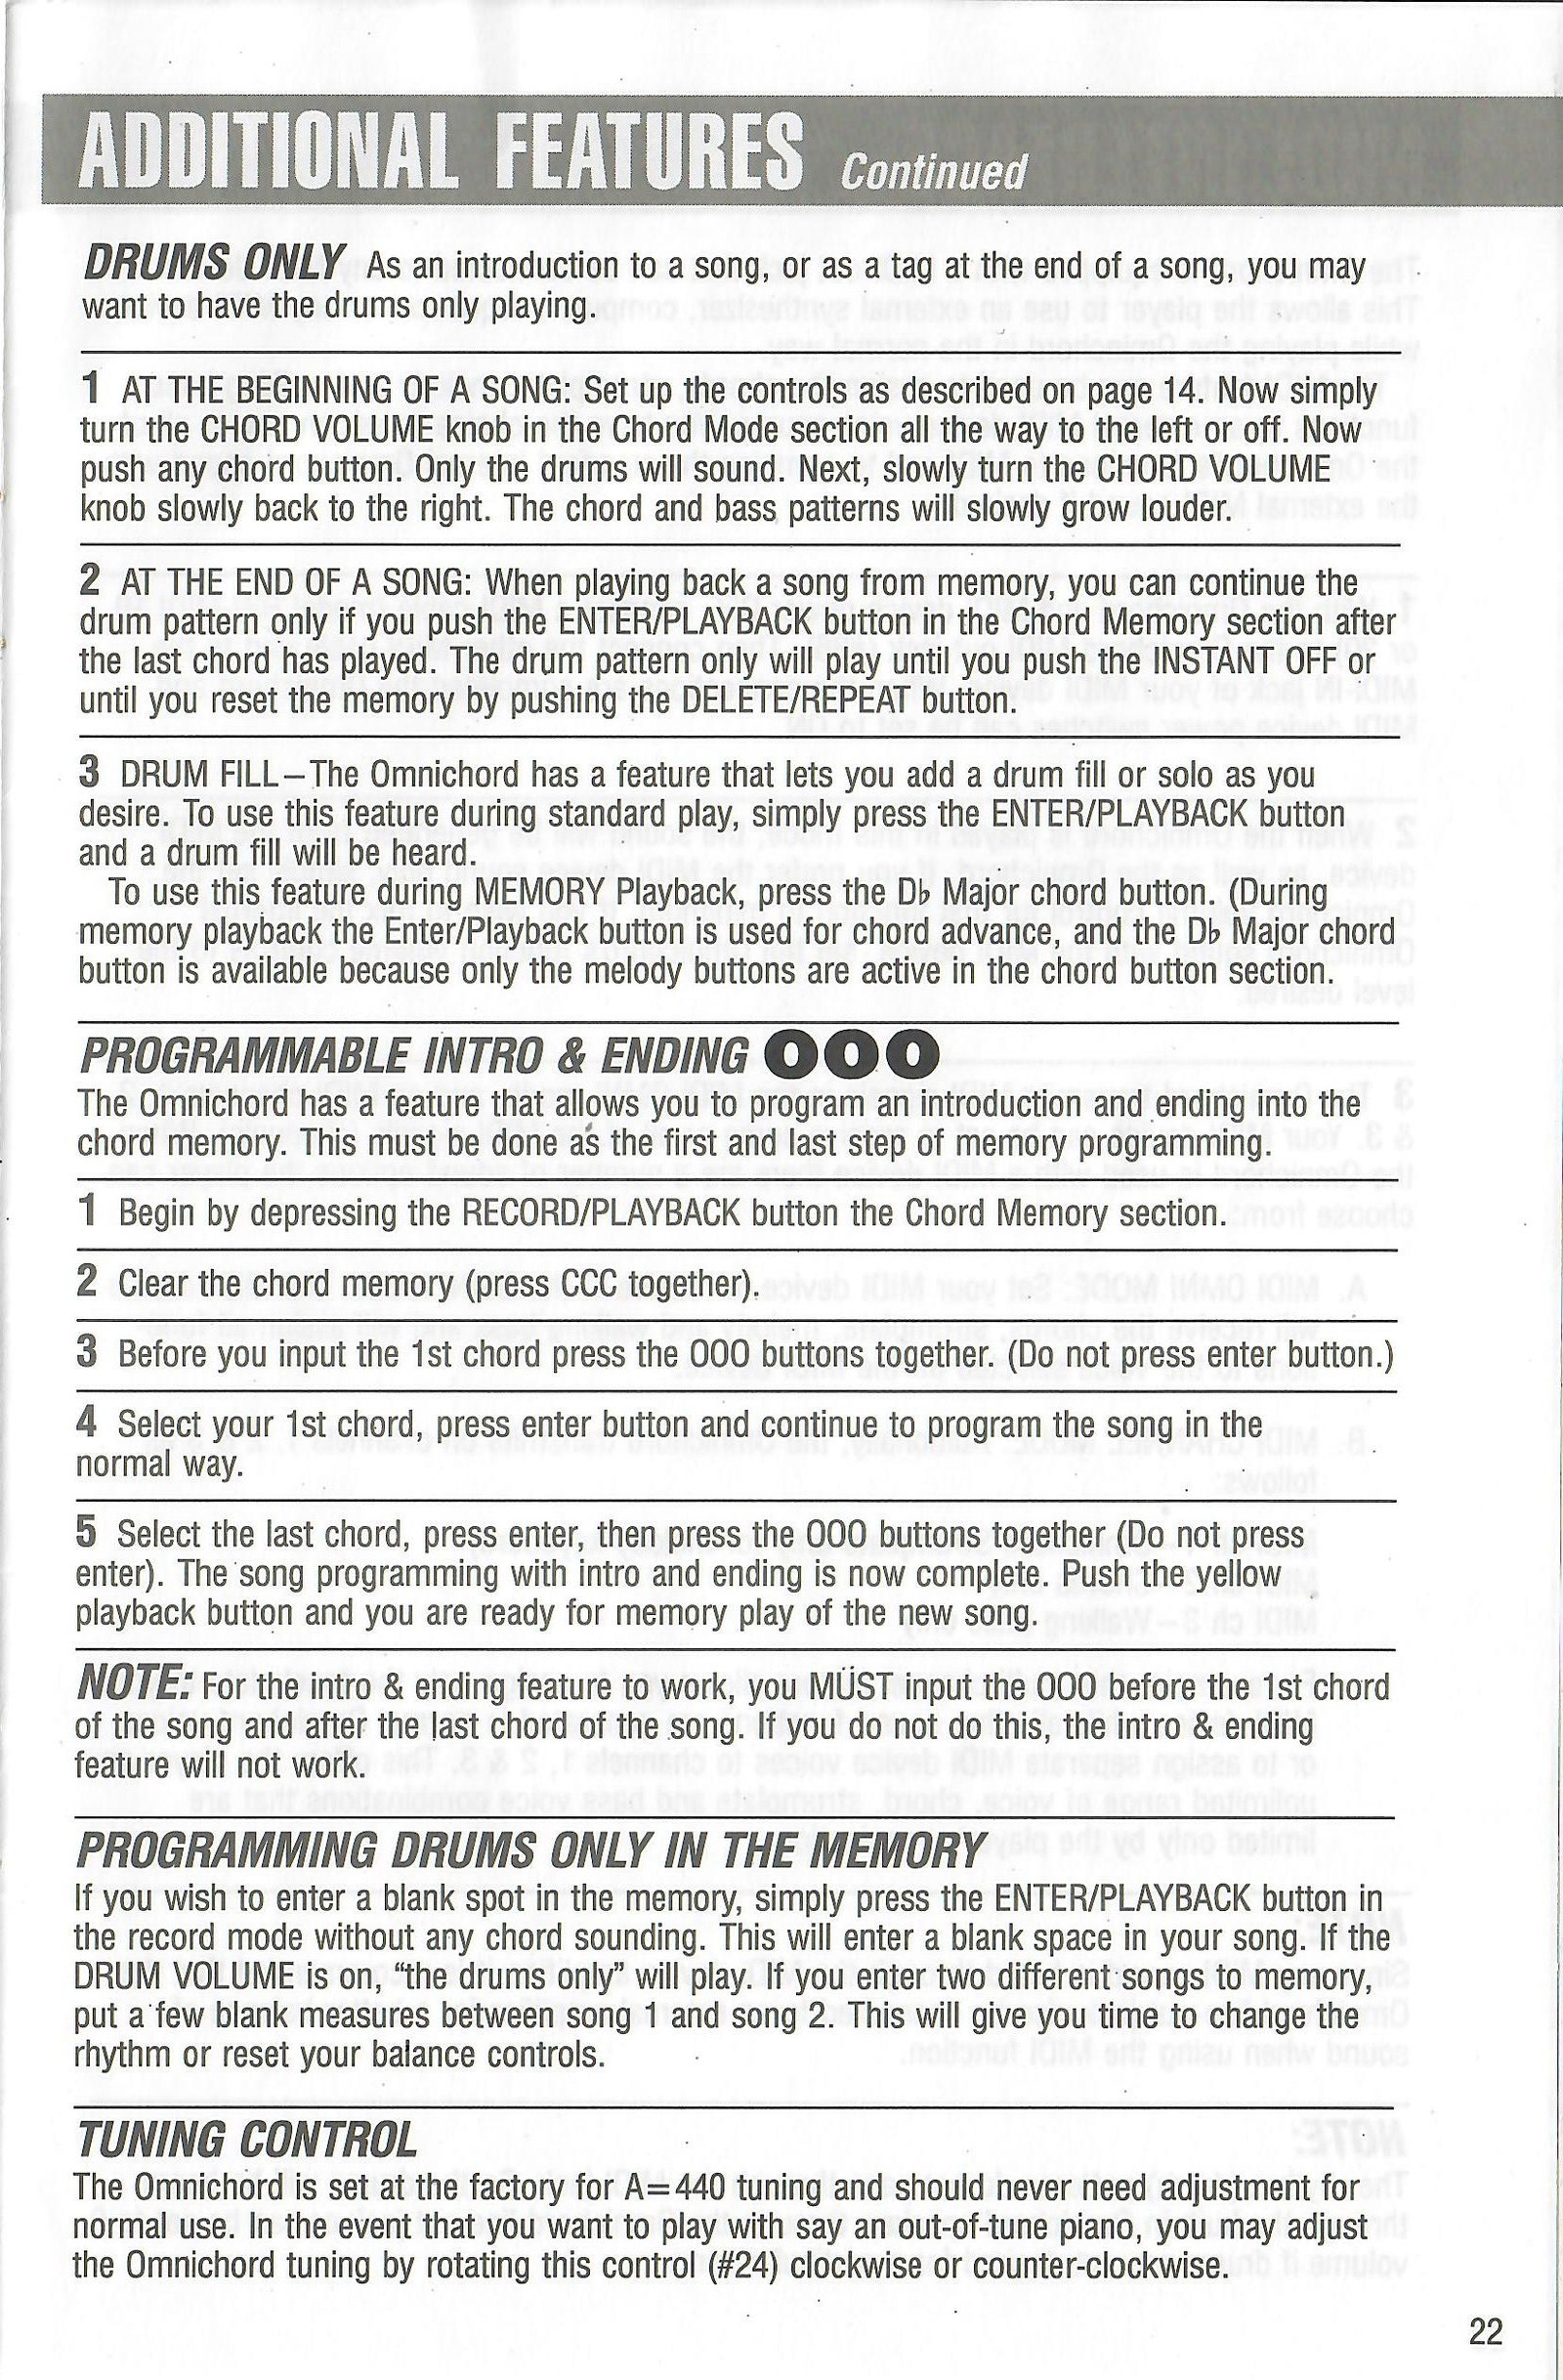
Drums, Drum Fill, programmable introductions and endings, and tuning
Drums Only
At the beginning of a song, use the page 14 settings, turn CHORD VOLUME fully off and press any chord. Only drums sound. Slowly raise CHORD VOLUME to fade in the chord and bass.
At the end of a memory song, press ENTER/PLAYBACK after the final chord. Drums continue until INSTANT OFF is pressed or memory is reset with DELETE/REPEAT.
Drum Fill
During standard play, press ENTER/PLAYBACK to add a drum fill. During memory playback, press the Db major chord button; ENTER/PLAYBACK is then reserved for advancing chords.
Programmable Introduction and Ending
Put Chord Memory into RECORD mode and clear the memory.
Before the first chord, press the three INTRO/END buttons (#32) together without pressing ENTER.
Enter the song normally.
After entering the final chord, press the three INTRO/END buttons together, again without pressing ENTER.
Select PLAYBACK. Both markers are required for the feature to work.
Programming Drums Only in Memory
In RECORD mode, press ENTER/PLAYBACK with no chord sounding to store a blank measure. With Rhythm volume up, the blank step plays drums only. Blank measures can also separate two songs and allow time to change rhythm or balance.
Tuning Control
The Omnichord is factory set to A=440. To match an out-of-tune accompanying instrument, rotate tuning control #24 clockwise or counter-clockwise.
View original scanned 22Original 23
OM-300
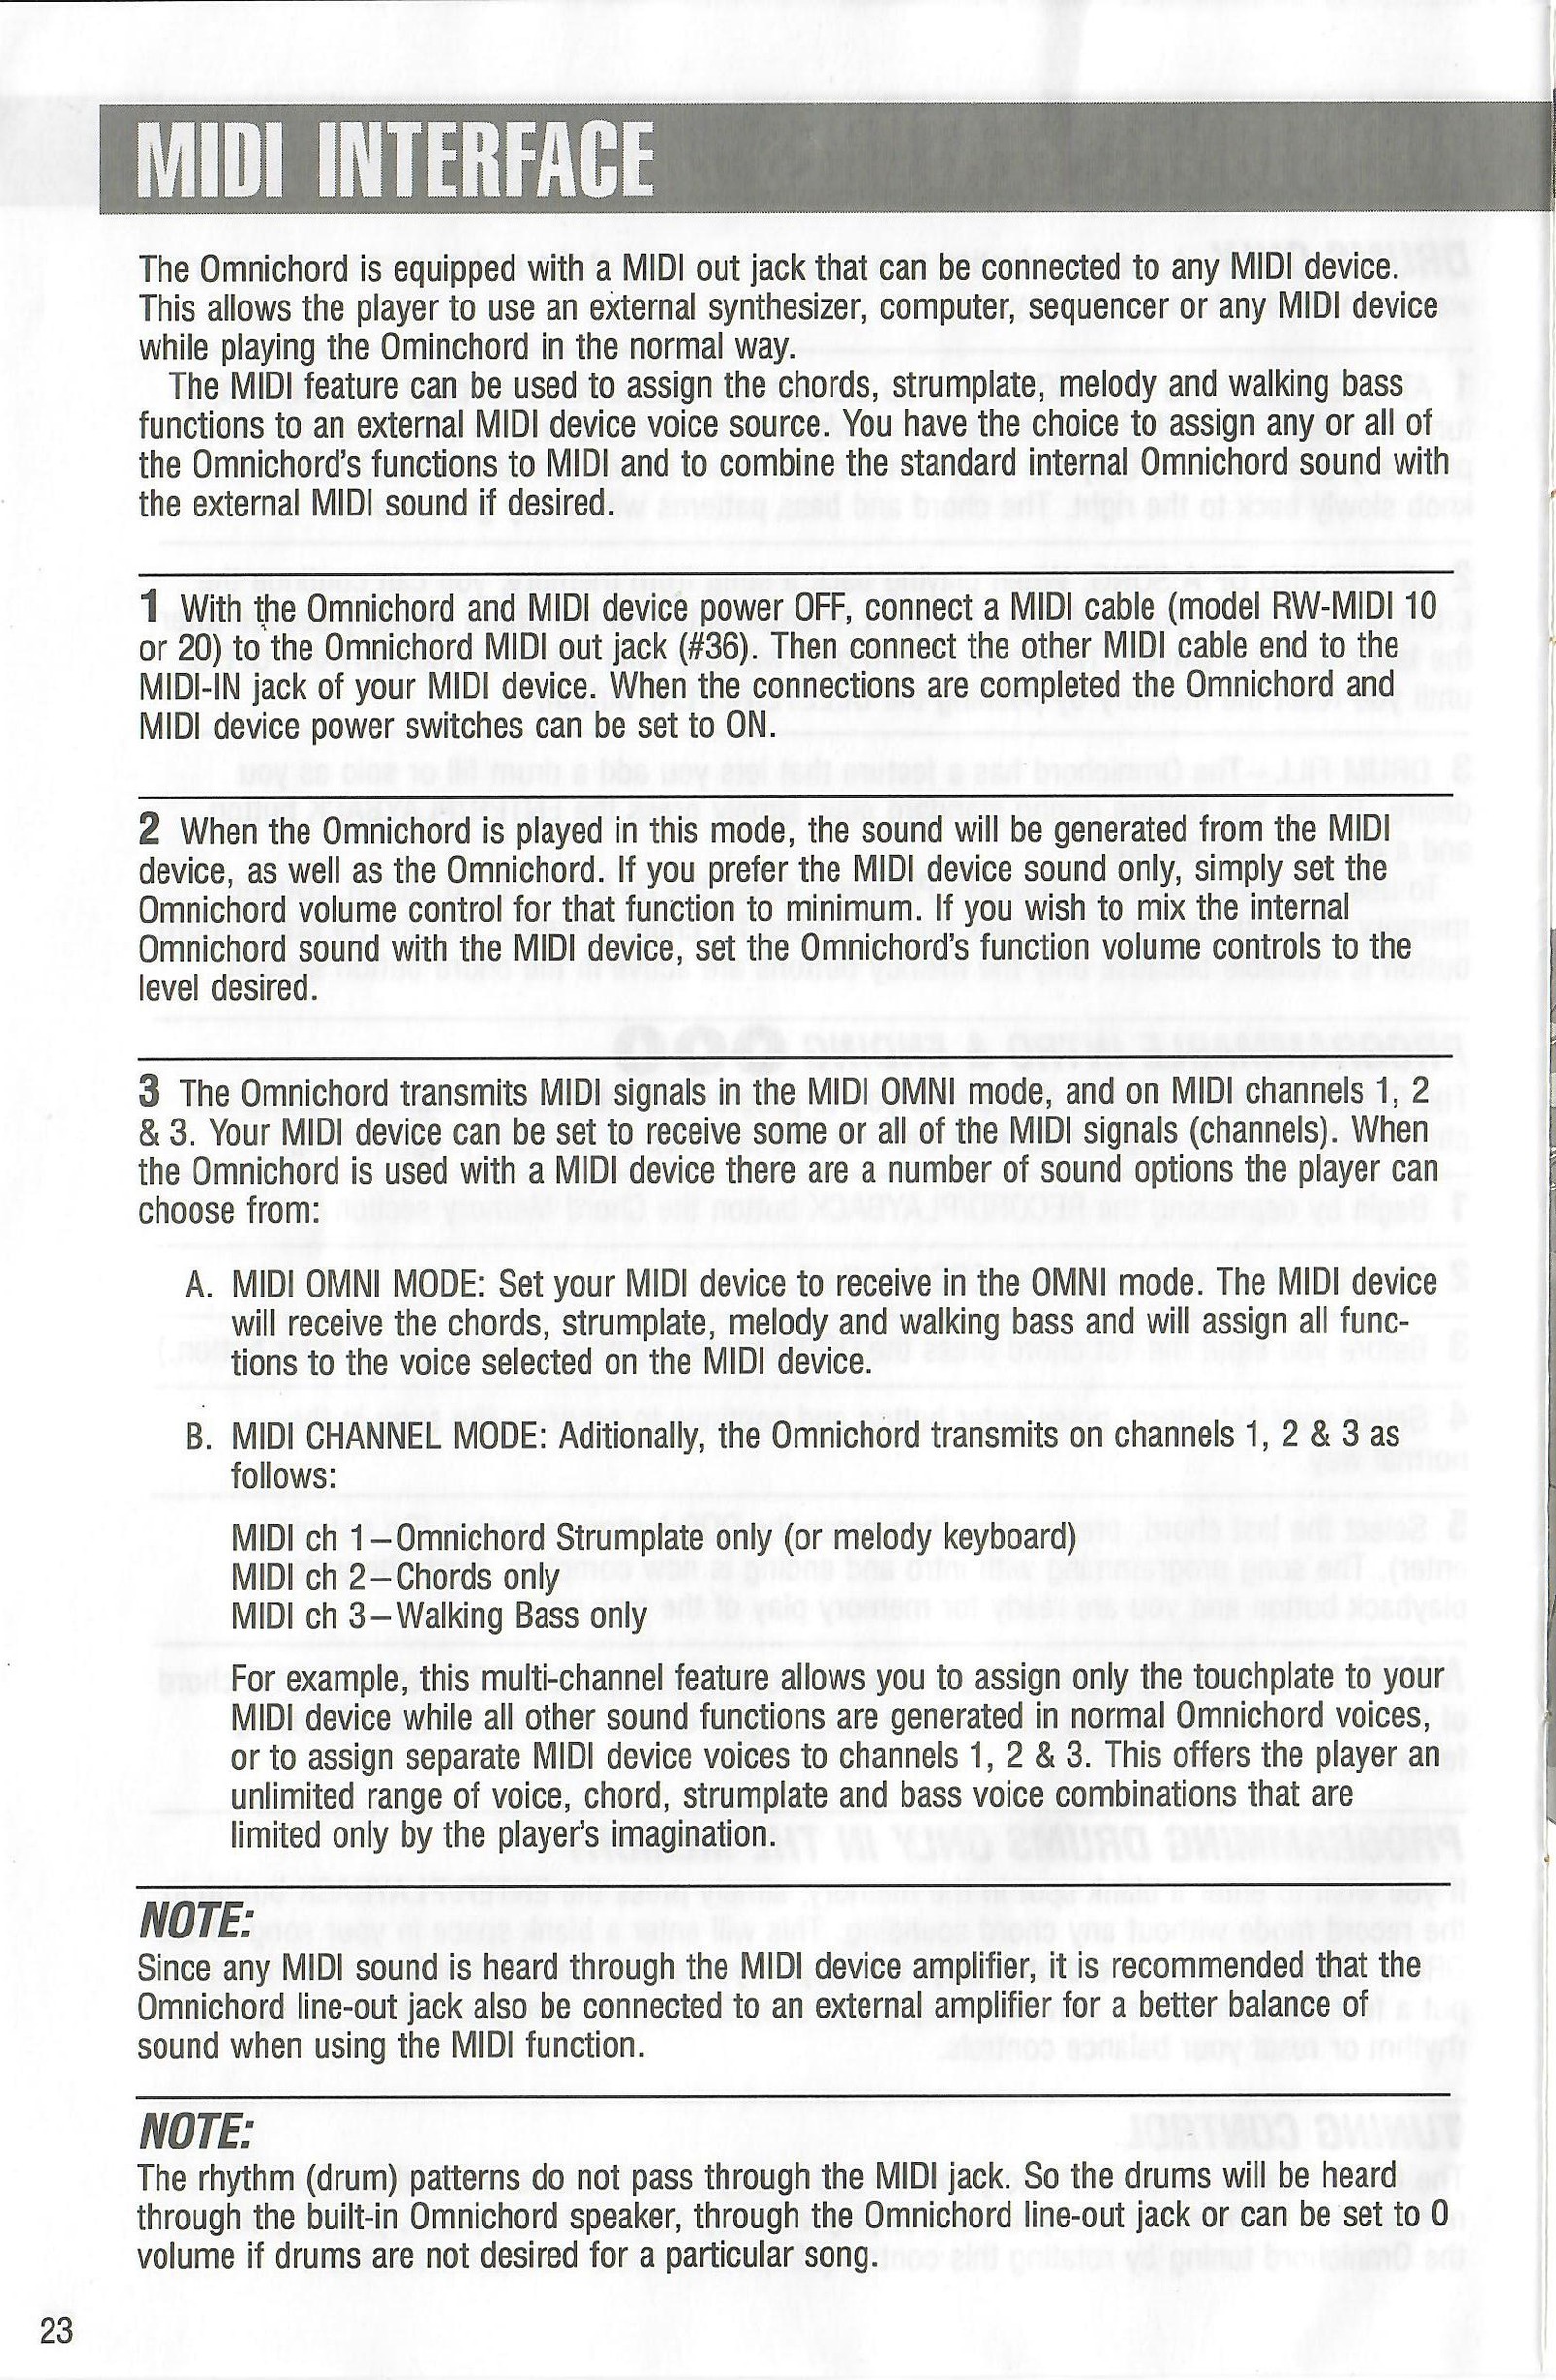
MIDI Interface
Connecting the OM-300 to external MIDI equipment
The OM-300 MIDI OUT can control an external synthesizer, computer, sequencer or other MIDI device. Chords, strumplate, melody and walking bass may be assigned to MIDI while internal Omnichord sounds are also used if desired.
With both devices off, connect an RW-MIDI 10 or 20 cable to OM-300 MIDI OUT jack 36, then connect the other end to the external device's MIDI IN. Turn both devices on after connections are complete.
MIDI-device sound and Omnichord sound are generated together. To hear MIDI only, reduce the relevant Omnichord function volume; to mix them, set each Omnichord function volume as desired.
The OM-300 transmits in MIDI OMNI mode and on MIDI channels 1, 2 and 3. In OMNI mode, the receiver handles chord, strumplate, melody and walking-bass data. In channel mode: channel 1 is Strumplate or melody keyboard, channel 2 is chords, and channel 3 is walking bass.
View original scanned 23Original 24
OM-300
Specifications
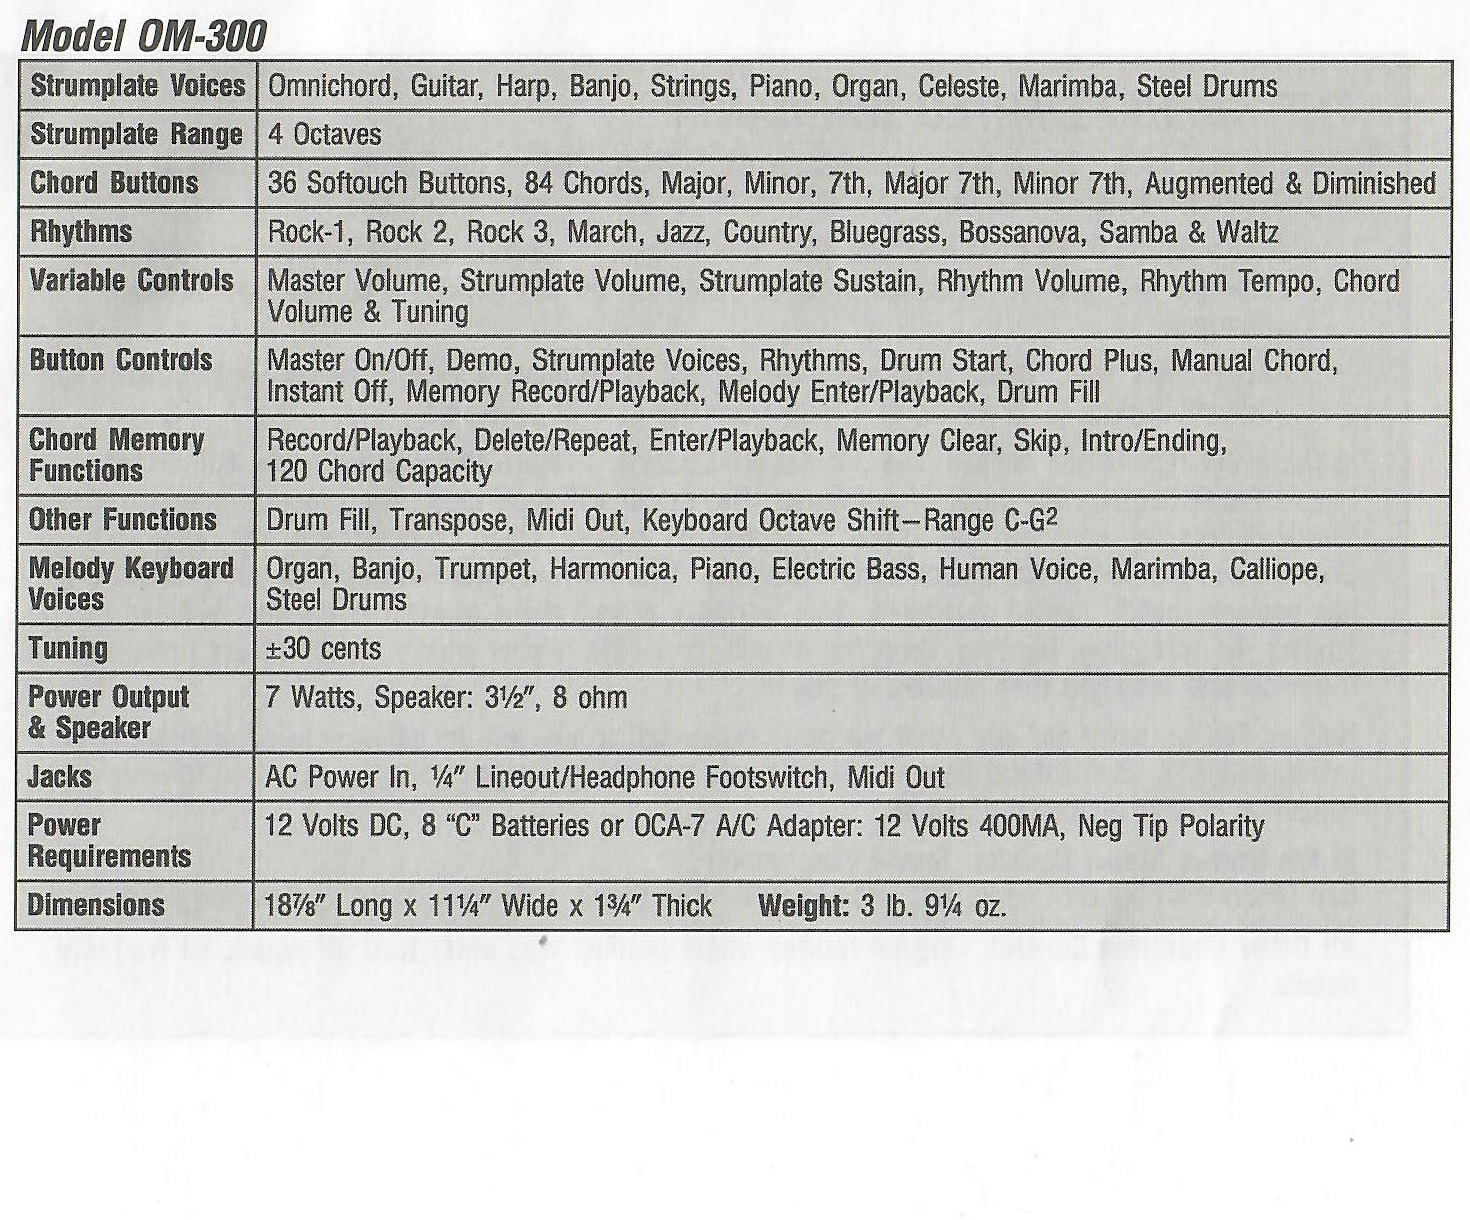
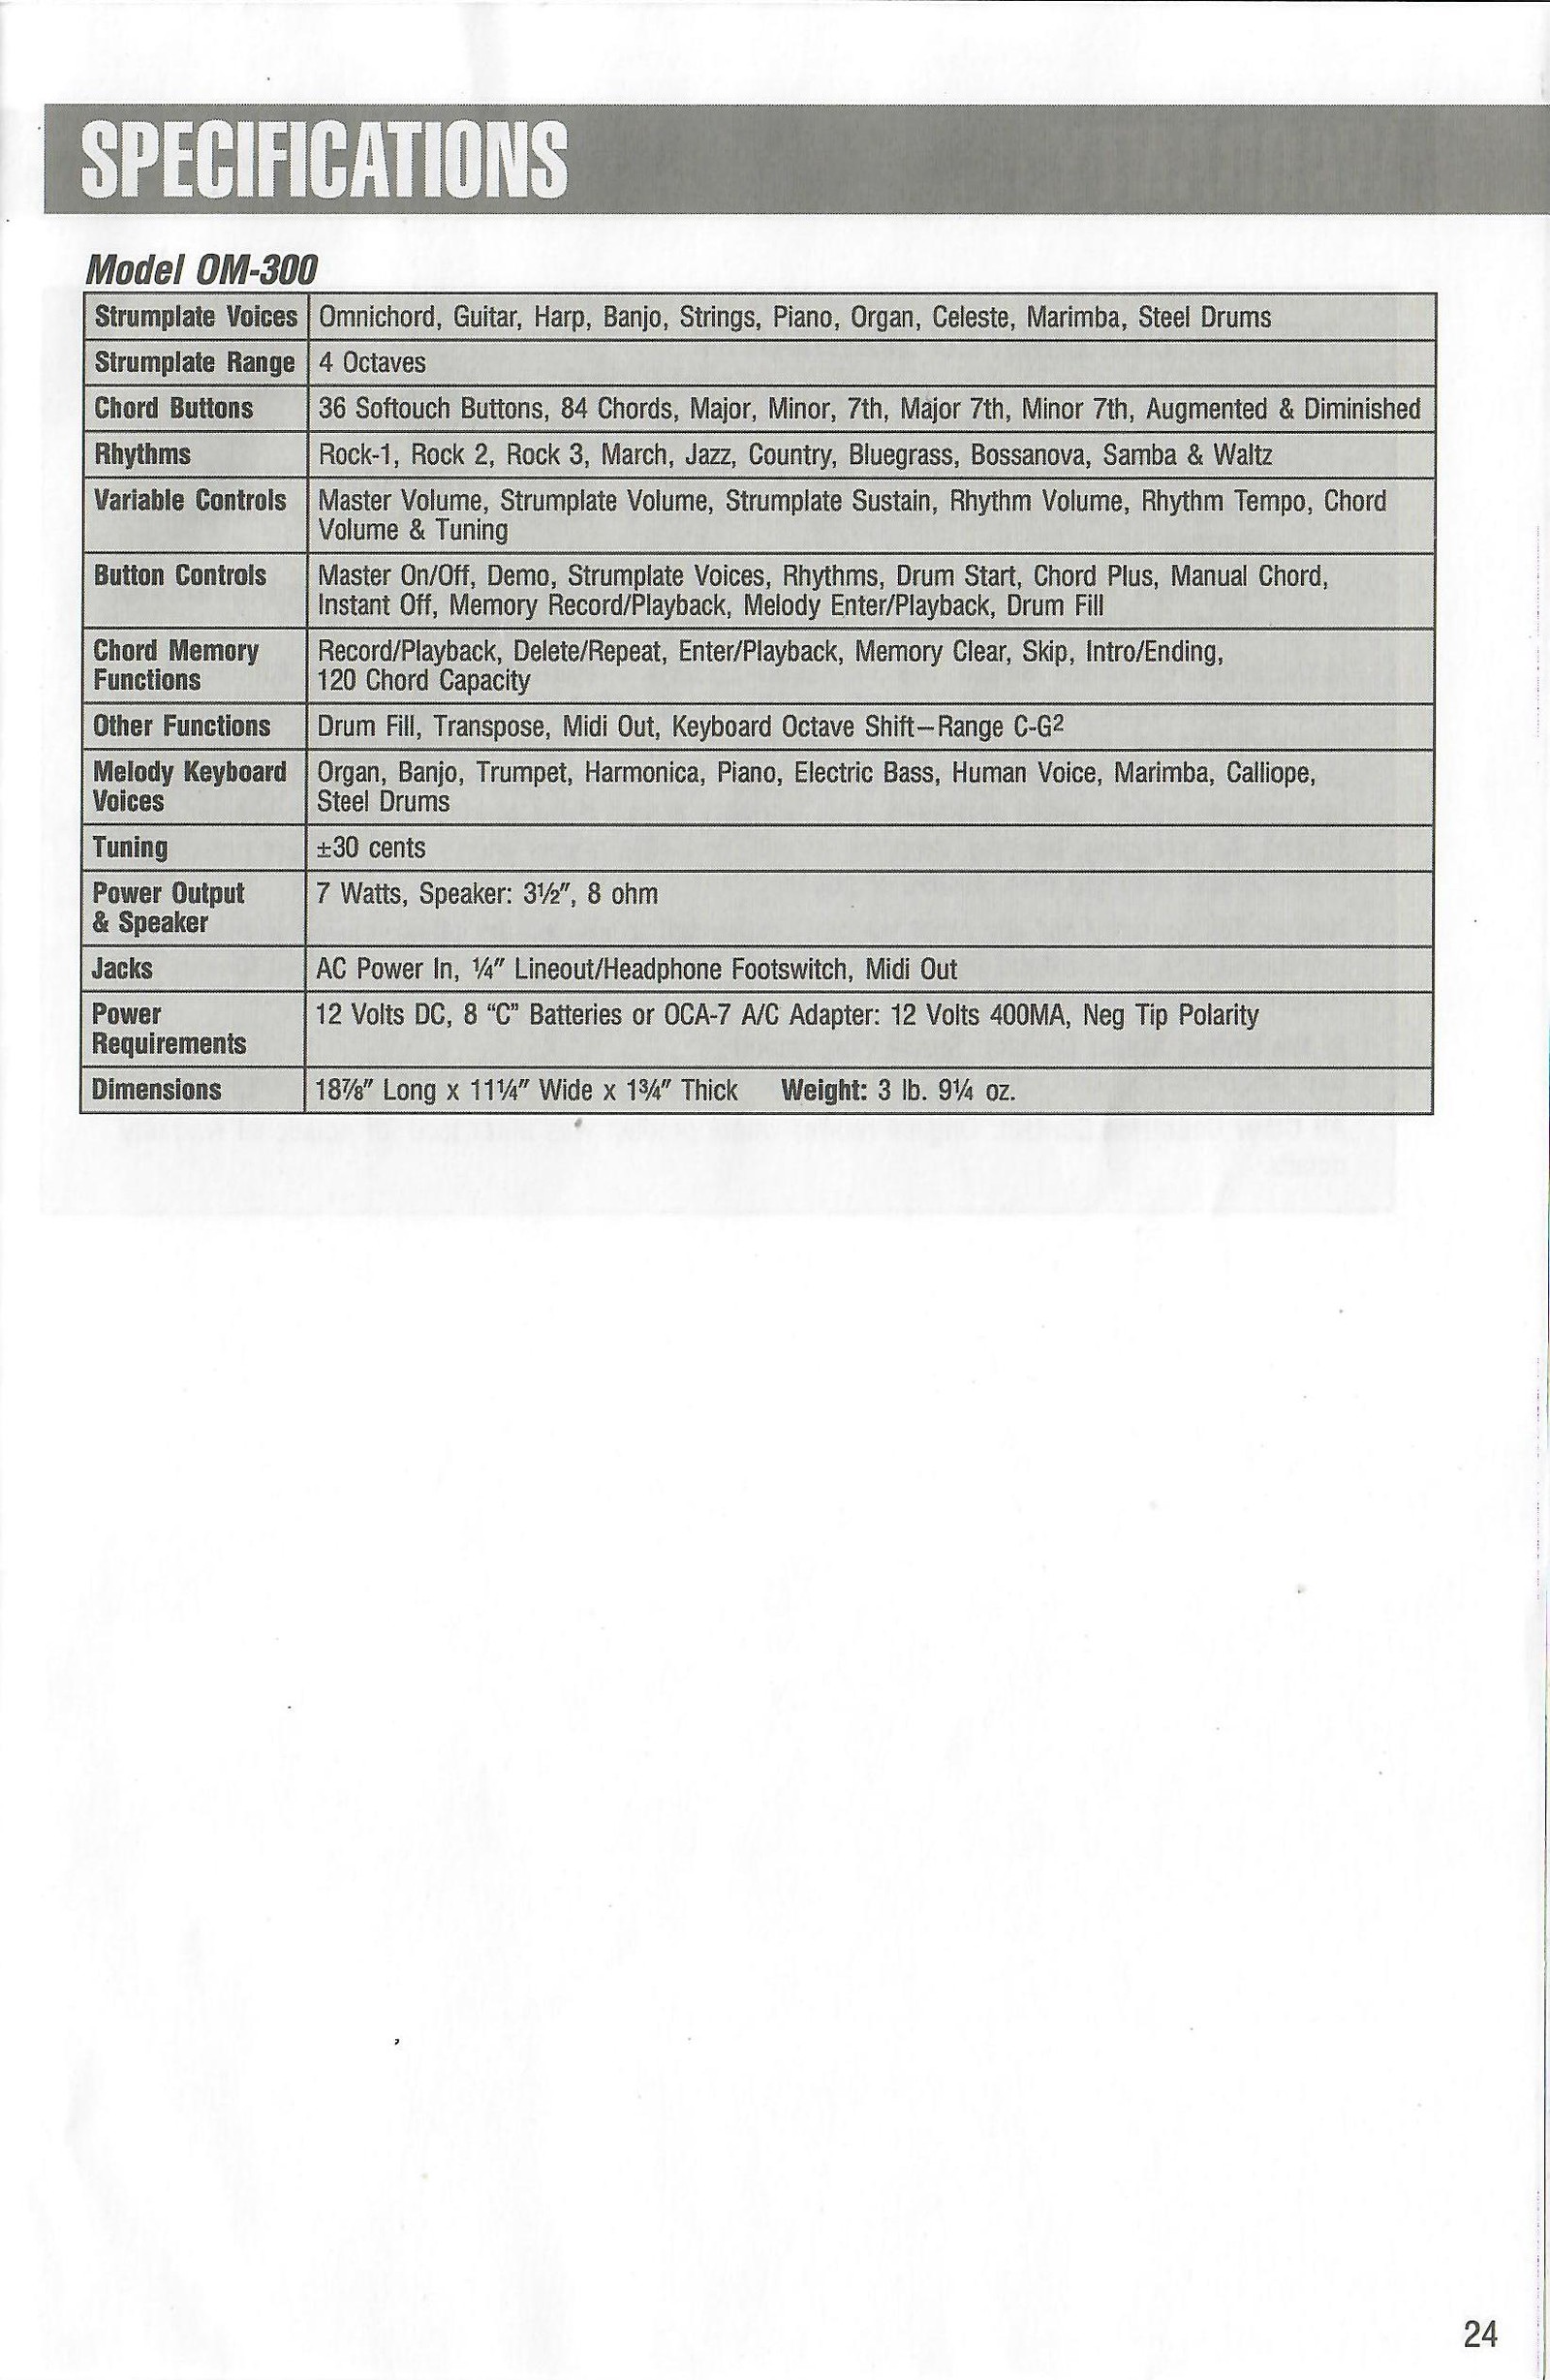
Model OM-300
Sounds and Range
Strumplate voices: Omnichord, Guitar, Harp, Banjo, Strings, Piano, Organ, Celeste, Marimba and Steel Drums. Strumplate range: four octaves.
Chord buttons: 36 Softouch buttons providing 84 chords - major, minor, seventh, major seventh, minor seventh, augmented and diminished. Rhythms: Rock 1, Rock 2, Rock 3, March, Jazz, Country, Bluegrass, Bossanova, Samba and Waltz.
Chord-memory functions: Record/Playback, Delete/Repeat, Enter/Playback, Memory Clear, Skip and Intro/Ending, with a capacity of 120 chords. Other functions: Drum Fill, Transpose, MIDI Out and Keyboard Octave Shift, range C-G2.
Melody Keyboard and Tuning
Melody-keyboard voices: Organ, Banjo, Trumpet, Harmonica, Piano, Electric Bass, Human Voice, Marimba, Calliope and Steel Drums. Tuning range: plus or minus 30 cents.
Output, Connections and Power
Power output: 7 watts. Speaker: 3.5-inch, 8 ohm. Jacks: A/C Power In, 1/4-inch Lineout/Headphone, Footswitch and MIDI Out.
Power requirements: 12 volts DC from eight C batteries or an OCA-7 A/C adapter rated at 12 volts, 400 mA, negative-tip polarity.
Dimensions
18 7/8 inches long by 11 1/4 inches wide by 1 3/4 inches thick. Weight: 3 pounds 9 1/4 ounces.
Original OM-300 specifications table.View original scanned 24Original 25
Historical warranty information
Warranty
The Suzuki Limited Warranty
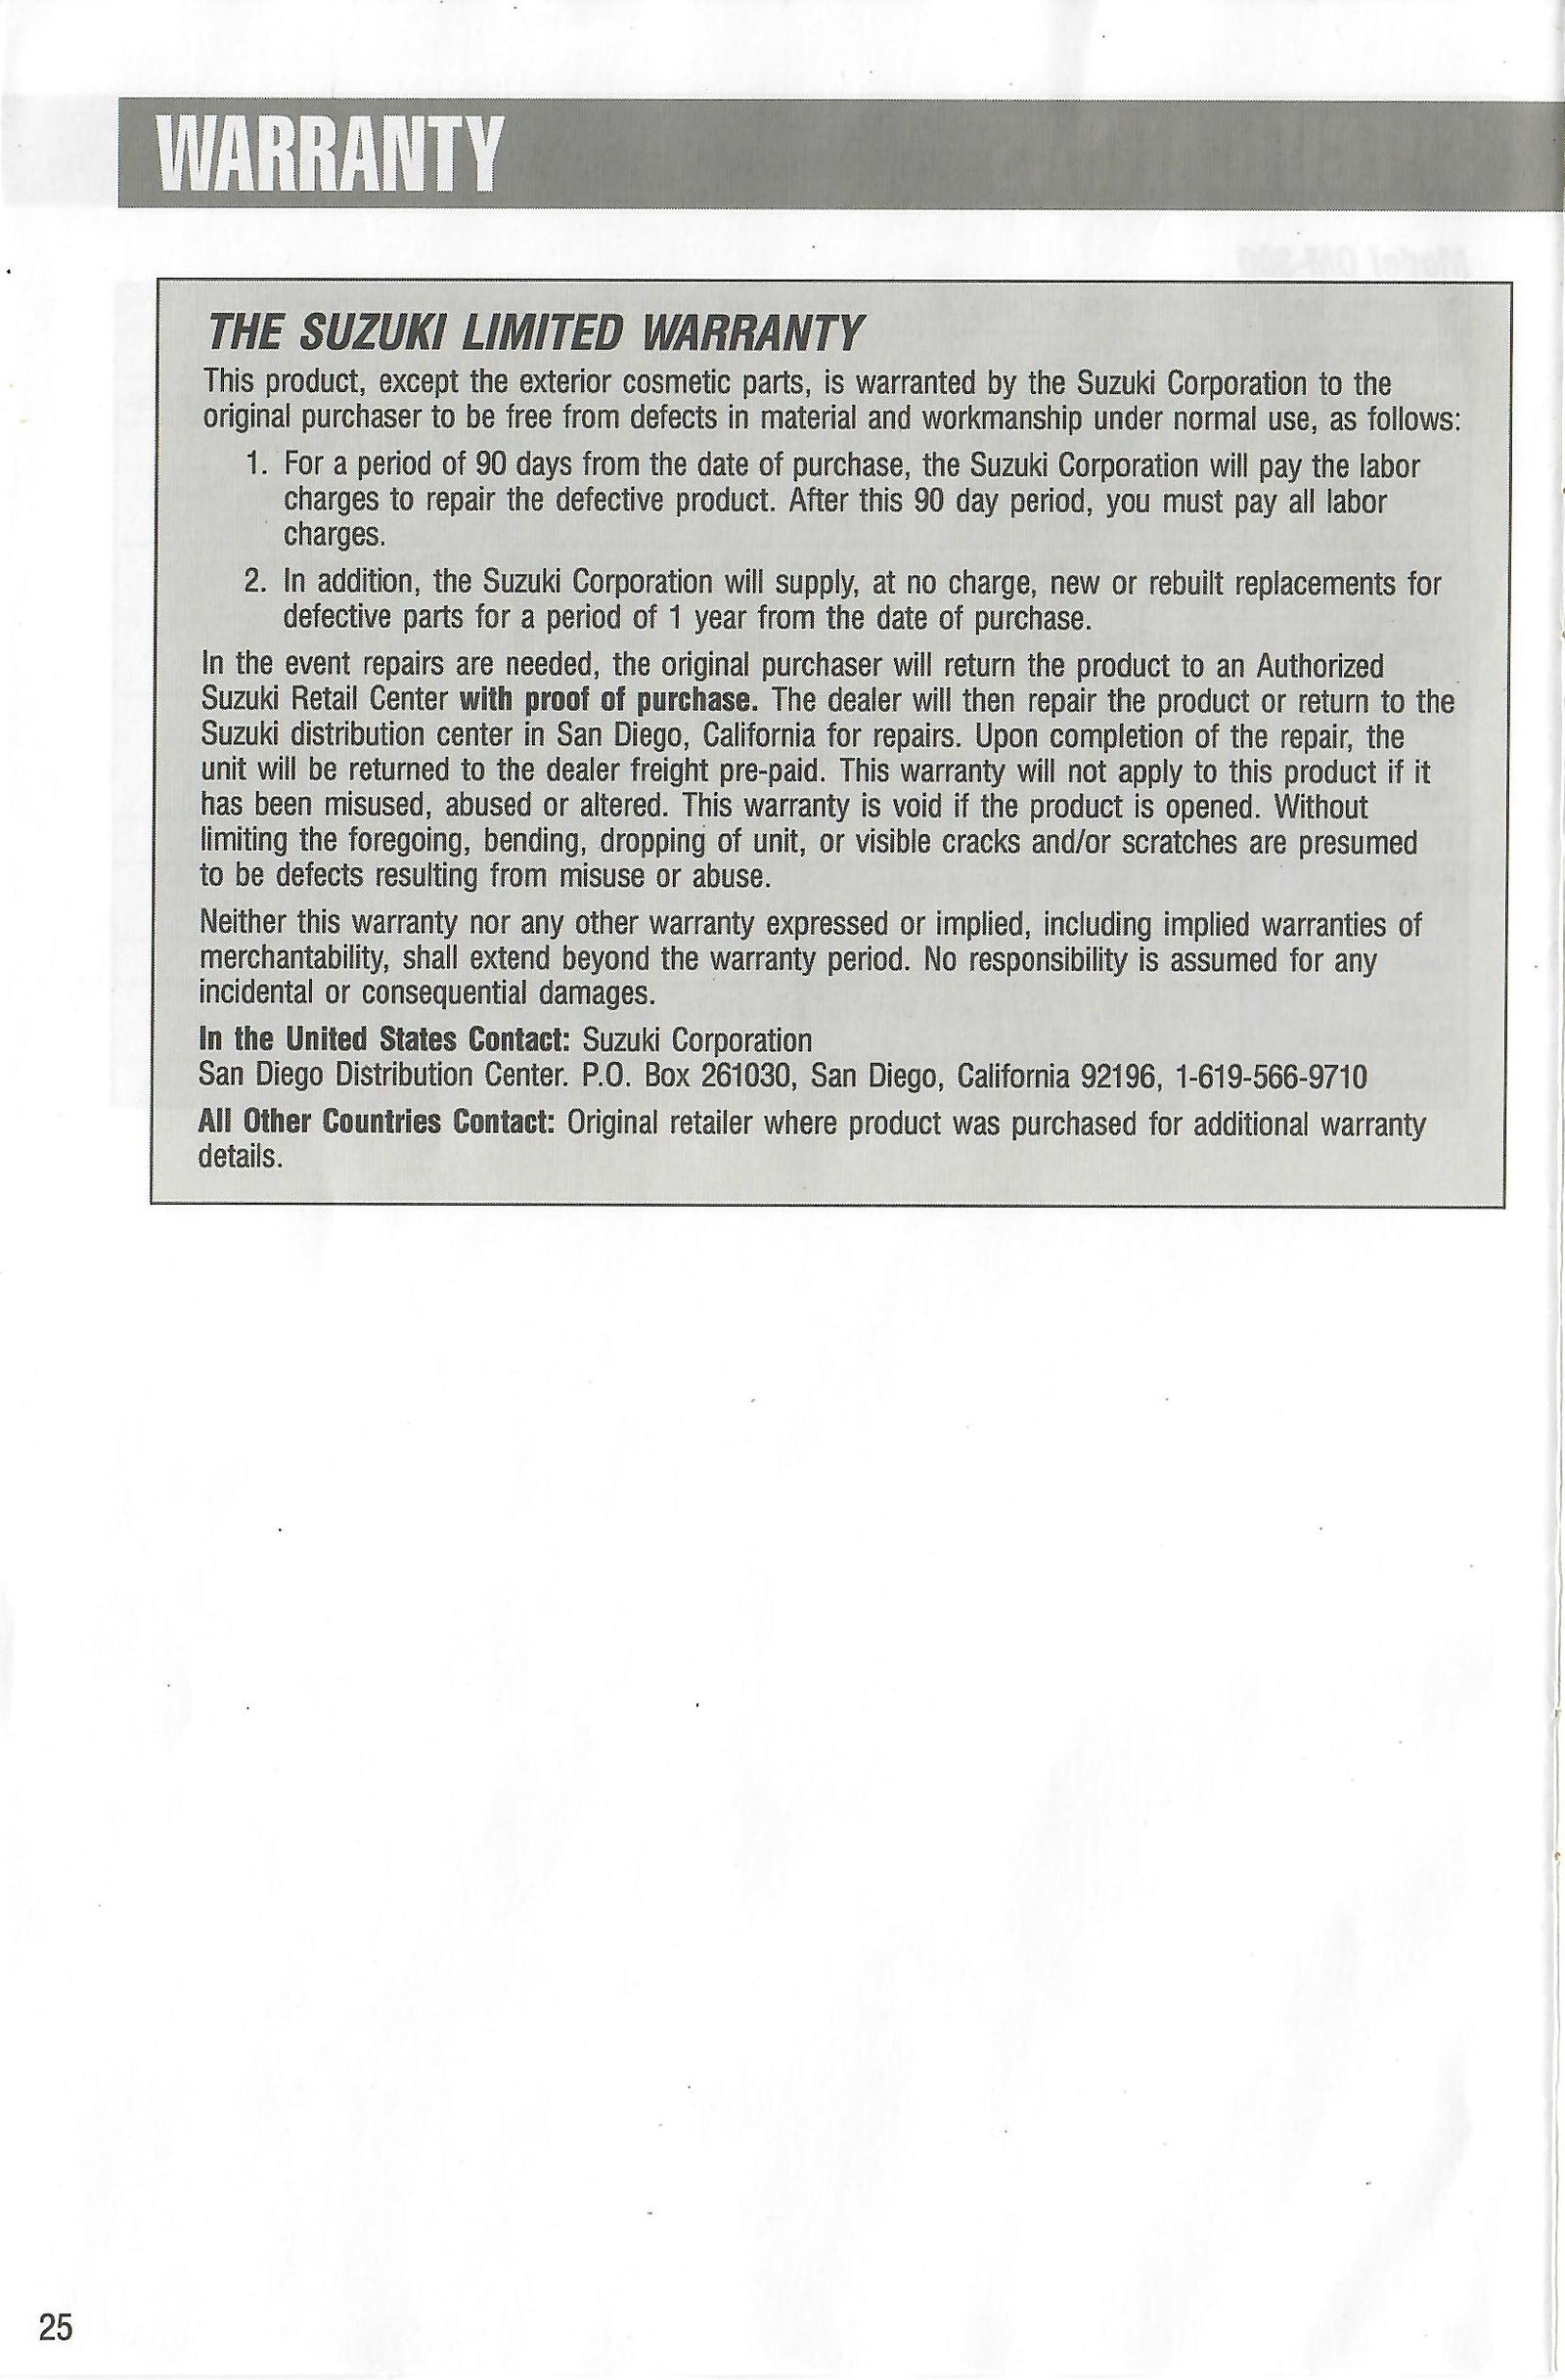
This product, except the exterior cosmetic parts, was warranted by Suzuki Corporation to the original purchaser to be free from defects in material and workmanship under normal use.
For 90 days from purchase, Suzuki would pay labour charges to repair a defective product; after that period, labour charges were the owner's responsibility. Suzuki would also supply new or rebuilt replacement parts for one year from purchase at no charge.
Repairs required the original purchaser to return the product to an Authorized Suzuki Retail Center with proof of purchase. The dealer would repair it or return it to the Suzuki distribution center in San Diego, California. Misuse, abuse, alteration or opening the product voided the warranty; bending, dropping, cracks and scratches were presumed to result from misuse or abuse.
The printed warranty disclaimed extension beyond the stated period and responsibility for incidental or consequential damages. Its United States contact was Suzuki Corporation, San Diego Distribution Center, P.O. Box 261030, San Diego, California 92196, 1-619-566-9710. Other countries were directed to the original retailer.
Original printed Suzuki limited-warranty panel.View original scanned 25