OM-108
Owner's Manual
Thank you for purchasing this unit.
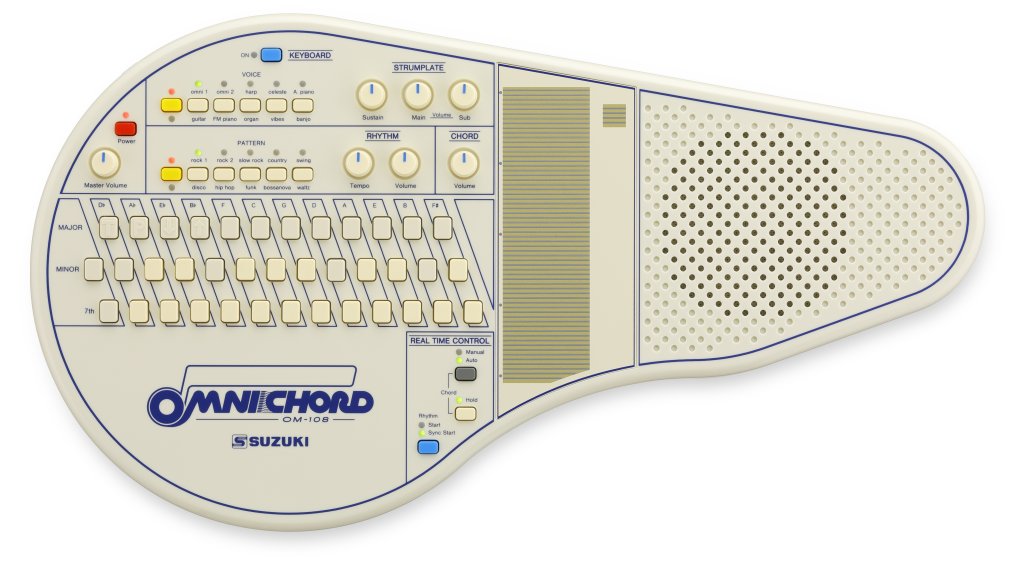
The Omnichord is an electronic musical instrument with an automatic accompaniment function and is equipped with a strumplate.
The Omnichord was created in 1981 with the aim of being an electronic instrument similar to an autoharp.
To take full advantage of your Omnichord and use it safely, be sure to read this manual carefully.
For safety purposes, please make sure you read “SAFETY INSTRUCTIONS” (p.54) and “PRECAUTIONS FOR USE” (p.58) before
using this unit.
1
Table of contents
INTRODUCTION 2
Features . . . . . . . . . . . . . . . . . . . . . . . . . . . . . . . . . . . . . . . . . . . . 2
Accessories . . . . . . . . . . . . . . . . . . . . . . . . . . . . . . . . . . . . . . . . . . . . . . . . . . . . . 2
Optional items (sold separatory) . . . . . . . . . . . . . . . . . . . . . . . . . . . . . . . . . 2
Names and functions . . . . . . . . . . . . . . . . . . . . . . . . . . . . . . . . . 3
Top panel . . . . . . . . . . . . . . . . . . . . . . . . . . . . . . . . . . . . . . . . . . . . . . . . . . . . . . 3
Side panel . . . . . . . . . . . . . . . . . . . . . . . . . . . . . . . . . . . . . . . . . . . . . . . . . . . . . . 5
Bottom panel . . . . . . . . . . . . . . . . . . . . . . . . . . . . . . . . . . . . . . . . . . . . . . . . . . . 6
MAKING THE CONNECTIONS 7
Connections . . . . . . . . . . . . . . . . . . . . . . . . . . . . . . . . . . . . . . . . . 7
Connecting an audio or MIDI device . . . . . . . . . . . . . . . . . . . . . . . . . . . . . . 7
Connecting to power source . . . . . . . . . . . . . . . . . . . . . . . . . . . . . . . . . . . . . 8
Turning on or off this unit . . . . . . . . . . . . . . . . . . . . . . . . . . . . 10
PLAYING THE OMNICHORD 12
Creating sounds . . . . . . . . . . . . . . . . . . . . . . . . . . . . . . . . . . . . 12
Playing chords . . . . . . . . . . . . . . . . . . . . . . . . . . . . . . . . . . . . . . 14
Playing using the strumplate . . . . . . . . . . . . . . . . . . . . . . . . . 17
Making rhythm sounds . . . . . . . . . . . . . . . . . . . . . . . . . . . . . . 19
Playing by using various functions . . . . . . . . . . . . . . . . . . . . 21
Chords and strumplate . . . . . . . . . . . . . . . . . . . . . . . . . . . . . . . . . . . . . . . . . 21
Chords, strumplate and rhythm . . . . . . . . . . . . . . . . . . . . . . . . . . . . . . . . . 22
Automatic accompaniment (chords and bass) . . . . . . . . . . . . . . . . . . . 23
Drum intro . . . . . . . . . . . . . . . . . . . . . . . . . . . . . . . . . . . . . . . . . . . . . . . . . . . . . 24
Playing the practice song . . . . . . . . . . . . . . . . . . . . . . . . . . . . . . . . . . . . . . . 26
Playing the keyboard and drum set . . . . . . . . . . . . . . . . . . . . 28
Keyboard and drum set controllers . . . . . . . . . . . . . . . . . . . . . . . . . . . . . . 28
Playing melodies . . . . . . . . . . . . . . . . . . . . . . . . . . . . . . . . . . . . . . . . . . . . . . . 30
Playing drums . . . . . . . . . . . . . . . . . . . . . . . . . . . . . . . . . . . . . . . . . . . . . . . . . 30
Additional information on the keyboard mode . . . . . . . . . . . . . . . . . . . 31
OTHER FEATURES 32
Master tune . . . . . . . . . . . . . . . . . . . . . . . . . . . . . . . . . . . . . . . . 32
Transpose . . . . . . . . . . . . . . . . . . . . . . . . . . . . . . . . . . . . . . . . . . 34
Octave shift . . . . . . . . . . . . . . . . . . . . . . . . . . . . . . . . . . . . . . . . 36
Reproducing the rhythm notes of OM-84 (Classic Mode) . . 37
MIDI . . . . . . . . . . . . . . . . . . . . . . . . . . . . . . . . . . . . . . . . . . . . . . . 39
Configuring the MIDI transmit settings . . . . . . . . . . . . . . . . . . . . . . . . . . . 39
MIDI information . . . . . . . . . . . . . . . . . . . . . . . . . . . . . . . . . . . . . . . . . . . . . . . 40
Drum map . . . . . . . . . . . . . . . . . . . . . . . . . . . . . . . . . . . . . . . . . . . . . . . . . . . . . 43
MIDI implementation chart . . . . . . . . . . . . . . . . . . . . . . . . . . . . . . . . . . . . . 44
CONFIGURATIONS 45
Auto power off setting . . . . . . . . . . . . . . . . . . . . . . . . . . . . . . . 45
Battery level indicator setting . . . . . . . . . . . . . . . . . . . . . . . . 46
Restoring the factory settings . . . . . . . . . . . . . . . . . . . . . . . . 48
APPENDIX 49
Scale arrangement of the strumplate . . . . . . . . . . . . . . . . . 49
Explanation of voices . . . . . . . . . . . . . . . . . . . . . . . . . . . . . . . 50
Troubleshooting . . . . . . . . . . . . . . . . . . . . . . . . . . . . . . . . . . . . 51
Mounting strap buttons . . . . . . . . . . . . . . . . . . . . . . . . . . . . . 52
Specifications . . . . . . . . . . . . . . . . . . . . . . . . . . . . . . . . . . . . . . 53
SAFETY INSTRUCTIONS . . . . . . . . . . . . . . . . . . . . . . . . . . . . . . 54
PRECAUTIONS FOR USE . . . . . . . . . . . . . . . . . . . . . . . . . . . . . 58
SERVICE
2
INTRODUCTION
Features
The Omnichord is an electronic musical instrument with an automatic accompaniment function and is equipped with a harp sensor
(strumplate). Your pre-selected chord is electronically matched to the four-octave strumplate so you can strum the correct chord progression
for almost any song.
The Omnichord was created in 1981 with the aim of being an electronic instrument similar to an autoharp. Even when the last model bearing
the Omnichord name was discontinued, its popularity remained undiminished, and in response to customer demand, Suzuki decided to
release the OM-108.
Accessories
Check that the following accessories are supplied with the product.
Start Up Guide ×1
Keyboard overlay ×1
Optional items (sold separatory)
AC adaptors (AD1-1210A and AD3-1210A)
Strap buttons (OSB-108)
The illustrations in this Manual are intended as examples only. The actual settings of the controls may differ from the illustration.
Tips
Use the strap buttons to attach a commercially available guitar strap to your Omnichord (p.52).
Names and functions
3
Names and functions
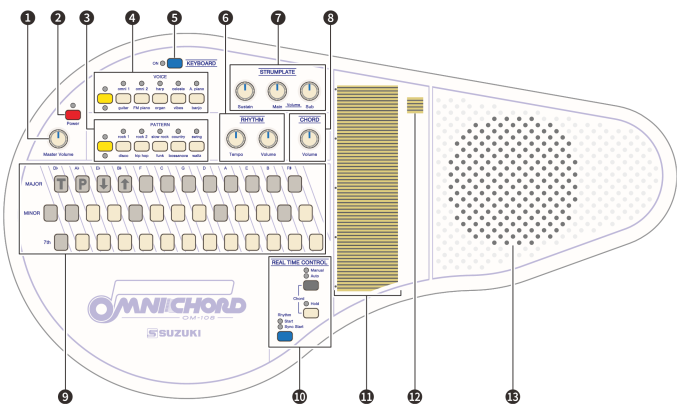
Top panel
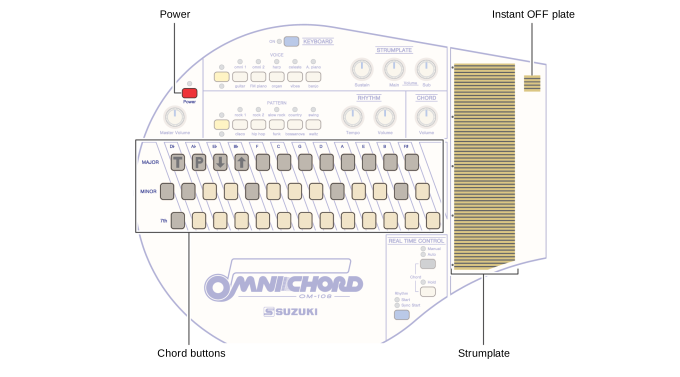
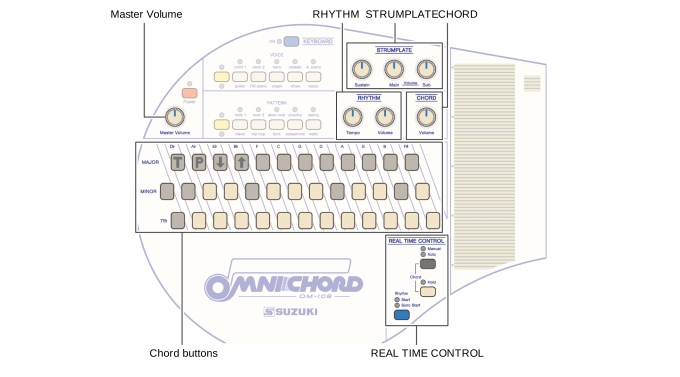
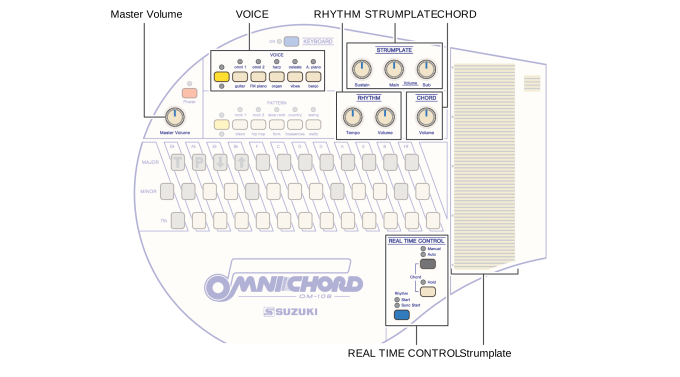
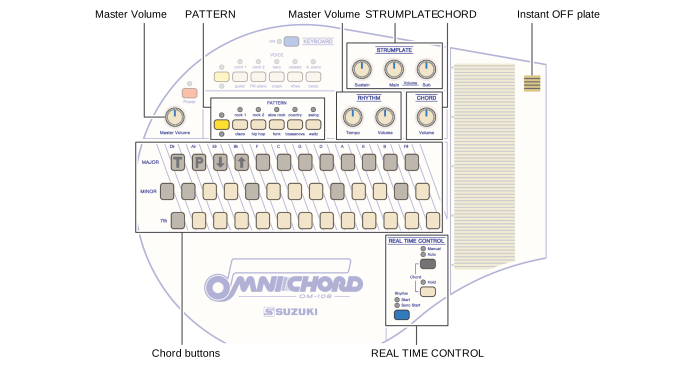
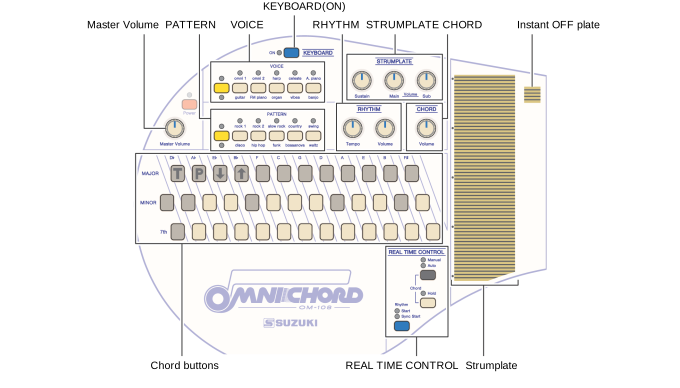
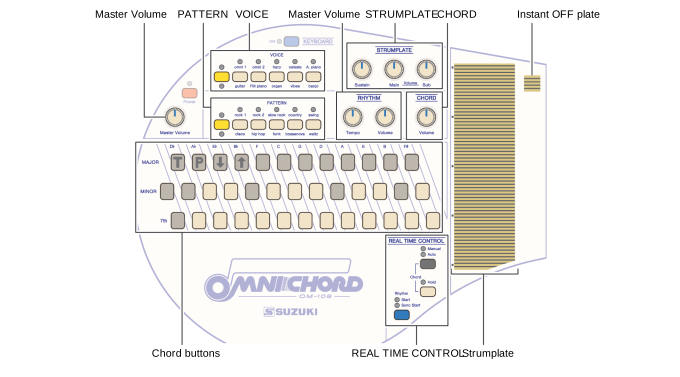
a [Master Volume] knob
Use this knob to control the volume of entire instrument (p.10).
b [Power] button
Use this button to turn on/off this unit (p.10).
c [PATTERN] buttons
Use these buttons to select a rhythm pattern (p.19).
Press the left button (yellow) to switch between the upper and lower sets, and the five right-hand buttons to select a rhythm pattern.
d [VOICE] buttons
Use these buttons to select a strumplate voice (p.17).
Press the left button (yellow) to switch between the upper and lower sets, and the five right-hand buttons to select a voice.
e [KEYBOARD (ON)] button
Use this button to enable/disable the keyboard mode (p.30).
In keyboard mode, the chord buttons, strumplate and Instant OFF plate work as a keyboard/drum set.
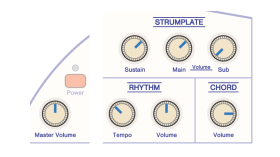
f [RHYTHM] knobs
Use these knobs to adjust the tempo and rhythm volume (p.19).
[Tempo] knob: Use this knob to adjust the rhythm tempo.
[Volume] knob: Use this knob to adjust the rhythm volume.
Tips
When using batteries, the Power LED works as a battery level indicator (p.8).
ab ec hfd g
ji k l m
Names and functions
4
g [STRUMPLATE] knobs
Use these knobs to adjust the sustain and volume of the strumplate voice (p.17).
[Sustain] knob: Use this knob to adjust the sustain level of the strumplate.
[Main Volume] knob: Use this knob to adjust the volume of the strumplate (main voice).
[Sub Volume] knob: Use this knob to adjust the volume of the strumplate (sub voice).
h [CHORD Volume] knob
Use this knob to adjust the volume of the chord/bass sounds (p.24).
i Chord buttons
Use these buttons to select a chord (p.14).
In keyboard mode, these buttons work as a keyboard/drum set (p.28).
j [REAL TIME CONTROL] buttons
Use these buttons to select play modes for the chord and rhythm (p.21).
k Strumplate
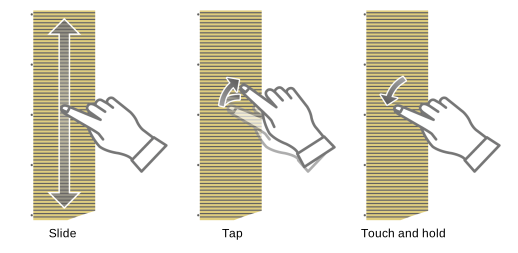
Slide or tap this plate with your finger to create sounds (p.17).
l Instant OFF plate
Tap this plate to stop playing sounds (p.12).
m Speaker
Button Function
[Chord Manual/Auto] button Use this button to enable/disable automatic chord/bass playing.
Manual: Automatic chord/bass playing is disabled.
Auto: Automatic chord/bass playing is enabled. Chord/bass automatically sounds according to a selected
rhythm pattern.
[Chord Hold] button Use this button to enable/disable the chord hold function.
On (LED turns on): The last selected state (automatic chord/bass playing) is maintained even after you
release the chord button.
Off (LED turns off): Automatic chord/bass playing stops when you release the chord button.
[Rhythm Start/Sync Start] button Use this button to turn on/off the rhythm synchronization.
Start: The selected rhythm sounds continuously.
Sync Start: The selected rhythm sounds in synchronization with chord playing.
Note
The rhythm sounds do not stop when the rhythm synchronization is turned off.
Names and functions
5
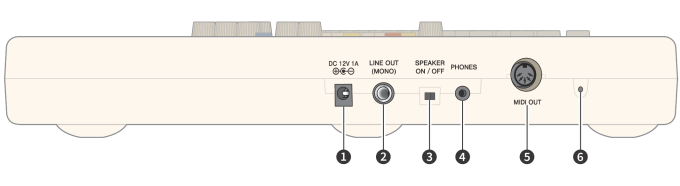
Side panel
a DC12V/1A jack
Use this jack to connect the AC adaptor (sold separately) (p.9).
b LINE OUT (MONO) jack
Use this jack to output audio to a connected audio device (such as a powered speaker or a mixer) (p.7).
c [SPEAKER(ON/OFF)] switch
Use this switch to enable/disable the speaker output of this unit when an external audio equipment is connected to the LINE OUT (MONO)
jack (p.7).
d PHONES jack
Use this jack to connect a set of stereo headphones (p.7).
e MIDI OUT port
Use this port to transmit MIDI data to a connected MIDI device (p.7).
f Strap button mounting holes
Use these holes to mount the strap buttons (sold separately) for attaching a commercially available guitar strap (p.52).
a b c d e f
Names and functions
6
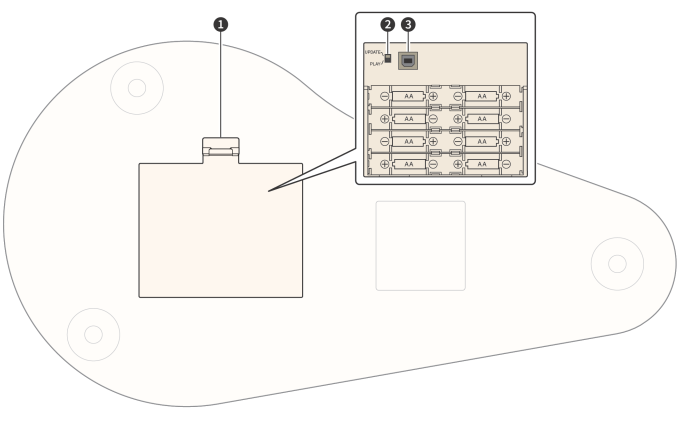
Bottom panel
a Battery box
Insert eight AA batteries (sold separately) into the box (p.8).
b [UPDATE/PLAY] switch
This switch is for factory maintenance. Keep the switch at the “PLAY” position.
c USB port
This port is for factory maintenance.
Note
Use of alkaline batteries is recommended. Rechargeable batteries (Ni-MH) can be used.
AA
AA
AA
AA
PLAY
AA
AA
AA
AA
UPDATE
cba
7
MAKING THE CONNECTIONS
Connections
Connecting an audio or MIDI device
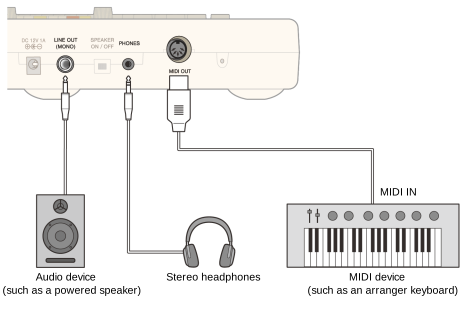
LINE OUT (MONO) jack
Connect an audio device (such as a powered speaker or a mixer) to output audio of this unit to the audio device.
Use a monaural cable (standard 1/4-inch plug) to make the connection.
PHONES jack
Connect a set of stereo headphones to the PHONES jack (1/8-inch connection).
MIDI OUT port
Connect a MIDI device (such as an arranger keyboard) to transmit MIDI data to it.
Use a MIDI cable (5-pin DIN) to make the connection.
Note
Be sure to turn off all devices before making a connection.
Tips
To enable speaker output of this unit at the same time, set the [SPEAKER(ON/OFF)] switch to “ON”.
Tips
Connecting headphones will mute the speaker outputs, but not the LINE OUT outputs. If you wish the sound to go through the headphones only, make
sure the LINE OUT (MONO) jack is disconnected.
Note
Configure the MIDI receive settings on the MIDI device and transmit settings on this unit (p.39).
Audio device
(such as a powered speaker)
Stereo headphones MIDI device
(such as an arranger keyboard)
MIDI IN
Connections
8
Connecting to power source
Using batteries
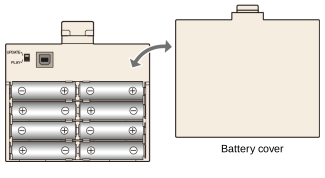
1 Remove the battery cover and insert eight AA batteries (sold separately) into the battery box in the right way.
Use of alkaline batteries is recommended. Rechargeable batteries (Ni-MH) can be used.
2 Attach the battery cover.
Battery level indicator
The Power LED indicates the current battery level when batteries are used.
Power LED Battery level
Light on (bright) High
Light on (dim) Low
Flashing Battery almost depleted (replace the batteries)
Note
Due to the characteristic of rechargeable batteries (Ni-MH), the battery level may be recognized less than the actual amount. When using rechargeable
batteries (Ni-MH) or when replacing them with alkaline batteries, configure the battery level indicator setting (p.46).
AA
AA
AA
AA
AA
AA
AA
AA
PLAY
UPDA TE
Battery cover
Connections
9
Using the AC adaptor
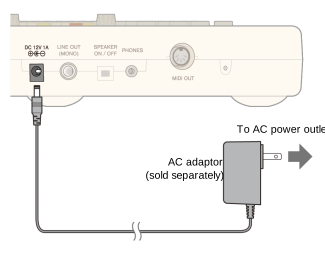
Connect an authorized AC adaptor to the DC12V/1A jack on this unit, then connect it to an AC power outlet.
Note
Power source via the AC adaptor has priority over the batteries.
To AC power outlet
AC adaptor
(sold separately)
Turning on or off this unit
10
Turning on or off this unit
Turning on this unit
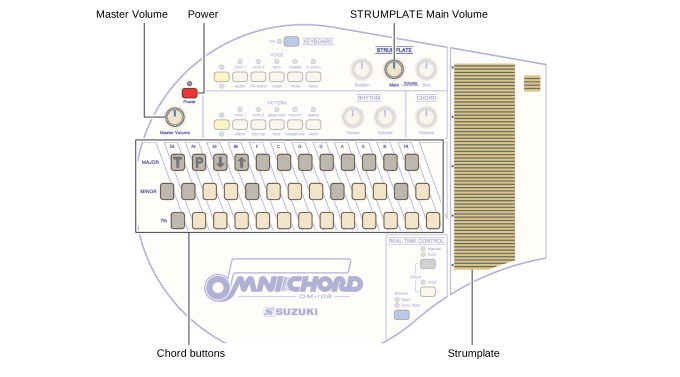
1 Rotate the [Master Volume] knob counterclockwise to set the volume at minimum.
2 Press the [Power] button.
This unit turns on and the power LED lights up.
3 Turn on external devices.
4 Press any of the chord buttons. While sliding your finger on the strumplate, gradually rotate the [Master Volume] knob clockwise
to adjust the volume.
Note
Do not touch the strumplate or Instant OFF plate while this unit is powering on. The plate sensors are calibrated at startup.
Master Volume Power STRUMPLATE Main Volume
Chord buttons Strumplate
Slide
Turning on or off this unit
11
5 Adjust the volume of the external device (such as a powered speaker).
Turning off this unit
1 Set the volume of the external device (such as a powered speaker) at minimum.
2 Turn off any external devices.
3 Press and hold the [Power] button for two seconds.
The power LED tuns off and the power of this unit goes off.
Note
When adjusting the volume, also adjust the [STRUMPLATE Main Volume] knob to enable sound.
Tips
If no buttons or knobs are used for 30 minutes, this unit will automatically turn off (auto power off). You can enable/disable the auto power off function
(p.45).
Note
The selection state of the buttons is not memorized when this unit is turned off (except the following settings).
- Rhythm tone setting (classic mode) (p.37)
- MIDI transmit setting (p.39)
- Auto power off setting (p.45)
- Battery level indicator setting (p.46)
12
PLAYING THE OMNICHORD
Creating sounds
Let's begin making sounds.
1 Press the [Power] button.
This unit turns on and the power LED lights up.
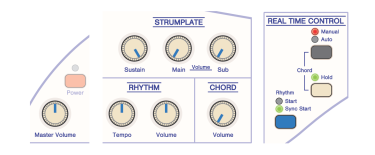
2 Set the controls as shown.
3 Press any of the chord buttons.
Tips
The following procedure is also described in the supplied “Start Up Guide”.
Power Instant OFF plate
Chord buttons Strumplate
Creating sounds
13
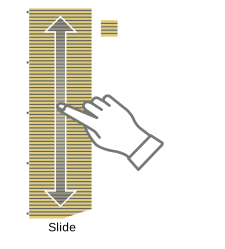
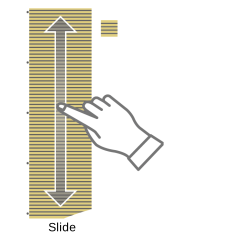
4 Slide your finger on the strumplate to create sounds.
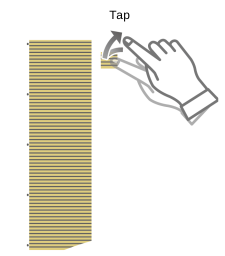
5 To stop playing sounds, tap the Instant OFF plate.
Slide
Tap
Playing chords
14
Playing chords
You can play 108 chords (in combination of roots and suffixes).
Root: Df, Af, Ef, Bf, F, C, G, D, A, E, B, Fs
Suffix: Major, minor, 7th, Major 7th, minor 7th, Augmented, diminished, suspended 4th, add 9th
1 Set the controls as shown.
Note
The chords of this unit consist of triads. Fifth of the 7th, Major 7th, minor 7th and diminished chords cannot be played.
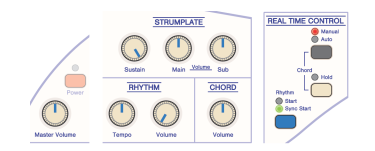
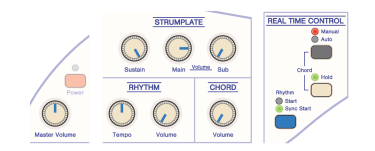
Knobs and buttons Setting
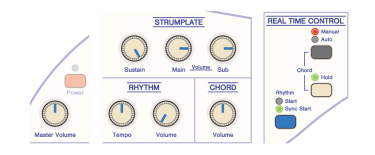
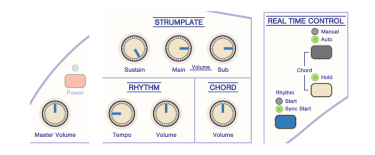
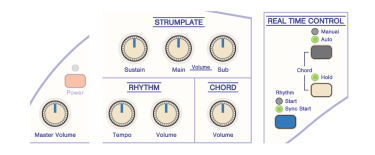
[Master Volume] Center
[STRUMPLATE] [Sustain] Maximum
[Main Volume] Center
[Sub Volume] Center
[RHYTHM] [Tempo] Center
[Volume] Minimum
[CHORD] [Volume] Center
Master Volume
Chord buttons
CHORDRHYTHM STRUMPLATE
REAL TIME CONTROL
Playing chords
15
2 Press any of the chord buttons (one to three buttons).
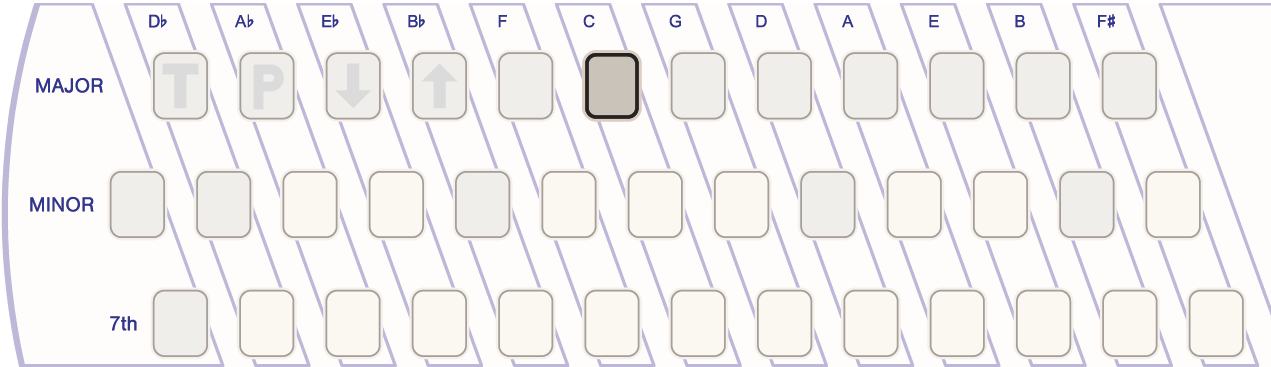
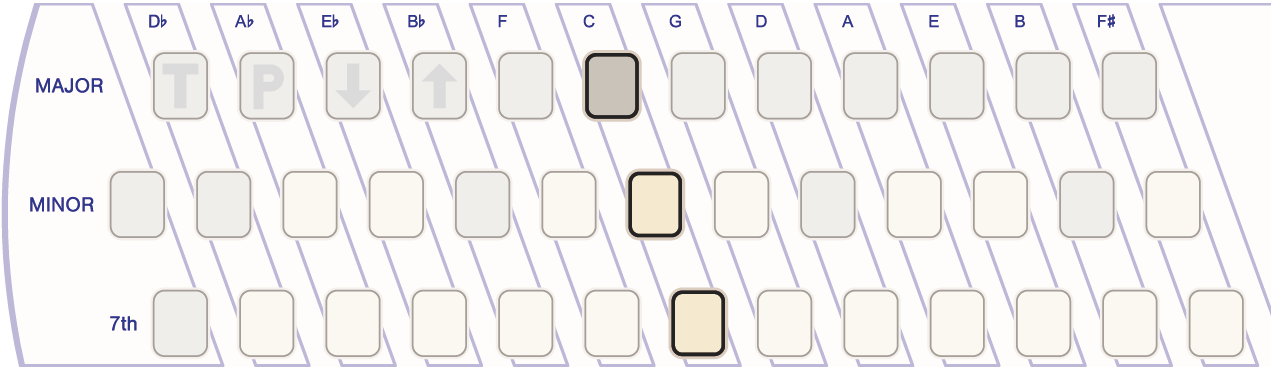
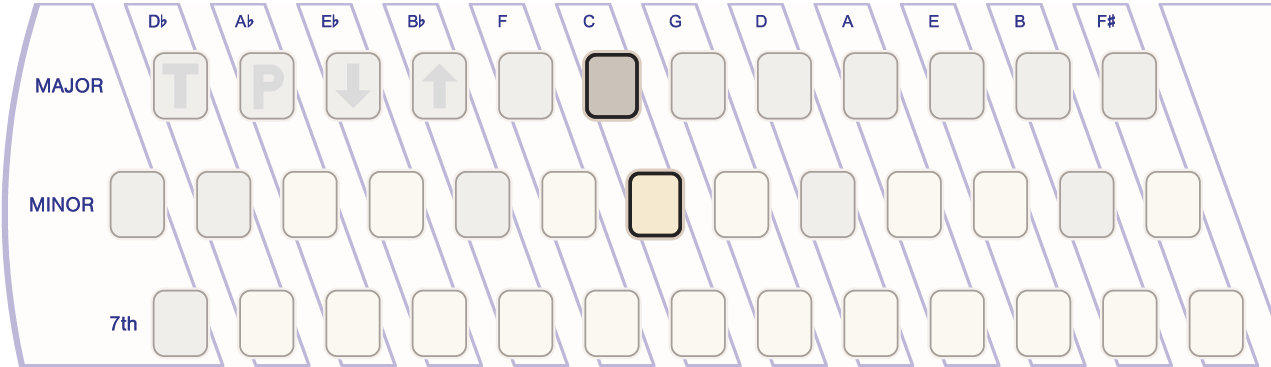
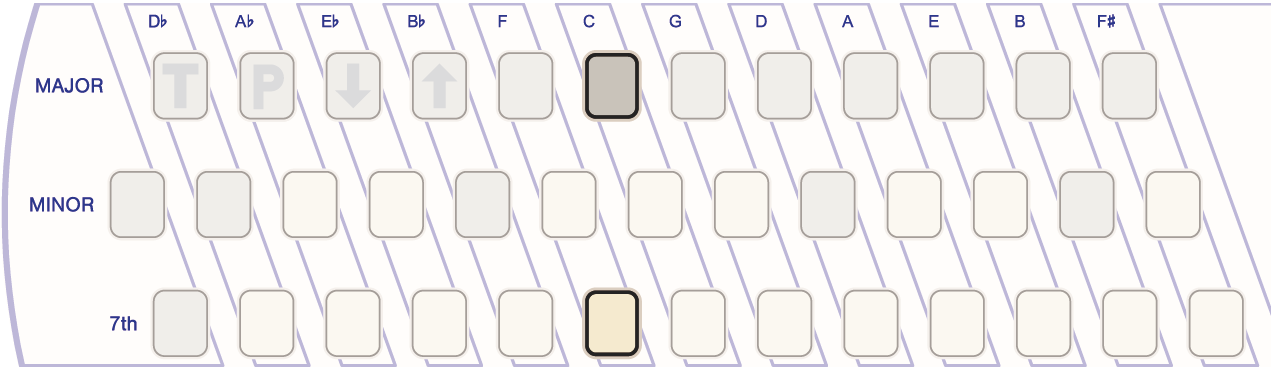
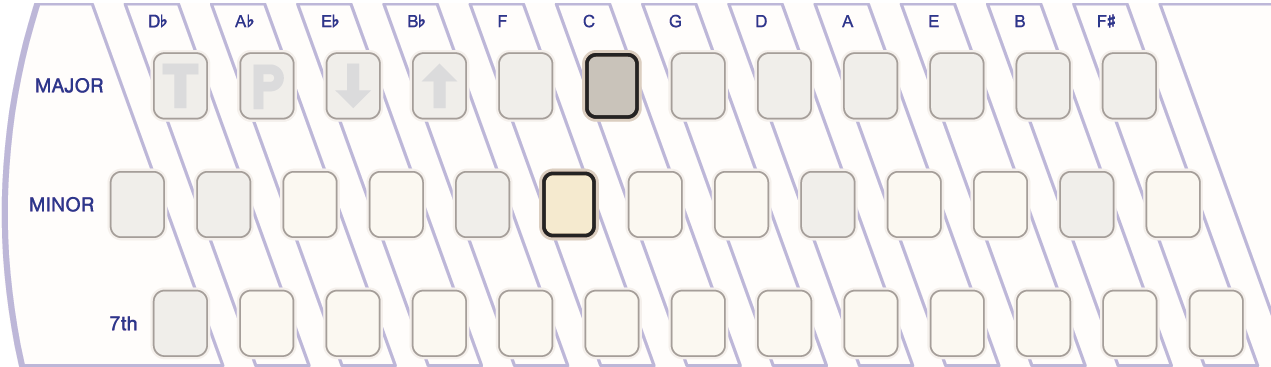
Major chord
(Example: C) Press the “C-MAJOR” chord button.
minor chord
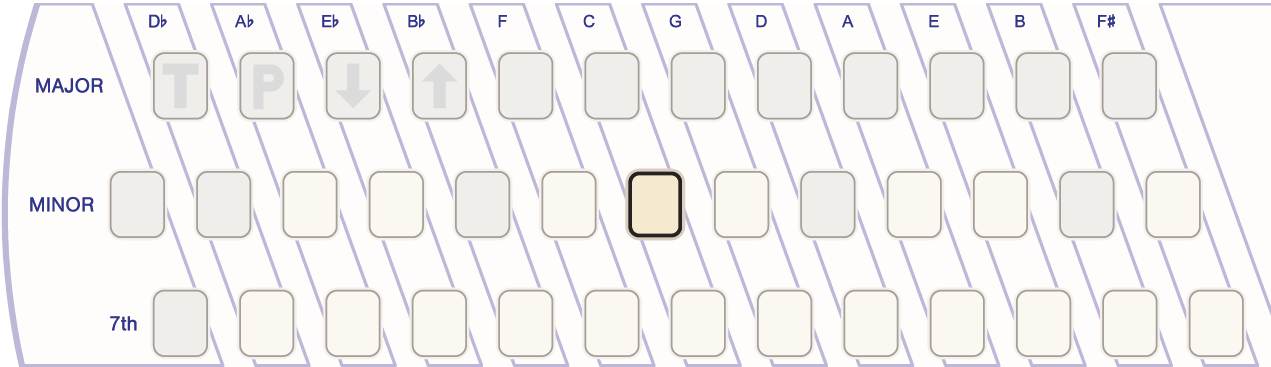
(Example: Cm) Press the “C-MINOR” chord button.
7th (dominant 7th) chord
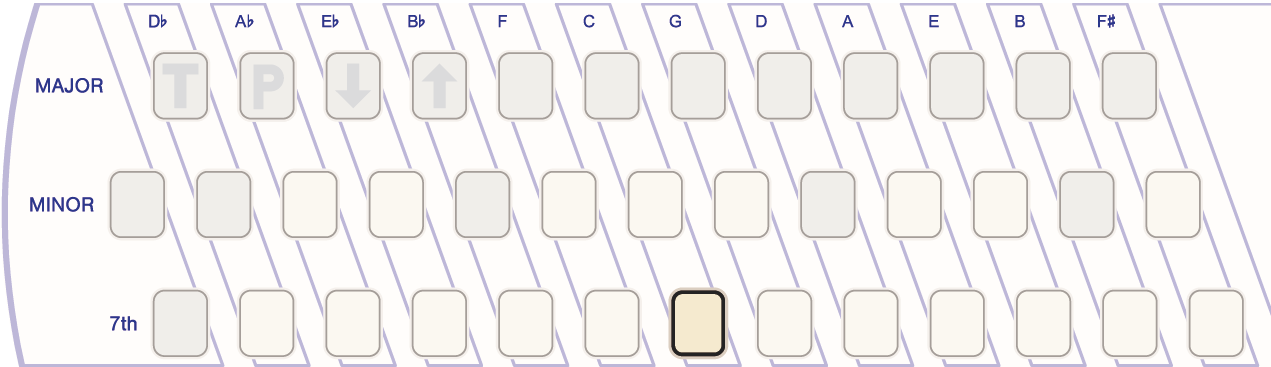
(Example: C7) Press the “C-7th” chord button.
Major 7th (M7) chord
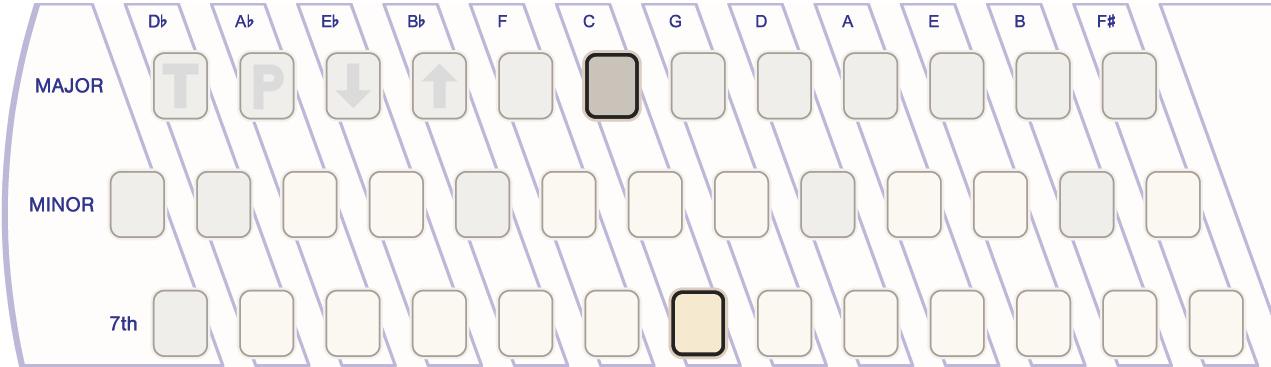
(Example: CM7) Press the “C-MAJOR” and “C-7th” chord buttons at the same time.
[REAL TIME CONTROL] [Chord Manual/Auto] Manual
[Chord Hold] Disabled (LED turned off)
[Rhythm Start/Sync Start] Sync Start
Tips
To play chord sounds continuously, enable the chord hold function.
Knobs and buttons Setting
Playing chords
16
minor 7th (m7) chord
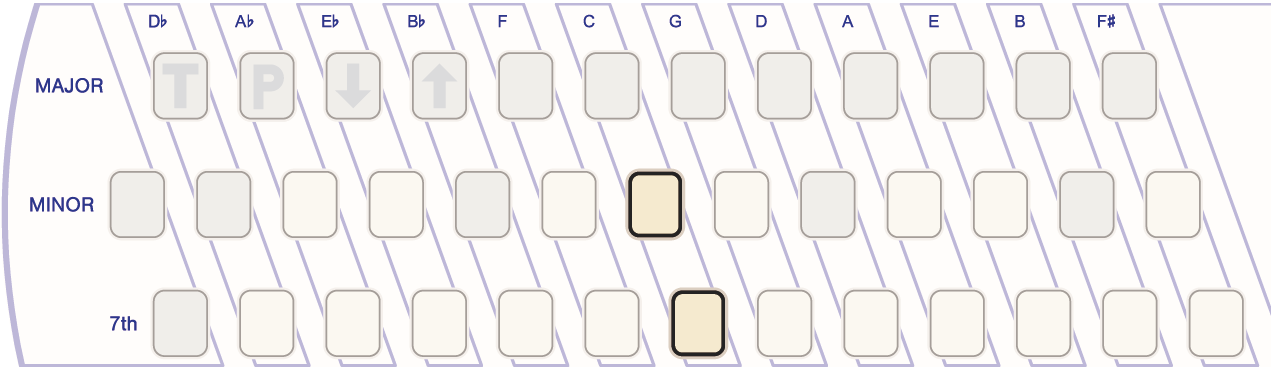
(Example: Cm7) Press the “C-MINOR” and “C-7th” chord buttons at the same time.
Augmented (aug) chord
(Example: Caug) Press the “C-MAJOR”, “C-MINOR” and “C-7th” chord buttons at the same time.
diminished (dim) chord
(Example: Cdim) Press the “C-MAJOR” and “C-MINOR” chord buttons at the same time.
suspended 4th (sus4) chord
(Example: Csus4) Press the “C-MAJOR” and “F-7th” (left of “C-7th”) chord buttons at the same time.
add 9th (add9) chord
(Example: Cadd9) Press the “C-MAJOR” and “F-MINOR” (left of “C-MINOR”) chord buttons at the same time.
Playing using the strumplate
17
Playing using the strumplate
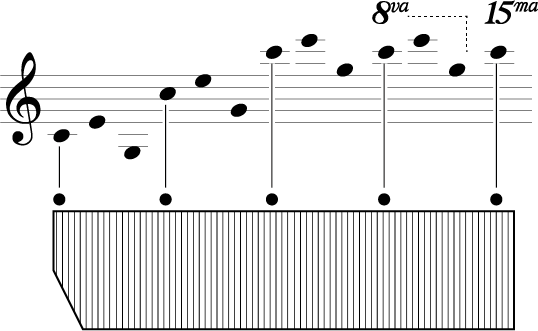
Fundamental notes of the selected chord (four octaves) will be arranged in the strumplate (p.49).
To play using the strumplate, simply slide or tap your finger on it.
Each note composes of two types of voices (main voice and sub voice). You can create a favorite sound by adjusting the balance of the main
and sub voices. For details about main and sub voices, refer to “Explanation of voices” (p.50).
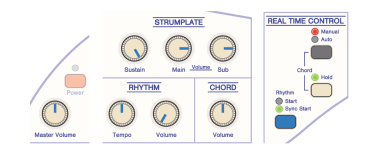
1 Set the controls as shown.
Knobs and buttons Setting
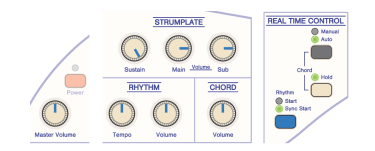
[Master Volume] Center
[STRUMPLATE] [Sustain] Maximum
[Main Volume] 3 o'clock
[Sub Volume] Minimum
[RHYTHM] [Tempo] Center
[Volume] Minimum
[CHORD] [Volume] Minimum
[REAL TIME CONTROL] [Chord Manual/Auto] Manual
[Chord Hold] Enabled (LED turned on)
[Rhythm Start/Sync Start] Sync Start
Master Volume
REAL TIME CONTROL Strumplate
VOICE STRUMPLATERHYTHM CHORD
Playing using the strumplate
18
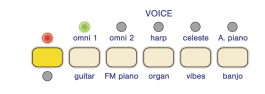
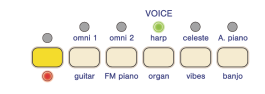
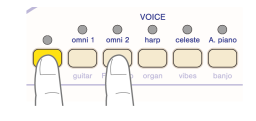
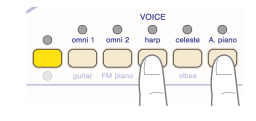
2 Use the [VOICE] buttons to select a voice.
Press the left button (yellow) to switch between the upper and lower sets, and the five right-hand buttons to select a voice.
(Example: “omni1” is selected)
(Example: “organ” is selected)
3 Press any of the chord buttons, then slide or tap the strumplate to play sounds.
4 Rotate the [STRUMPLATE Sub Volume] knob to adjust the volume of the sub voice.
By increasing the volume of the sub voice, it gradually harmonizes with the main voice, and the sound becomes gorgeous.
5 Rotate the [STRUMPLATE Sustain] knob to adjust the sustain level of the strumplate voice.
The sustain effect is added to both the main and sub voices together. You cannot adjust them individually.
Tips
The sounding manner differs in three ways.
Slide: chord stroke
Tap: single sound (tap repeatedly to perform arpeggio)
Touch and hold: continuous sound
Tips
If you want to play with a sub voice only, set the main voice volume to minimum.
Slide Tap Touch and hold
Making rhythm sounds
19
Making rhythm sounds
This unit is equipped with 10 rhythm patterns that correspond to a variety of music styles.
Select a rhythm pattern and adjust the tempo.
1 Set the controls as shown.
Tips
This unit is equipped with “Classic Mode” (p.37). When activated, the rhythm voicing of the OM-84 can be used.
Knobs and buttons Setting
[Master Volume] Center
[STRUMPLATE] [Sustain] Maximum
[Main Volume] Minimum
[Sub Volume] Minimum
[RHYTHM] [Tempo] Center
[Volume] Center
[CHORD] [Volume] Minimum
[REAL TIME CONTROL] [Chord Manual/Auto] Manual
[Chord Hold] Enabled (LED turned on)
[Rhythm Start/Sync Start] Sync Start
Master Volume
REAL TIME CONTROL
PATTERN Master Volume STRUMPLATE CHORD Instant OFF plate
Chord buttons
Making rhythm sounds
20
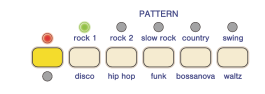
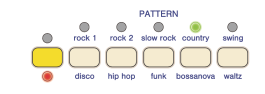
2 Use the [PATTERN] buttons to select a rhythm.
Press the left button (yellow) to switch between upper and lower sets, and the five right-hand buttons to select a rhythm.
(Example: “rock1” is selected)
(Example: “bossanova” is selected)
3 Press any of the chord buttons.
Playback of the selected rhythm starts.
4 Rotate the [RHYTHM Tempo] knob to adjust the rhythm tempo.
5 To stop playing sounds, tap the Instant OFF plate.
Note
If you select another rhythm while any rhythm is playing, it will change at the start of the next bar.
Playing by using various functions
21
Playing by using various functions
By combining chord, strumplate, rhythm and REAL TIME CONTROL functions, you can achieve a musical performance with rich expression.
This chapter introduces some typical examples.
Chords and strumplate
You can play continuous chord sounds and strumplate together. This is effective as a song introduction or for free tempo play.
1 Set the controls as shown.
Knobs and buttons Setting
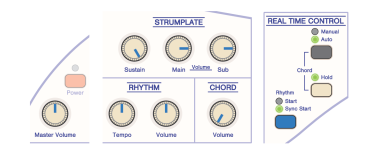
[Master Volume] Center
[STRUMPLATE] [Sustain] Maximum
[Main Volume] 3 o'clock
[Sub Volume] 3 o'clock
[RHYTHM] [Tempo] Center
[Volume] Minimum
[CHORD] [Volume] Center
Master Volume
REAL TIME CONTROL
PATTERN Master Volume STRUMPLATE CHORD Instant OFF plate
Chord buttons Strumplate
VOICE
Playing by using various functions
22
2 Use the [VOICE] buttons to select a voice (p.17).
3 Press any of the chord buttons, then play the strumplate.
The chord and strumplate sounds begin to play.
4 To stop playing sounds, tap the Instant OFF plate.
Chords, strumplate and rhythm
With rhythm sounds, you can perform an ensemble of chords and strumplate by yourself.
1 Set the controls as shown.
2 Use the [VOICE] buttons to select a voice (p.17).
3 Use the [PATTERN] buttons to select a rhythm (p.19).
4 Press any of the chord buttons.
The chord sounds begin to play.
5 Rotate the [RHYTHM Volume] clockwise gradually.
The rhythm sounds are gradually added.
6 Rotate the [RHYTHM Tempo] knob to adjust the rhythm tempo.
7 While pressing any of the chord buttons, play the strumplate.
8 To stop playing sounds, tap the Instant OFF plate.
[REAL TIME CONTROL] [Chord Manual/Auto] Manual
[Chord Hold] Enabled (LED turned on)
[Rhythm Start/Sync Start] Sync Start
Knobs and buttons Setting
[Master Volume] Center
[STRUMPLATE] [Sustain] Maximum
[Main Volume] 3 o'clock
[Sub Volume] 3 o'clock
[RHYTHM] [Tempo] Center
[Volume] Minimum
[CHORD] [Volume] Center
[REAL TIME CONTROL] [Chord Manual/Auto] Manual
[Chord Hold] Enabled (LED turned on)
[Rhythm Start/Sync Start] Sync Start
Knobs and buttons Setting
Playing by using various functions
23
Automatic accompaniment (chords and bass)
You can add strumplate play to automatic accompaniment of chords and bass in response to a selected rhythm. This is the most gorgeous
play style of this unit.
1 Set the controls as shown.
2 Use the [VOICE] buttons to select a voice (p.17).
3 Use the [PATTERN] buttons to select a rhythm (p.19).
4 Press any of the chord buttons.
The chord and bass sounds begin to play according to the selected rhythm.
5 Rotate the [RHYTHM Tempo] knob to adjust the rhythm tempo.
6 Press any of the chord buttons, then play the strumplate.
7 To stop playing sounds, tap the Instant OFF plate.
Knobs and buttons Setting
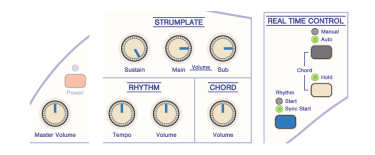
[Master Volume] Center
[STRUMPLATE] [Sustain] Maximum
[Main Volume] 3 o'clock
[Sub Volume] 3 o'clock
[RHYTHM] [Tempo] Center
[Volume] Center
[CHORD] [Volume] Center
[REAL TIME CONTROL] [Chord Manual/Auto] Auto
[Chord Hold] Enabled (LED turned on)
[Rhythm Start/Sync Start] Sync Start
Playing by using various functions
24
Drum intro
You can perform a song with drum intro. Here. we will introduce two typical methods.
Fade-in (chord and bass)
1 Set the controls as shown.
2 Use the [VOICE] buttons to select a voice (p.17).
3 Use the [PATTERN] buttons to select a rhythm (p.19).
4 Press a chord button to select the chord used for the introduction.
Drum intro starts.
5 Rotate the [CHORD Volume] knob clockwise gradually.
The chord and bass sounds are gradually added.
Knobs and buttons Setting
[Master Volume] Center
[STRUMPLATE] [Sustain] Maximum
[Main Volume] 3 o'clock
[Sub Volume] 3 o'clock
[RHYTHM] [Tempo] Center
[Volume] Center
[CHORD] [Volume] Minimum
[REAL TIME CONTROL] [Chord Manual/Auto] Auto
[Chord Hold] Enabled (LED turned on)
[Rhythm Start/Sync Start] Sync Start
Playing by using various functions
25
Adding chord and bass together
1 Set the controls as shown.
2 Use the [VOICE] buttons to select a voice (p.17).
3 Use the [PATTERN] buttons to select a rhythm (p.19).
4 Press the [Rhythm Start/Sync Start] button to select “Start”.
Drum intro starts.
5 Press any of the chord buttons.
The chord and bass sounds are added at the same time.
Knobs and buttons Setting
[Master Volume] Center
[STRUMPLATE] [Sustain] Maximum
[Main Volume] 3 o'clock
[Sub Volume] 3 o'clock
[RHYTHM] [Tempo] Center
[Volume] Center
[CHORD] [Volume] Center
[REAL TIME CONTROL] [Chord Manual/Auto] Auto
[Chord Hold] Enabled (LED turned on)
[Rhythm Start/Sync Start] Sync Start
Note
To stop playing sounds, press the [Rhythm Start/Sync Start] button to select “Sync Start”, then tap the Instant OFF plate. The Instant OFF plate does
not work when “Start” is selected.
Playing by using various functions
26
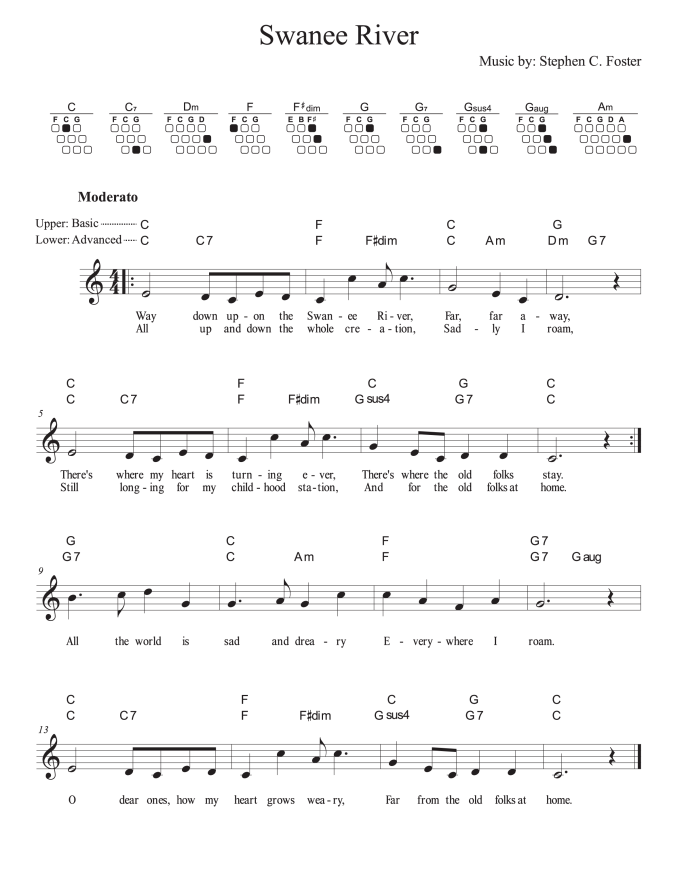
Playing the practice song
1
Set the controls as shown.
2 Use the [VOICE] buttons to select a voice (p.17).
3 Use the [PATTERN] buttons to select a rhythm (p.19).
We recommend “rock1” for this practice song.
4 Start playing.
5 To stop playing sounds, tap the Instant OFF plate.
Knobs and buttons Setting
[MASTER VOLUME] Center
[STRUMPLATE] [Sustain] Maximum
[Main Volume] 3 o'clock
[Sub Volume] 3 o'clock
[RHYTHM] [Tempo] 9 o'clock
[Volume] Center
[CHORD] [Volume] Center
[REAL TIME CONTROL] [Chord Manual/Auto] Auto
[Chord Hold] Enabled (LED turned on)
[Rhythm Start/Sync Start] Sync Start
Tips
As your performance improves, increase the rhythm tempo.
Playing by using various functions
27
Playing the keyboard and drum set
28
Playing the keyboard and drum set
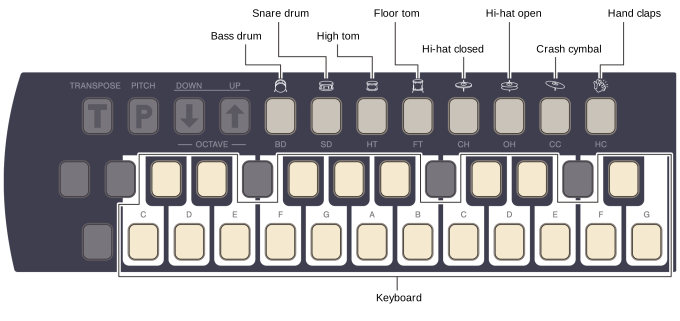
This unit is equipped with a keyboard mode. In keyboard mode, the chord buttons and plates work as a keyboard/drum set.
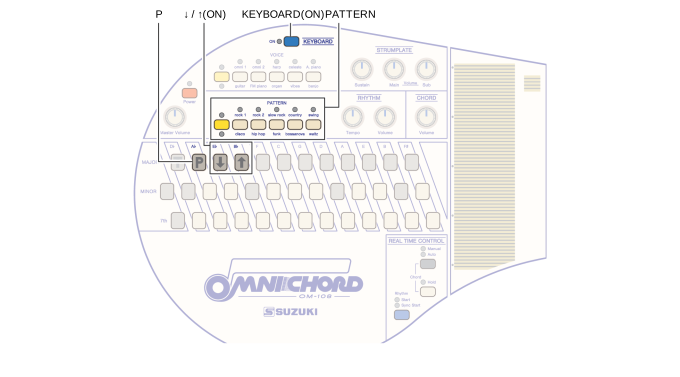
Keyboard and drum set controllers
Chord buttons (with keyboard overlay)
Master Volume STRUMPLATE CHORDRHYTHMPATTERN Instant OFF plate
Chord buttons
VOICE
REAL TIME CONTROL Strumplate
KEYBOARD(ON)
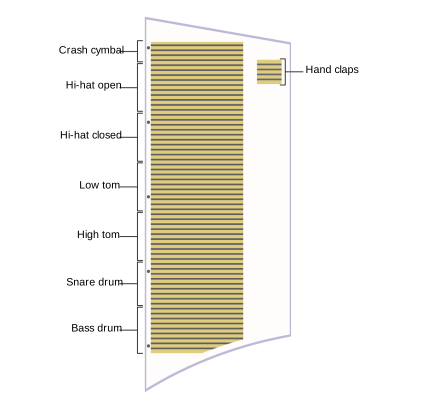
Bass drum
Snare drum
High tom
Floor tom
Hi-hat closed Crash cymbal
Hi-hat open Hand claps
Keyboard
Playing the keyboard and drum set
29
Strumplate and Instant OFF plate
Crash cymbal
Hi-hat open
Hi-hat closed
Low tom
High tom
Snare drum
Bass drum
Hand claps
Playing the keyboard and drum set
30
Playing melodies
Use the chord buttons (keyboard) to play melodies.
1 Set the controls as shown.
2 Press the [KEYBOARD (ON)] button to turn on its LED.
The keyboard mode is enabled.
3 Use the [VOICE] buttons to select a voice (p.17).
4 Use the [PATTERN] but
Transpose
34
Transpose
You can transpose the pitch by half-steps (semitones).
When you sing to your own accompaniment without changing chords, transpose the pitch to suit your voice.
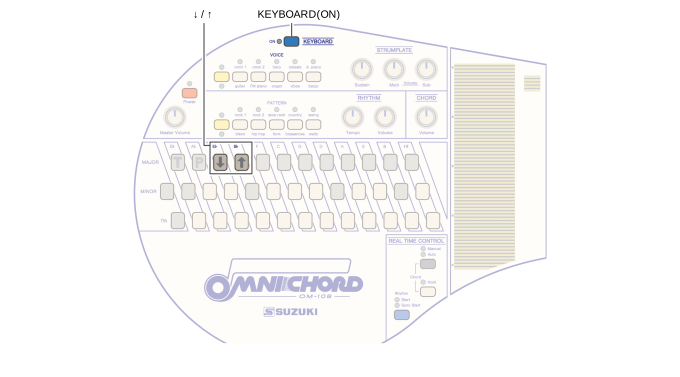
1 Press the [KEYBOARD (ON)] button to turn on its LED.
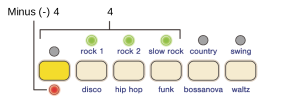
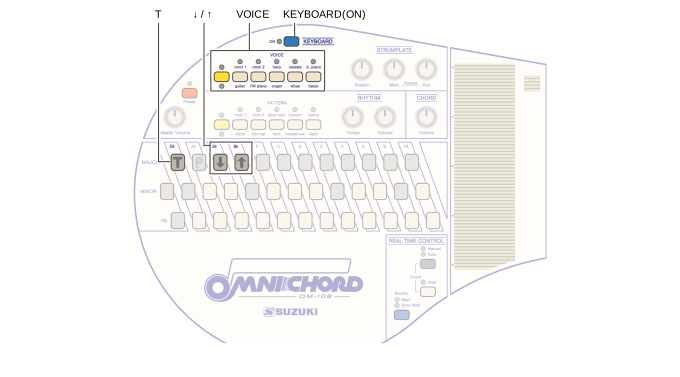
2 Press and hold the [T] button (chord button) and press the [↑] or [↓] button.
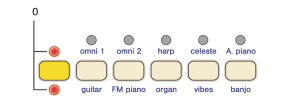
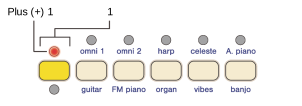
The [VOICE] LEDs show the parameter currently selected.
Examples
Affected to Chord, Strumplate
Parameter -6 to 0 to +6
Factory setting 0
Note
This setting does not work on keyboard melodies.
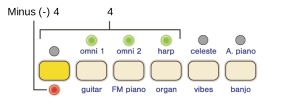
Parameter-4
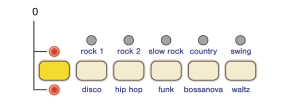
Parameter0
TKEYBOARD(ON)VOICE↓ / ↑
Minus (-) 4 4
0
Transpose
35
3 To finish the setting, press the [KEYBOARD (ON)] button to turn off its LED.
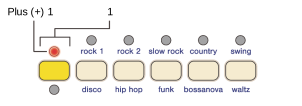
Parameter “+1
Tips
To check the current setting, press only the [T] button.
To restore the factory setting, press and hold the [T] button and press the [↑] and [↓] buttons together.
Plus (+) 1 1
Octave shift
36
Octave shift
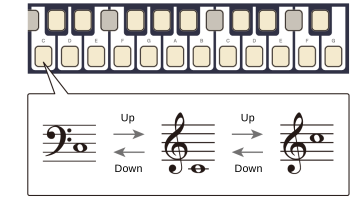
You can adjust the sounding octave of the keyboard. There are three steps available.
1 Press the [KEYBOARD (ON)] button to turn on its LED.
2 To shi the keyboard one octave up, press the [↑] button (chord button).
To shi the keyboard one octave down, press the [↓] button.
Pressing any of the keys (chord buttons) makes a sound with a selected octave setting.
Affected to Keyboard (keyboard mode)
Parameter Down, Normal, Up
Factory setting Normal
Tips
To restore the factory setting, press the [↑] and [↓] buttons together.
Position the supplied keyboard overlay on the chord buttons so you can easily recognize the keyboard layout.
KEYBOARD(ON)↓ / ↑
Reproducing the rhythm notes of OM-84 (Classic Mode)
37
Reproducing the rhythm notes of OM-84 (Classic Mode)
This unit faithfully reproduces the rhythm tones of the OM-84.
Switching to the Classic Mode (OM-84)
1 Turn off this unit (p.11).
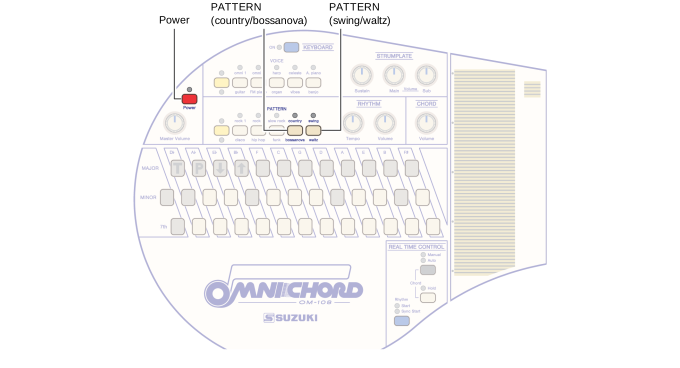
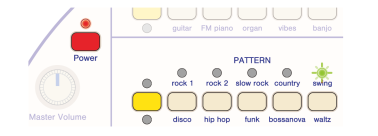
2 Press and hold [PATTERN (swing/waltz)] button and press [Power] button.
3 When the [PATTERN (swing/waltz)] LED flashes, release the button.
This unit is switched to the Classic Mode (rhythm notes of OM-84).
Switching to normal mode (OM-108)
1 Turn off this unit (p.11).
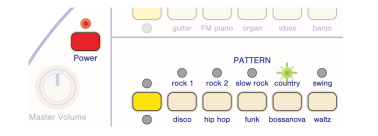
2 Press and hold [PATTERN (country/bossanova)] button and press [Power] button.
Tips
The Suzuki OM-84 is one of the most popular Omnichord models due to its unique 1980s rhythm voicing.
Affected to Rhythm notes
Parameter Normal mode (OM-108), Classic Mode (OM-84)
Factory setting Normal mode (OM-108)
PATTERN
(country/bossanova)
Power
PATTERN
(swing/waltz)
Reproducing the rhythm notes of OM-84 (Classic Mode)
38
3 When the [PATTERN (country/bossanova)] LED flashes, release the button.
This unit is switched to normal mode (rhythm notes of OM-108).
MIDI
39
MIDI
MIDI (Musical Instrument Digital Interface) is an internationally recognized communication standard allowing electronic musical instruments
and sequencers to communicate with one another, regardless of manufacturers.
The MIDI of this unit transmits control messages such as “Chord button ON (pressed) or Off (released)” and “Strumplate On (touched) or Off
(released)”, and parameter values such as volumes, sustain level and tempo.
* “MIDI” is the registered trademark in Japan of the Association of Musical Electronics Industry.
What you can do with the MIDI OUT port
By connecting a MIDI device to the MIDI OUT port of this unit, you can transmit MIDI data to the MIDI device.
(Examples of use)
Perform a song on this unit with a sound source of a MIDI device (such as a synthesizer or a digital piano).
Play this unit in synchronization with a MIDI device (such as arranger keyboard and a sequencer).
Record performance sounds on a sequencer or a PC (DAW).
About MIDI channels
MIDI has 16 MIDI channels that transmit various MIDI messages. MIDI devices communicate through MIDI messages via a MIDI cable.
This unit uses five MIDI channels that transmit playing information (such as operations of chord buttons or strumplate).
To transmit MIDI messages as intended, you need to match the MIDI channel settings on a transmitting side (this unit) and a receiving side
(MIDI device). For details, refer to “MIDI information” (p.40).
About MIDI clock
MIDI clock is a signal transmitted at regular intervals and used for synchronizing the tempo of connected MIDI devices.
This unit transmit MIDI clock signals synchronized with the rhythm tempo. This enables you to play back automatic accompaniment or auto
rhythm on the MIDI device (such as an arranger keyboard or drum machine) in accordance with the tempo of this unit.
Configuring the MIDI transmit settings
Configure MIDI receive settings on the external MIDI device, and MIDI transmit settings on this unit.
1 Turn off this unit (p.11).
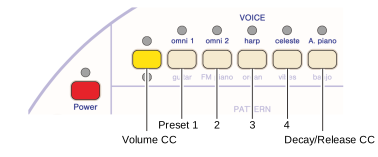
2 Press and hold the [VOICE] buttons which correspond to the setup parameters and press the [Power] button.
For details about each setup parameter, refer to “MIDI information” (p.40).
Tips
For details about a cable connection, refer to “Connecting an audio or MIDI device” (p.7).
For information about MIDI receive settings, refer to the manual of your MIDI device.
MIDI transmit setting Parameter Factory setting
Volume CC On (when the button is pressed)
Off (when the button is not pressed)
Off
Preset (MIDI transmit preset) Preset 1 to 4 Preset 1
Decay/Release CC On (when the button is pressed)
Off (when the button is not pressed)
Off
Preset
Preset 1 2 3 4
Decay/Release CC
MIDI
40
Example:
When selecting “Volume CC: On”. “Preset 2” and “Decay/Release CC: Off”
When selecting “Volume CC: Off”, “Preset 3” and “Decay/Release CC: On
3 When the [VOICE] LED flashes, release the button.
This unit is turned on with the new setting.
MIDI information
System and real time messages
O: Yes, X: No
Channel messages
O: Yes, X: No
*1: When this unit is in keyboard mode, the “omni 1” voice will be monophonic locally, but MIDI will transmit all note messages according to the keys played.
*2: This message will be transmitted in synchronization with operations of the [STRUMPLATE Volume], [RHYTHM Volume] and [CHORD Volume] knobs when
“Volume CC” is set to “On” (p.39). This allows you to adjust the volume balance when performing music. Some MIDI devices may not support this function.
Note
Even when you wish to change the Volume CC or Decay/Release setting only, press the [VOICE] button for Preset at the same time.
Note
In case you only wish to hear sound from the external MIDI device, set the [Master Volume] knob to minimum. The [SPEAKER (ON/OFF)] switch will not
work in this scenario.
Message
MIDI transmit preset
Description
Preset 1 to 3 Preset 4
Clock (F8)
OX
This message will be transmitted in synchronization with the
rhythm tempo of this unit.
Start (FA)
OX
This message is transmitted when the rhythm starts.
Stop (FC)
OX
This message is transmitted when the rhythm stops.
Channel Note message
Control Change MIDI transmit preset
Volume (7) Release (72) Decay (75) Preset 1 Preset 2 Preset 3 Preset 4
CH1 Main Voice *1
O *2 O *3 O *3
CH2 Chord
O *2
XX X
CH3 Bass
O *2
XX X
CH4 Sub Voice *1
O *2 O *3 O *3
XX
CH10 Drum
O *2
XXXX X
MIDI
41
*3: This message will be transmitted in synchronization with operations of the [STRUMPLATE Sustain] knob when “Decay/Release CC” is set to “On” (p.39).
Some MIDI devices may not support this function.
About Decay/Release CC
MIDI transmit preset
This unit uses five MIDI channels to transmit the note messages (control information of the main voice, chords, bass, sub voice and drums).
By selecting a MIDI transmit preset in accordance with your purpose, this unit automatically controls how each note message is transmitted.
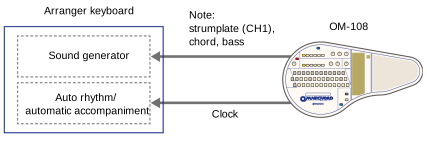
Preset 1 (Accomp and Strumplate voice)
Transmit channels: CH1 to CH3
This preset transmits playing sounds of the strumplate (melody in keyboard mode), chords and bass to a multitimbral MIDI sound source.
Example:
Play the strumplate, chords and bass while beating out a rhythm pattern of the arranger keyboard in synchronization with MIDI clock of this
unit.
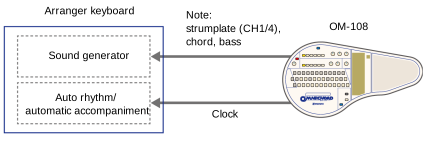
Preset 2 (Accomp and Two Strumplate voices)
Transmit channels: CH1 to CH4
This preset transmits playing sounds of the strumplate (melody in the keyboard mode), chords and bass to a multitimbral MIDI sound
source.
Since strum sounds are transmitted to both CH1 and CH4, you can assign a different voice to each channel to create various sound effects.
Example:
Play the strumplate (in two different voices), chords and bass while beating out a rhythm pattern of the arranger keyboard in synchronization
with MIDI clock of this unit.
Decay/Release CC Description
On
The Decay/Release CC value changes in response to [STRTUMPLATE Sustain] knob adjustments.
This is effective when you play sound of an instrument whose sound fades-out, such as a piano or guitar.
Since the gate time depends on touching/releasing the strumplate (or pressing/releasing a chord button in keyboard mode), you
can express a finer musical nuance.
Off
You can adjust the time taken for a sound to stop after the sound starts.
This is effective when you play sound of an instrument whose sound does not fade-out such as an organ or string voice.
If the time is set on maximum, the gate time becomes infinite (the state of “note on” continues until you press another key or tap the
Instant OFF plate).
For an instrument whose sound fades-out such as piano or guitar, it prevents the sound from abruptly stopping.
Tips
The gate time is a time from “note on” to “note off”, e.g., from the moment a key is pressed, until the key is released on a piano.
Note
Set “MIDI clock” to “External” on the arranger keyboard.
Tips
“Multitimbral” means the ability to play several different sounds at the same time, e.g., General MIDI. Each sound is controlled by a different MIDI channel.
Note
Set “MIDI clock” to “External” on the arranger keyboard.
Sound source
Auto rhythm/
automatic accompaniment
Arranger keyboard
OM-108
Note:
strumplate (CH1),
chord, bass
Clock
MIDI
42
Preset 3 (All Out)
Transmit channels: CH1 to CH4, CH10
This preset transmits playing sounds of the strumplate (melody in keyboard mode), chords. bass and drums to a multitimbral MIDI sound
source.
For information about drum note messages transmitted by CH10 on this unit, refer to “Drum map” (p.43).
Example:
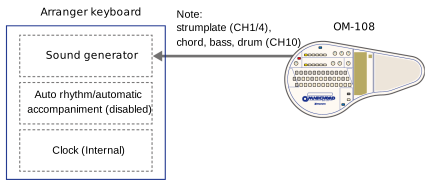
Apply note messages of this unit without using automatic rhythm/automatic function of an arranger keyboard.
Preset 4 (Strum Only)
Transmit channels: CH1
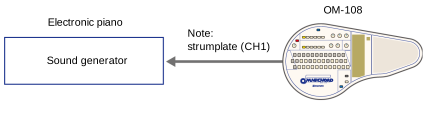
This preset transmits playing sounds of the strumplate (melody in keyboard mode) only.
Select this preset when you want to add a performance of the strumplate to a MIDI sound source of a single timbre (such as an electronic
piano) or music created on DAW.
Example:
Note
Set “MIDI clock” to “Internal” on the arranger keyboard.
Sound source
Auto rhythm/
automatic accompaniment
Arranger keyboard
OM-108
Note:
strumplate (CH1/4),
chord, bass
Clock
Sound source
Auto rhythm/automatic
accompaniment (disabled)
Arranger keyboard
OM-108
Note:
strumplate (CH1/4),
chord, bass, drum (CH10)
Clock (Internal)
Sound source
Electronic piano
OM-108
Note:
strumplate (CH1)
MIDI
43
Drum map
Note number Octave Note Instrument
36 2 C Bass drum
37
2
Df
Rim shot
38 2 D Snare drum
39
2
Ef
Hand claps
40 2 E -
41 2 F Floor tom
42
2
Fs
Hi-hat close
43 2 G -
44
2
Gs
-
45 2 A Low tom
46
2
Bf
Hi-hat open
47 2 B -
48 3 C Hight tom
49
3
Df
Cymbal
50 3 D -
51
3
Ef
-
52 3 E -
53 3 F -
54
3
Fs
Tamb ourin e
55 3 G -
56
3
Gs
-
57 3 A -
58
3
Bf
-
59 3 B -
60 4 C -
61
4
Df
-
62 4 D High conga (muted)
63
4
Ef
-
64 4 E -
65 4 F -
66
4
Fs
-
67 4 G -
68
4
Gs
-
69 4 A -
70
4
Bf
Maracas
71 4 B -
72 5 C -
73
5
Df
-
74 5 D -
75
5
Ef
Claves
MIDI
44
MIDI implementation chart
Model: OM-108 (Omnichord)
Date: 12-Feb-2024 (Version: 1.0)
Mode 1: OMNI ON, POLY / Mode 2: OMNI ON, MONO / Mode 3: OMNI OFF, POLY / Mode 4: OMNI OFF, MONO
O: Yes, X: No
*1: Not transmitted when the MIDI transmit preset is “Preset 4” (p.42).
Function Transmitted Recognized Remarks
Basic Channel
Default 1 - 3 X
Changed 1 - 4, 10 X
Mode
Default 3 X
Messages X X
Altered ***** X
Note Number
12 - 120 X
:True Voice ***** X
Velocity
Note ON X X
Note OFF X X
After Touch
Key's X X
Ch's X X
Pitch Bend X X
Control Change
7
O
XVolume
72
O
XRelease
75
O
XDecay
Program Change
XX
:True# ***** X
System ExclusiveXXX
System Common
:Song Position X X
:Song Select X X
:Tune X X
System Real Time
:Clock
O *1
X
:Commands
O *1
X
AUX Messages
:All Sounds Off X X
:Reset All Controllers X X
:Local On/Off X X
:All Notes Off X X
:Active Sense
O
X
:Reset X X
45
CONFIGURATIONS
Auto power off setting
You can enable/disable the auto power off function. When this function is enabled, this unit will automatically turn off if no buttons or knobs
are used for 30 minutes.
(Factory setting: Enabled)
1 Turn off this unit (p.11).
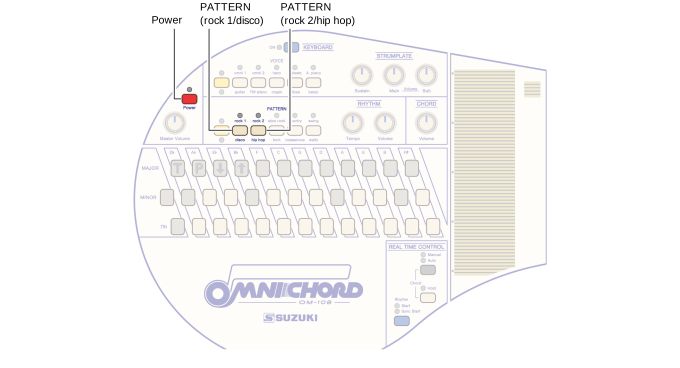
2 To enable the auto power off function, press and hold the [PATTERN (rock 1/disco)] button and press the [Power] button.
To disable, press and hold the [PATTERN (rock 2/hip hop)] button and press the [Power] button.
3 When the [PATTERN] LED flashes, release the button.
This unit is turned on with the new setting.
PATTERN
(rock 1/disco)
Power
PATTERN
(rock 2/hip hop)
Battery level indicator setting
46
Battery level indicator setting
When batteries are used, the Power LED indicates the current battery level (p.8).
Due to the characteristic of rechargeable batteries (Ni-MH), the battery level may be recognized less than the actual amount.
When using rechargeable batteries (Ni-MH) or when replacing them with alkaline batteries, configure the battery level indicator setting.
(Factory setting: Alkaline battery)
When using rechargeable batteries (Ni-MH)
1 Turn off this unit (p.11).
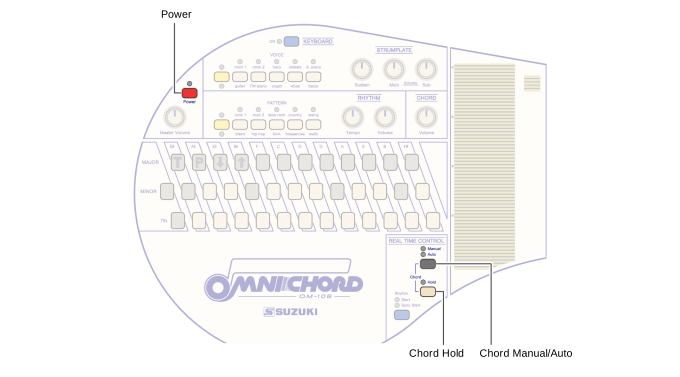
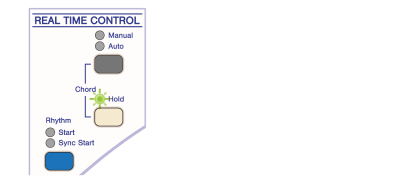
2 Press and hold the [Chord Hold] button and press the [Power] button.
The [Chord Hold] LED flashes for a few seconds.
This unit is turned on with the new setting.
When using alkaline batteries
1 Turn off this unit (p.11).
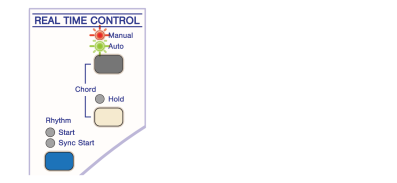
2 Press and hold the [Chord Manual/Auto] button and press the [Power] button.
The [Chord Manual/Auto] LEDs flash for a few seconds.
Power
Chord Hold Chord Manual/Auto
Battery level indicator setting
47
This unit is turned on with the new setting.
Restoring the factory settings
48
Restoring the factory settings
1 Turn off this unit (p.11).
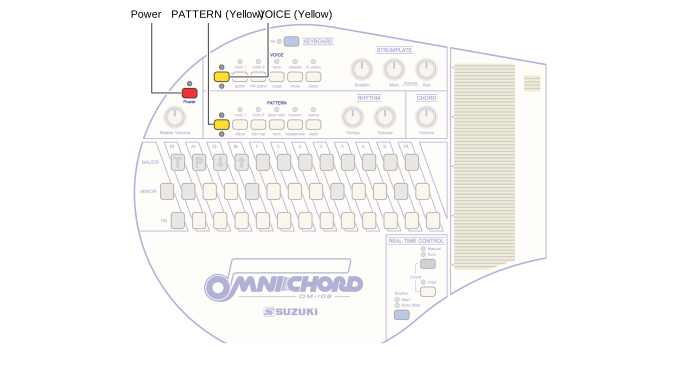
2 Press and hold the left buttons (yellow) of the [VOICE] and [PATTERN] buttons, and press the [Power] button.
3 When the left buttons (yellow) flash, release the buttons.
Factory settings are now restored.
Power PATTERN (Yellow) VOICE (Yellow)
49
APPENDIX
Scale arrangement of the strumplate
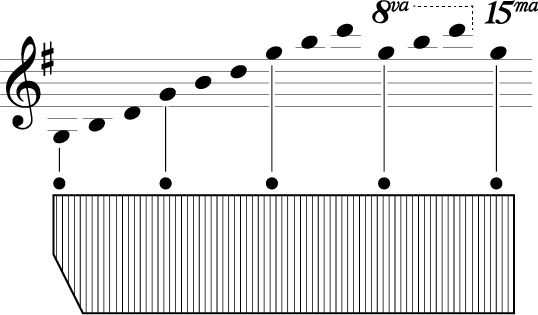
Starting from Fs, the notes up to F of the next octave are grouped. Higher notes will be rearranged to the octave lower than the root.
Example: G Major
Example: C Major
Explanation of voices
50
Explanation of voices
Each voice consists of two types of voices (main and sub voices).
The main voice is an instrument which can be selected by pressing the [VOICE] button.
A sub voice has a role that enhances the selected main voice. It is automatically selected according to a selected main voice.
Assignments of main and sub voices
Types of main voices
Types of sub voices
VOICE omni 1 omni 2 harp celeste A. piano
Main Mellow Pulse Mellow Pulse Harp Celeste A. Piano
Sub Tremolo Pulse Synth Strings Synth Strings Synth Strings Synth Strings
VOICE guitar FM piano organ vibes banjo
Main Guitar FM Piano Organ Vibes Banjo
Sub Synth Strings (Octave
Unison)
Mellow Synth Pad Synth Strings (Octave
Unison)
Synth Strings Synth Strings
Voice Description Sound continuity
Mellow Pulse This voice reproduces the classic sounds of “OM-84” which is an Omnichord released in the
1980s. To create this voice, the analogue sound source circuit of “OM-84” is incorporated into
“OM-108”.
Harp This voice reproduces sounds of a pedal harp used in an orchestra. On this unit, make a chord
change using the chord buttons instead of pedals.
Celeste This voice reproduces the soft and subtle sound of a struck idiophone called “Celeste”.
A. Piano This voice reproduces sounds of an acoustic piano (grand piano) used in orchestra. It is difficult
to play fast arpeggio using piano keys but the strumplate allows you to play it easily.
Guitar This voice reproduces the sound of a guitar with steel strings.
FM Piano This voice reproduces electronic piano sounds of a digital synthesizer released in 1980s and is
suitable for ballad songs.
Organ This voice reproduces sounds of a Hammond organ, created by a combination of fifth drawbar
setting and chorus effect.
O
Vibes This voice reproduces sounds of a vibraphone (a metallophone equipped with spinning fans at
the top of the resonator tubes). We recommend tapping the strumplate with multiple fingers
instead of sliding when you use this voice.
Banjo This voice reproduces sounds of a 5-strings resonator banjo often used in country music. We
recommend tapping the strumplate alternately and quickly with multiple fingers instead of
sliding when you use this voice.
Voice Description Sound continuity
Tremolo Pulse As with Mellow Pulse, this voice reproduces the classic tremolo effect sound of “OM-84”.
Synth Strings This voice reproduces orchestral strings sounds of synthesizer. Compared to the actual
sounds, this voice has soft and flat traits so that it harmonizes well with other timbres.
O
Synth Strings (Octave Unison) This voice reproduces orchestral strings sounds of synthesizer in octave unison which
makes the sounds more majestic.
O
Mellow Synth Pad This voice reproduces mellow synth pad sounds. By mixing with other timbres, you can
create a deep atmosphere.
O
Troubleshooting
51
Troubleshooting
Refer to the following information when the Omnichord does not function properly.
In some cases, the Omnichord will function properly if reset to factory settings (p.48).
If the problem still persists, consult with your retailer, a SUZUKI dealer in your area or an authorized SUZUKI distributor.
When this function is enabled, this unit will automatically turn off If no buttons or knobs are used for 30 minutes.
Problem Cause Remedy
This unit does not turn on. The batteries are inserted the wrong way. Insert the batteries correctly (p.8).
The batteries have been discharged. Replace all batteries with new ones.
The connection of the AC adaptor is
incorrect.
Connect the AC adaptor correctly (p.9).
The power goes down on its own. The auto power function is enabled. When the auto power function is enabled, this unit will automatically
turn off if no buttons or knobs are used for 30 minutes.
Disable it as needed (p.45).
No sound. The [Master Volume] knob is set at
minimum.
Rotate the [Master Volume] knob and [Volume] knob of each function
to adjust the volume.
Sound is quiet or distorted. The battery level is low. If the battery level is too low, sound may become quiet or distorted.
In this case, replace all batteries with new ones.
The [Master Volume] knob is set at low. Rotate the [Master Volume] knob and [Volume] knob of each function
to adjust the volume.
Rechargeable batteries (Ni-MH) are used. Due to the characteristic of rechargeable batteries (Ni-MH), sound
may become quiet or distorted.
Replace with alkaline batteries or use the AC adaptor as needed (p.9).
The [Power] LED becomes dim. The battery level is low. Replace all batteries with new ones.
Rechargeable batteries (Ni-MH) are used. Due to the characteristic of rechargeable batteries (Ni-MH), the battery
level may be recognized less than the actual amount.
When using rechargeable batteries (Ni-MH), configure the battery
level indicator setting (p.46).
The [Power] LED flashes. The batteries are almost depleted. Replace all batteries with new ones. The power will turn off soon.
The strumplate and Instant OFF plate do
not function.
You touched the strumplate or Instant OFF
plate when turning on this unit.
Turn the power off and on again without touching the plates (p.10).
The Instant OFF plate does not work on
rhythm sounds.
The rhythm synchronization is tuned off. Press the [Rhythm Start/Sync Start] button to select “Sync Start” and
tap the Instant OFF plate.
A chord sounds continuously. The chord hold function is enabled. Tap the Instant OFF plate or press the [Chord Hold] button to disable
the chord hold function.
A lot of noise. Because this unit employs many analog
circuits, noises may be heard in some
cases.
To reduce noises, turn down the [Master Volume] knob and turn up
the [STRUMPLATE Volume], [RHYTHM Volume] and [CHORD Volume]
knobs.
Speaker sound is interrupted or distorted. The battery level is low. Turn down the [Master Volume] knob or replace woo batteries with
new ones.
If you wish to obtain large sound stably, use an authorized AC adaptor
or connect an external speaker to the LINE OUT (MONO) jack.
Mounting strap buttons
52
Mounting strap buttons
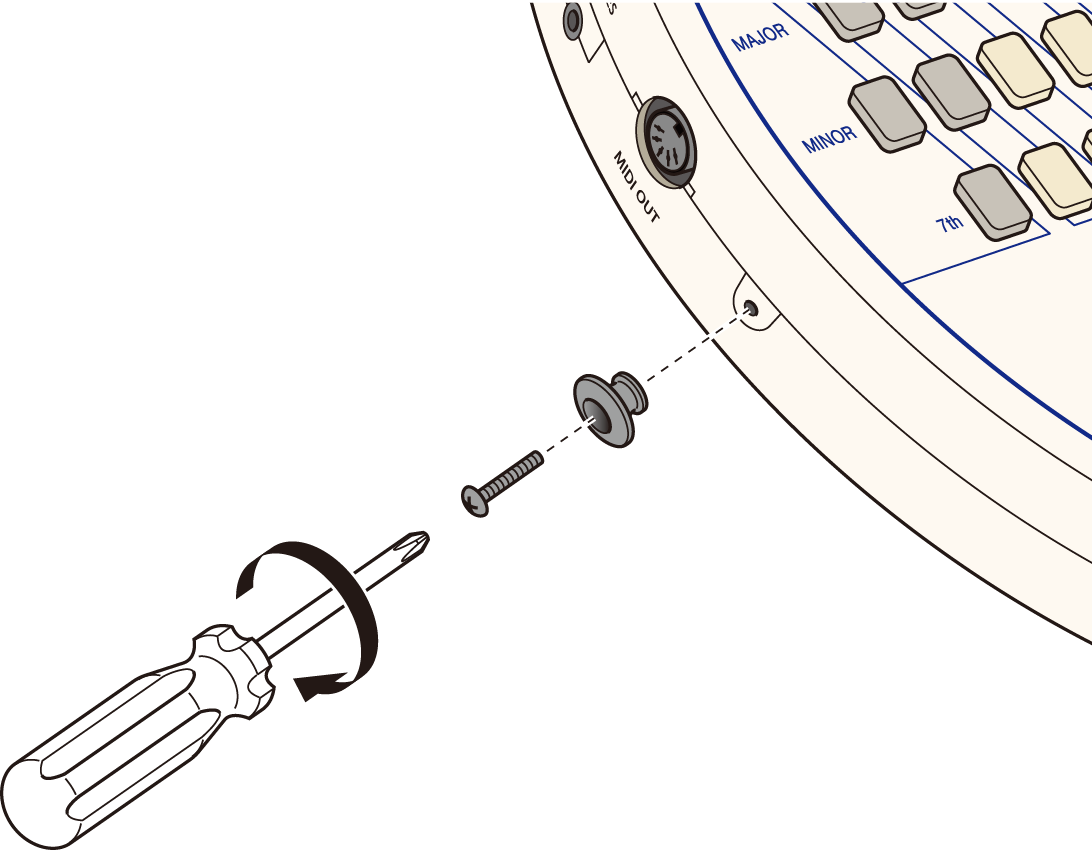
By using the strap buttons “OSB-108” (sold separately), you can attach a commercially available guitar strap to your Omnichord.
Things to prepare
OSB-108 (set of two strap buttons and two screws)
PH2 screwdriver
1 Insert a screw into the center of a button and align the tip of the screw with a strap button hole on the side panel (either left or
right) of this unit.
2 Use a PH2 screwdriver to turn the screw clockwise.
Stop tightening the screw if there is no gap between the button and main body.
3 Use the same procedure to install a strap button to the other side of this unit.
Check the strap buttons are firmly secured to this unit before using a guitar strap.
! CAUTION
" Keep the strap buttons out of reach of small children.
" Be careful not to get hurt when handling the screws.
# Do not use commercially available strap buttons. Doing so may damage to the mounting hole.
" Do not overtighten or install and remove the screws repeatedly. Doing so may damage to the mounting hole.
" Tighten the screws on a regular basis. If a screw is loosened, this unit may fall accidentally.
" Please also refer to the manual of your guitar strap.
Specifications
53
Specifications
Chords
Buttons: 38
Types: Major, minor, 7th, Major 7th, minor 7th, Augmented, diminished, suspended 4th, add 9th
Voices
10 voices (main, sub), 4 octaves
Rhythms
10 patterns
Functions
Knobs: Master Volume, STRUMPLATE (Sustain, Main Volume, Sub Volume), RHYTHM (Tempo, Volume), CHORD (Volume)
Buttons: Power, VOICE (6 buttons), PATTERN (6 buttons), Chord (38 buttons), REAL TIME CONTROL (Chord Manual/Auto, Chord Hold, Rhythm
Start/Sync Start), KEYBOARD
Others: Strumplate, Instant OFF plate, SPEAKER (ON/OFF) switch, Master tune, Transpose, Octave shift
Speaker
10 cm (4 in)
Output
4.3W
Connection jacks
DC12V/1A
LINE OUT: monaural standard
PHONES: headphone output (stereo mini)
MIDI OUT
Power
AC adaptor (sold separately) or AA batteries x 8 (sold separately)
* Use of alkaline batteries is recommended. Rechargeable batteries (Ni-MH) can be used.
Power consumption
3.7W
Continuous battery operation time
Approx. 8 hours
Dimensions (width/depth/height)
45.7 x 25.0 x 5.18 cm (18 x 9-7/8 x 2-1/16 in)
Weight
1.2 kg (2 lb 10 oz)
Accessories
Start Up Guide ×1, Keyboard overlay ×1
SAFETY INSTRUCTIONS
54
SAFETY INSTRUCTIONS
Before using this unit, please make sure you read the following “SAFETY INSTRUCTIONS.
Always follow the instructions listed below to maintain in safety.
In this manual, the degrees of dangers are classified as follows:
POWER
INSTALLATION
HANDLING
This sign shows there is a risk of death or severe injury if the corresponding instruction
is not properly followed.
This sign shows there is a risk of injury or material damages (damage to property,
people and animals) if the corresponding instruction is not properly followed.
WARNING
CAUTION
Use only the correct voltage specified for this unit.
The required voltage is printed on the AC adaptor.
Use only the correct AC adaptor for your region. Seek
advice from your retailer.
Be sure to use the dedicated AC adaptor.
Do not forcibly twist the power cable or put a
heavy object on it.
Doing so can damage the power cable, resulting in
electric shocks or a fire.
Do not connect this unit to an AC wall outlet using
a multi-plug outlet extender.
Exceeding the power rating (watts/amperes) can
cause overheating, resulting in electric shocks or a
fire.
WARNING
Do not install or store this unit in locations such as
the following.
Locations where temperature or humidity may
become extremely high (e.g. in direct sunlight, near
heating devices or in the car).
In or near wet or damp locations (e.g. bathroom,
sink, wet floor).
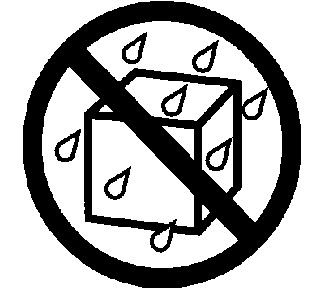
Locations exposed to rain, water droplets or steam
Locations where the instrument may be subject to
dust or vibration.
Unstable places with a risk of falling
Do not place water containers (e.g. flower vase),
insect sprays, perfumes, alcohols, nail polish or
spray cans on or near this unit.
In case any liquid adheres to the surface of this unit,
immediately wipe clean with a soft dry cloth.
Do not disassemble or modify this unit or the AC
adaptor.
Do not repair or replace parts of this unit by
yourself. No user serviceable parts.
Never do anything not mentioned on this manual. In
case this unit needs to be repaired, consult with your
retailer.
Do not drop or apply strong impact to this unit.
Do not insert liquids (e.g. water, juice) or foreign
objects (e.g. flammable materials, coins, wires)
into this unit.
SAFETY INSTRUCTIONS
55
POWER
BATTERIES
Not suitable for young children.
Handling by children must be done under the
monitoring and supervision of an adult.
If batteries leak, do not touch the liquid with your
bare hands.
There is severe risk of burns or blindness if the liquid
comes into contact with skin or eyes. If this occurs,
immediately rinse the affected area with water and
seek medical attention.
Do not use this unit for a long period of time at a
high volume.
Depending on a combination of this unit and external
devices (e.g. amplifier, speaker, headphones), loud
sounds may output, resulting in hearing loss. In case
you experience any hearing loss or ringing, consult a
physician.
Set the volume low before powering on the
Omnichord.
To avoid sudden high volume, always start with a
lower volume, and gradually increase to a
comfortable level.
If any of the following problems occurs,
immediately turn off this unit and then remove
the AC adaptor from the AC wall outlet.
The AC adaptor or power cable is damaged.
Smoke or unusual smell comes from this unit.
Liquid or foreign object enter the inside of the
instrument.
The unit becomes wet (by rain or other moisture).
Any failure occurs in this unit.
If you continue to use without solving the problem,
it may result in electric shocks, a fire or
malfunction. Consult with your retailer, a near
SUZUKI dealer or an authorized SUZUKI
distributor.
When connecting or disconnecting the AC
adaptor, hold the plug instead of the cable.
Pulling the cable can damage the plug, socket or
cable.
If not using this unit for a long period of time,
remove the AC adaptor from the AC wall outlet.
When there is a risk of lightning, remove the AC
adaptor from the AC wall outlet.
Clean the AC adaptor and plug parts regularly.
The plug covered in dust can cause poor insulation,
resulting in a fire.
Do not handle the AC adopter or power cable with
wet hands.
Use of alkaline batteries is recommended.
Manganese dry cell batteries and rechargeable
batteries may not work correctly.
Use the same type of batteries.
Do not mix batteries from different brands or
manufacturers.
When replacing batteries, replace them all at the
same time.
Observe the recommended battery expiry date.
Even if expired batteries have never been used, they
may not work correctly.
Observe battery polarity.
If a battery is inserted the wrong way, there is a risk of
heat generation, liquid leakage, or explosion.
CAUTION
SAFETY INSTRUCTIONS
56
INSTALLATION
HANDLING
Insert the battery negative side first and remove
from the positive side.
Make sure to press the negative contact correctly
against the spring when inserting it, as there is a risk
of damage to the product, overheating of the battery,
explosion, smoke, or fire.
Keep battery terminals clean.
If the battery terminals are dirty, the battery may not
be able to perform to its full potential, affecting
operation. Please remove dirt with a dry cloth before
use.
Always remove batteries from the instrument
when it will not be used for an extended period.
Dispose of used batteries responsibly, and in
accordance with local recycling rules.
Install this unit and the AC adaptor in a well-
ventilated location.
Do not rest your weight or place heavy objects on
this unit.
Prevent complicated wiring of cords and cables.
Also be sure to keep them out of the reach of small
children.
Before moving this unit, turn off the power and
then remove all cables (e.g. AC adaptor, external
devices).
Before cleaning this unit, turn off the power and
remove the AC adaptor from the AC wall outlet.
FOR UNITED KINGDOM:
FOR YOUR SAFETY, PLEASE READ THE FOLLOWING TEXT
CAREFULLY
This appliance is supplied with a molded 3-pin mains plug for
your safety and convenience.
The plug contains a 13 amp fuse.
Should the fuse need to be replaced, please ensure that the
replacement fuse has a rating of 13 amps and that it is approved
by ASTA or BSI to BSI1362.
Check for the ASTA mark or the BSI mark on the body
of the fuse.
If the fuse cover is lost, the plug must not be used until a
replacement cover is obtained.
A replacement fuse cover can be obtained from your local Suzuki
Dealer.
If the fitted molded plug is unsuitable for the socket outlet in
your home, then the fuse should be removed and the plug cut
off and disposed of safely.
There is a danger of severe electrical shock if the cut-off plug is
inserted into any 13 amp socket.
To replace the fuse, open the fuse compartment with a
screwdriver and replace the fuse and fuse cover.
SAFETY INSTRUCTIONS
57
Note: This equipment has been tested and found to comply with
the limits for a Class B digital device, pursuant to part 15 of the
FCC Rules. These limits are designed to provide reasonable
protection against harmful interference in a residential
installation.
This equipment generates, uses and can radiate radio frequency
energy and, if not installed and used in accordance with the
instructions, may cause harmful interference to radio
communications.
However, there is no guarantee that interference will not occur in
a particular installation.
If this equipment does cause harmful interference to radio or
television reception, which can be determined by turning the
equipment off and on, the user is encouraged to try to correct
the interference by one or more of the following measures:
Reorient or relocate the receiving antenna.
Increase the separation between the equipment and receiver.
Connect the equipment into an outlet on a circuit different
from that to which the receiver is connected.
Consult the dealer or an experienced radio/TV technician for
help.
In the unlikely event that you need to dispose of
this unit, be sure to contact your dealer or your
nearest town or municipal office for its proper
disposal.
PRECAUTIONS FOR USE
58
PRECAUTIONS FOR USE
POWER
Turn off the power of all devices before connecting external
devices to prevent malfunction or damage to the devices.
Do not connect any equipment that generates noise (e.g.
refrigerator, washing machine, microwave, air conditioner) on the
same power line as this unit to prevent noise generation or
malfunction of this unit. If a different power line is not available,
use a noise filter for the power line.
INSTALLATION
This unit may interfere with TV, radio or wireless devices (e.g.
cellular phone), or a device with a large transformer (e.g. power
amplifier). If interference occurs, change the position or
orientation of the corresponding device, or turn off if not in use.
To prevent damage or malfunction, turn off the power of any
external devices before connecting to the Omnichord.
HANDLING
Do not apply excessive force, or damage any parts of the product.
When cleaning the unit, use a soft dry cloth or a wet cloth wrung
out tightly.
To remove stubborn dirt on the plastic parts, wipe clean using a
cloth with neutral detergent and then a soft dry cloth. Using
benzine, paint thinners or alcohol can cause deformation or
discoloration.
SUZUKI EUROPE Ltd. HAMMOND SUZUKI EUROPE B. V.
SUZUKI CORPORATION
Manufacturer:
SUZUKI MUSICAL INSTRUMENT MFG. Co., Ltd.
2-25-7, Ryoke, Chuo-ku, Hamamatsu, Shizuoka Pref. 430-0852
JAPAN
12 Vermont Place, Tongwell, Milton Keynes,
Buckinghamshire, MK15 8JA
UK
Tel: (+44) 1908-511488
Web site: www.suzukimusic.co.uk
Contact: sales@suzukimusic.co.uk
Parmentierstraat6-8, 4143HALeerdam
THE NETHERLANDS
Web site : www.hammond.eu
Contact : info@hammond.eu
2-25-7, Ryoke, Chuo-ku, Hamamatsu, Shizuoka Pref. 430-0852
JAPAN
Tel: (+81) 53-460-3781 Fax: (+81) 53-460-3783
Product Registration
www.hammond.eu/Contact/RegistrationPage
Contact
https://suzukimusic-global.com/contact.php/
59
SERVICE
Suzuki maintains a policy of continuously improving and upgrading its instruments and therefore reserves the right to change
specifications without notice. Although every attempt has been made to insure the accuracy of the descriptive contents of this
Manual, total accuracy cannot be guaranteed.
Should the owner require further assistance, inquiries should first be made to your Authorized Suzuki Dealer. If you still need further
assistance, contact Suzuki at the following addresses: